Table of Contents
Advertisement
Quick Links
Thank you for purchasing a Panasonic product.
This document explains how to install the motion sensor properly.
For details about how to use the system, refer to the User's Guide
(page 14).
Please read this document before using the unit and save it for future
reference.
Home Network System
KX-HNS102FX
Model No.
Installation Guide
Motion Sensor
Advertisement
Table of Contents

Related Manuals for Panasonic KX-HNS102FX


Summary of Contents for Panasonic KX-HNS102FX
- Page 1 Home Network System Motion Sensor KX-HNS102FX Model No. Thank you for purchasing a Panasonic product. This document explains how to install the motion sensor properly. For details about how to use the system, refer to the User’s Guide (page 14).
-
Page 2: Table Of Contents
Table of Contents Introduction Accessory information ....3 Important Information About this system ......4 For your safety ......4 Important safety instructions ..5 For best performance ....5 Other information .......6 Setup Part names and functions ..7 LED indicator ......7 Setup overview ......7 Inserting the batteries ....8 Registering the motion sensor ........8... -
Page 3: Introduction
Introduction Accessory information Supplied accessories Accessory item/Part number Quantity Batteries Wall mounting adaptor Wall mounting screws (25 mm) When replacing batteries, see “Power source” of “Specifications”, page 15 for battery information. The motion sensor can be wall mounted with or without the wall mounting adaptor (page 12). -
Page 4: Important Information
R Keep small parts (screws, etc.) out protection from property loss. of the reach of children. There is a Panasonic will not be held risk of swallowing. In the event they responsible in the event that are swallowed, seek medical advice property loss occurs while this immediately. -
Page 5: Important Safety Instructions
Hub location/avoiding noise R Keep out of the reach of small The hub and other compatible children. There is a risk of Panasonic devices use radio waves to swallowing. If the battery is communicate with each other. swallowed, seek medical attention R For maximum coverage and immediately. -
Page 6: Other Information
Important Information less than 0 °C or greater than 40 °C. points in accordance with your national Damp basements should also be legislation. avoided. By disposing of them correctly, you will R Operating the product near electrical help to save valuable resources and appliances may cause interference. -
Page 7: Setup
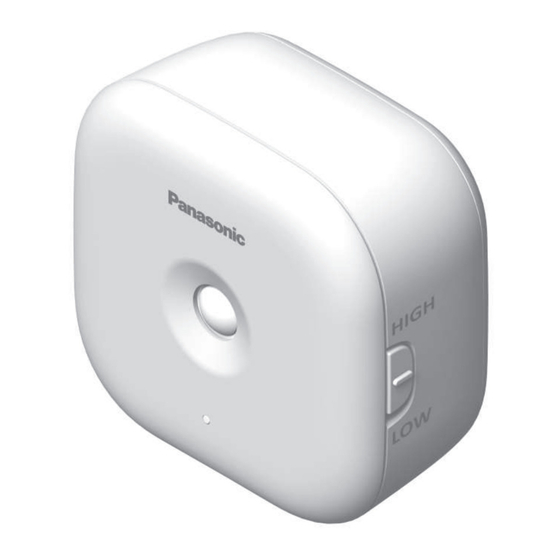
Setup as possible, otherwise battery life may be reduced. Part names and Indicator Status functions Green, lit No motion detected Red, lit Motion was detected Red, Sensor is out of range blinking of the hub Green, Registration mode blinking (You pressed and held slowly No battery power Note:... -
Page 8: Inserting The Batteries
Setup Install the rear cover. Inserting the R Place it with the “ ” mark facing upwards and slide it. batteries R USE ONLY Alkaline batteries AA (LR6) size. R Do NOT use Manganese/Ni-Cd/ Ni-MH batteries. R Confirm the polarities ( Remove the rear cover by pressing the upper sides of the cover (A) and sliding it down (B). -
Page 9: Information About Sensor Features
Setup motion sensor’s sensor features in Using registration buttons these situations. R Panasonic takes no responsibility for Hub: any injury or damage caused by the Press and hold M OTHER use of the motion sensor. DEVICEN until the LED indicator blinks slowly in green. - Page 10 Setup move directly toward the front of the Detection range when looking from motion sensor. the side Vertical detection range: approx. 20° It is difficult to detect movement Distance of detectable motion: directly towards the front of the approx. 5 m motion sensor.
-
Page 11: Confirming The Usage Area
Setup R Near fire or heating devices R Near magnetic fields (such as near Confirming the microwaves and magnets) usage area R Areas subject to extreme temperature changes, such as next to air conditioners Wireless communication R Areas with reflective objects, such range as glass, that can interfere with detection of temperature variation... -
Page 12: Wall Mounting
Setup Using the rear cover Wall mounting Remove the rear cover by pressing the upper sides of the There are two methods for wall cover (A) and sliding it down (B). mounting the motion sensor. To mount the sensor flat against the wall, use the rear cover. - Page 13 Setup Attach the motion sensor to the Attach the wall mounting adaptor rear cover. to the wall by using screws ( R Insert the grooves on the R Place the wall mounting motion sensor to the 4 tabs on adaptor with “UP” mark facing the rear cover, and then push upwards.
-
Page 14: Appendix
Appendix Testing the motion Features available sensor when using the [Home Network] app You can observe the motion sensor’s LED indicator and test the performance Some of the motion sensor’s features of the motion sensor. that are available when using the Press M [Home Network] app are listed below. -
Page 15: Specifications
39 mm – With the wall mounting adaptor attached: Approx. 72 mm ´ 73 mm ´ 61 mm R Mass (weight) www.panasonic.net/pcc/support/tel/ – With the rear cover attached: homenetwork/manual/ Approx. 70 g, excluding the batteries – With the wall mounting adaptor... - Page 16 We recommend keeping a record of the following information to assist with any repair under warranty. Serial No. Date of purchase (found inside the battery compartment) Name and address of dealer Attach your purchase receipt here. © Panasonic Corporation 2016 PNQP1189YA CC0216WK1126...