Table of Contents
Advertisement
Quick Links
Operating Instructions
Telephone Answering System
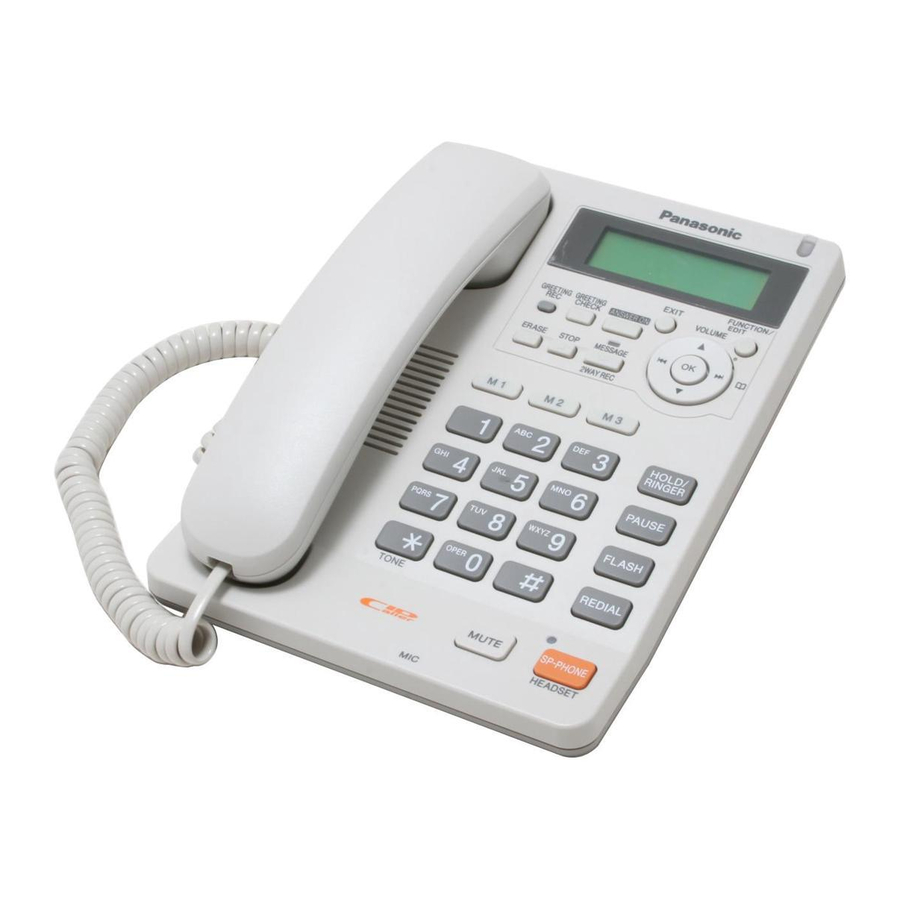
KX-TS620
Model No.
Model shown is KX-TS620W
This unit is compatible with Caller ID. To use this feature, you must subscribe to the
appropriate service offered by your service provider.
Please read these Operating Instructions before using the unit and save for future
reference.
Panasonic World Wide Web address: http://www.panasonic.com
for customers in the USA or Puerto Rico
For assistance, please visit http://www.panasonic.com/phonehelp
Advertisement
Table of Contents

Related Manuals for Panasonic KX-TS620W


Summary of Contents for Panasonic KX-TS620W
-
Page 1: Operating Instructions
Please read these Operating Instructions before using the unit and save for future reference. Panasonic World Wide Web address: http://www.panasonic.com for customers in the USA or Puerto Rico For assistance, please visit http://www.panasonic.com/phonehelp... -
Page 2: Table Of Contents
Dialing from the Phonebook ... 33 Chain Dial... 34 Editing ... 35 Erasing ... 35 For assistance, please visit http://www.panasonic.com/phonehelp Direct Dial (M1, M2, M3) Storing Names and Numbers in the Direct Dial memory...36 Dialing a Stored Number from the Direct Dial memory...37... -
Page 3: Introduction
Please read IMPORTANT SAFETY INSTRUCTIONS on page 4 before use. Read and understand all instructions. Thank you for purchasing your new Panasonic telephone answering system. We recommend keeping a record of the following information for future reference Serial No. (found on the bottom of the unit) Name and address of dealer Attach your purchase receipt here. -
Page 4: Preparation
Take the unit to an authorized service center when service is required. Opening or removing covers may expose you to For assistance, please visit http://www.panasonic.com/phonehelp dangerous voltages or other risks. Incorrect reassembly can cause electric shock when the unit is subsequently used. - Page 5 5°C (41°F) or greater than 40°C (104°F). Damp basements should also be avoided. For assistance, please visit http://www.panasonic.com/phonehelp • The AC adaptor is used as the main disconnect device. Ensure that the AC outlet is installed near the unit and is easily accessible.
-
Page 6: Location Of Controls
• The {OK} button is used to select or confirm your menu choices. For assistance, please visit http://www.panasonic.com/phonehelp {M2} {M3}) Display (p. 8) {HOLD/RINGER} (p. 14, 23) {PAUSE} (p. - Page 7 {GREETING CHECK} (p. 17) {GREETING REC} (p. 16) {ERASE} (p. 17, 30, 37, 46) For assistance, please visit http://www.panasonic.com/phonehelp {ANSWER ON} (p. 43) {EXIT} (p. 11, 18, 25, 33) {FUNCTION/EDIT} (p. 11, 18, 27) {MESSAGE/2WAY REC} and Indicator (p. 44, 45) {STOP} (p.
-
Page 8: Display
SP-PHONE/HEADSET indicator is off (p. 22). : {PAUSE} was pressed while dialing or storing phone numbers. : {FLASH} was pressed while storing phone numbers. For assistance, please visit http://www.panasonic.com/phonehelp (This display shows all the possible configurations.) When the handset is on the cradle, the AC adaptor is... -
Page 9: Settings
Telephone Jack (RJ11C) • USE ONLY WITH Panasonic AC ADAPTOR PQLV205 or PQLV207. • Use only a Panasonic Handset for the KX-TS620W or KX-TS620B. • The AC adaptor must remain connected at all times. (It is normal for the adaptor to feel warm during use.) -
Page 10: Connecting A Communication Device
• Make sure the communication device is not in use before using this unit (making calls, storing phone numbers in memory etc.) or the communication device may not operate properly. For assistance, please visit http://www.panasonic.com/phonehelp Noise Filter (For DSL Users) -
Page 11: Programming Summary
• You can exit the programming mode any time by pressing {EXIT}. • If you do not press any buttons for 60 seconds, the unit will exit the programming mode. For assistance, please visit http://www.panasonic.com/phonehelp To store names and phone numbers in memory (p. -
Page 12: Time And Date
0100 and 1259. • For 24-hour clock: Enter numbers between 0000 and 2359. Enter time 9 : 3 For assistance, please visit http://www.panasonic.com/phonehelp Press {OK} (Next key). • If numbers between 0000 and Press {#} to select “AM”, “PM” or 24-hour clock. -
Page 13: Display Language
{EXIT} or wait for 60 seconds. • You can exit the programming mode any time by pressing {EXIT}. For assistance, please visit http://www.panasonic.com/phonehelp ” will Dialing Mode If you have touch tone service, set to Tone. -
Page 14: Lcd Contrast
{EXIT} or wait for 60 seconds. • You can exit the programming mode any time by pressing {EXIT}. For assistance, please visit http://www.panasonic.com/phonehelp Ringer Volume Make sure that the AC adaptor is connected and the unit is not being used. -
Page 15: Time Adjustment (Caller Id Subscribers Only)
To use this feature again, turn it on and reprogram the area codes you want to edit once again. For assistance, please visit http://www.panasonic.com/phonehelp Time Adjustment (Caller ID subscribers only) Using this feature, the unit’s date and time setting will be automatically }. -
Page 16: Preparing The Answering System
• The display will show the recording time. • If you record for over 1 minute, the unit will automatically stop recording. When finished, press {STOP}. • To change the message, start again from step 1. For assistance, please visit http://www.panasonic.com/phonehelp {GREETING REC} {STOP} {ERASE} {GREETING CHECK}... - Page 17 “Hello, we are not available now. Please call again. Thank you for your call.” Flash Memory Message Backup Messages are stored indefinitely on a “flash memory” IC chip and will not be affected by power failures. All messages are saved until you erase them. For assistance, please visit http://www.panasonic.com/phonehelp Preparing the Answering System...
-
Page 18: Programming Summary For The Answering System
• You can exit the programming mode any time by pressing {EXIT}. • If you do not press any buttons for 60 seconds, the unit will exit the programming mode. For assistance, please visit http://www.panasonic.com/phonehelp } or { indicates the end of the function menu. -
Page 19: Number Of Rings
} or { • You can also select the number of rings by pressing dialing buttons {2} to {7} or {0} (Toll saver*). For assistance, please visit http://www.panasonic.com/phonehelp Preparing the Answering System Press {OK} (Save key). • A long beep sounds. -
Page 20: Caller's Recording Time
{EXIT} or wait for 60 seconds. • You can exit the programming mode any time by pressing {EXIT}. For assistance, please visit http://www.panasonic.com/phonehelp If you select “Greeting only”, the unit will answer a call with the greeting message, and then hang up. The unit will not record any incoming messages. -
Page 21: Making/Answering Calls
• If the other party has difficulty hearing you, press VOLUME { speaker volume. • You can switch to the handset by lifting it up. To switch back to the speakerphone, press {SP-PHONE/HEADSET}. For assistance, please visit http://www.panasonic.com/phonehelp Making/Answering Calls 12 : 34PM NOV.24 123456789 12 : 34PM NOV.24... - Page 22 Example: Handset volume level: 2 Volume !!!! High “??” shows one level. • The display shows the volume level for a few seconds. For assistance, please visit http://www.panasonic.com/phonehelp Lift the handset press {REDIAL}. Press {REDIAL} Lift the handset. Press {REDIAL} press {SP-PHONE/HEADSET}.
-
Page 23: Answering Calls
• The RINGER indicator will flash when — a telephone number is dialed in PULSE mode, or — someone picks up or hangs up another phone connected to the same phone line. This is normal. For assistance, please visit http://www.panasonic.com/phonehelp Making/Answering Calls... -
Page 24: Caller Id Service
• If the name and the time/date display service is available in your area, the display will show caller’s names and the time/date the calls were received. For further information, please contact your telephone company. For assistance, please visit http://www.panasonic.com/phonehelp SMITH,JACK 1-111-444-7777... -
Page 25: Viewing The Caller List
• To scroll between callers, press { To exit the Caller List, press {EXIT}. • If “No items stored” is displayed in step 1, the Caller List is empty. For assistance, please visit http://www.panasonic.com/phonehelp Caller ID Service 12 : 34AM MAY.21... - Page 26 ) is displayed after the number, the whole phone number has not been shown. Press previous display. Each time you press alternately. For assistance, please visit http://www.panasonic.com/phonehelp To return to the previous caller, press { To exit the Caller List, press {EXIT}.
-
Page 27: Calling Back From The Caller List
Caller List. Scroll to the desired caller by pressing { } or { Press {FUNCTION/EDIT}. For assistance, please visit http://www.panasonic.com/phonehelp Press {FUNCTION/EDIT}. repeatedly until the number is shown in the desired format. • Each time you press {FUNCTION/ • The order of which pattern a... -
Page 28: Storing Caller List Information In The Phonebook
(Next key). b) If you do not need to change the name press {OK} (Next key). For assistance, please visit http://www.panasonic.com/phonehelp If there is no name information for the caller “Enter name” will be displayed. a) If a name is required, enter the b) If a name is not required, Press {OK} (Save key). -
Page 29: Storing Caller List Information In The Direct Dial Memory
(Next key). b) If you do not need to change the name press {OK} (Next key). For assistance, please visit http://www.panasonic.com/phonehelp If there is no name information for the caller “Enter name” will be displayed. a) If a name is required, enter the... -
Page 30: Erasing Caller List Information
• After a few seconds, the display will show the previous caller information. • To exit the Caller List, press {EXIT} or wait for 60 seconds. For assistance, please visit http://www.panasonic.com/phonehelp To erase all entries in the Caller List Before erasing all entries, make sure that “... -
Page 31: Phonebook
• If you want to change the storing name, press { } to reach the desired display. 987654321 For assistance, please visit http://www.panasonic.com/phonehelp Press {OK} (Save key). • A long beep sounds. • To continue storing other items, • If the display shows “... -
Page 32: Selecting Characters To Enter Names
Press {5} four times, press {6} three times, then press { Press {6} twice, press {3} twice, then press {7} four times. For assistance, please visit http://www.panasonic.com/phonehelp Number of times key is pressed – To move the cursor to the left To move the cursor to the right } twice. -
Page 33: Dialing From The Phonebook
• You can also dial the stored number as follows: 1. Lift the handset or press {SP-PHONE/HEADSET}. 2. Find the desired item (above steps 1 and 2). 3. Press {OK} (Send key). For assistance, please visit http://www.panasonic.com/phonehelp } to enter the Phonebook. Phonebook Press {... -
Page 34: Chain Dial
• If you have rotary or pulse service, you need to press {£} (TONE) before pressing } or { } in step 1 to change the dialing mode temporarily to tone. For assistance, please visit http://www.panasonic.com/phonehelp Keys {£} } or {... -
Page 35: Editing
Press {OK} (Save key). • A long beep sounds. • To exit the Phonebook, press {EXIT} or wait for 60 seconds. For assistance, please visit http://www.panasonic.com/phonehelp Erasing Make sure that the handset is on the cradle, the AC adaptor is connected and the SP-PHONE/HEADSET indicator light is off. -
Page 36: Direct Dial (M1, M2, M3)
• If you want to change the storing name, press { } to reach the desired display. 123456789 M1,M2,M3=Save For assistance, please visit http://www.panasonic.com/phonehelp Press one of the Direct Dial button ({M1}, {M2} or {M3}) (Save key). (Example: {M1} is pressed.) • A long beep sounds. -
Page 37: Dialing A Stored Number From The Direct Dial Memory
{PAUSE} where needed. If required, you can also store {FLASH} in a phone number. Pressing {PAUSE} or {FLASH} counts as one digit (p. 38, 40). For assistance, please visit http://www.panasonic.com/phonehelp Direct Dial (M1, M2, M3) Dialing a Stored Number from the Direct Dial... -
Page 38: Special Features
• Pressing {PAUSE} more than once increases the length of the pause between numbers. Muting Your Conversation Press {MUTE} while talking. “ • The other party cannot hear you but you can hear them. • To resume the conversation, press {MUTE} again. For assistance, please visit http://www.panasonic.com/phonehelp {ERASE} {EXIT} {FUNCTION/EDIT} {FLASH}... -
Page 39: For Call Waiting Service Users
• Please contact your service company for details and availability in your area. For assistance, please visit http://www.panasonic.com/phonehelp Special Features Setting Hold Music to ON/ You can set music play during the hold as follows. -
Page 40: Flash Button
Scroll to “Set flash time ?” by pressing { } or { press {OK} (Yes key). Flash time For assistance, please visit http://www.panasonic.com/phonehelp Select the desired time by pressing { Press {OK} (Save key). • A long beep sounds. • The display will return to step 3. To •... -
Page 41: Setting The Password
• If the wrong password was entered, 3 beeps will sound. Enter the correct password. New password : ---- For assistance, please visit http://www.panasonic.com/phonehelp Enter a new password using a 4-digit number. (Example: “1234” is entered.) Press {OK} (Save key). -
Page 42: Call Restriction
} or { Call restrict ? Press {OK} (Yes key). Restrict No. : -- For assistance, please visit http://www.panasonic.com/phonehelp If you changed the password “1111” (default), the below display will be shown. Follow the following steps 1 and 2. 1. Enter the password (p. 41). -
Page 43: Answering System
While a call is being recorded, you can monitor it through the speaker. • To increase the speaker volume, press VOLUME { To answer the call, lift the handset or press {SP-PHONE/HEADSET}. The unit stops recording. For assistance, please visit http://www.panasonic.com/phonehelp For assistance, please visit http://www.panasonic.com/phonehelp MESSAGE Indicator {ANSWER ON} {SP-PHONE/HEADSET} }. -
Page 44: Listening To Messages
• At the end of the last message, “End of final message” is heard. The unit will announce the remaining recording time if it is less than 3 minutes. For assistance, please visit http://www.panasonic.com/phonehelp MESSAGE Indicator {STOP} ” and {MESSAGE/2WAY REC} ”. -
Page 45: Recording Your Telephone Conversation
• The MESSAGE indicator flashes (only when the Answering System is ON). • When you record your 2-way telephone conversation, you should inform the other party that the conversation is being recorded. For assistance, please visit http://www.panasonic.com/phonehelp Answering System JONES,JENNIFER... -
Page 46: Erasing Messages
• A long beep sounds and “No message” is heard. The display shows “ message ”. • The information in the Caller List will not be erased. To erase Caller List information, see page 30. For assistance, please visit http://www.panasonic.com/phonehelp MESSAGE Indicator {ERASE}... -
Page 47: Remote Operation From A Touch Tone Phone
Follow the menu or enter the direct commands (p. 50). To end the remote operation, hang up. • The messages are saved. • The unit will announce the remaining recording time after playback, if it is less than 3 minutes. For assistance, please visit http://www.panasonic.com/phonehelp Answering System... -
Page 48: Remote Code
• You can exit the programming mode any time by pressing {EXIT}. To check the remote code Repeat steps 1 to 3. • The current remote code is displayed. When finished, press {EXIT}. For assistance, please visit http://www.panasonic.com/phonehelp Remote code : 23 [OK]=Save... -
Page 49: Voice Menu
• 3 seconds after playback, the voice menu will start again from the beginning. • If you hear “Memory full” after playback, erase some, or all, of the messages (p. 46). For assistance, please visit http://www.panasonic.com/phonehelp Answering System Press {1}. -
Page 50: Direct Remote Operation
MESSAGE (During playback) ERASING ALL MESSAGES ANSWERING SYSTEM For assistance, please visit http://www.panasonic.com/phonehelp • Only new messages are played back. • All messages are played back. • The current message is repeated. • The current message is skipped. The next message is played. - Page 51 Skipping the greeting message After calling your unit, press {£} (TONE) during the greeting message. • The unit skips the rest of the greeting message and you can start recording your message after the long beep. For assistance, please visit http://www.panasonic.com/phonehelp Answering System...
-
Page 52: Useful Information
Useful Information Wall Mounting This unit can be mounted on a wall. Press the tabs in the direction of the arrows (1), then remove the wall mounting adaptor (2). Connect the AC adaptor. Tuck the telephone line cord inside the wall mounting adaptor, and push it in the direction of the arrow. -
Page 53: Optional Headset
Optional Headset Plugging the optional headset into the unit allows a hands-free phone conversation. Please use only a Panasonic KX-TCA60, KX-TCA86, KX-TCA88HA, KX-TCA91, KX-TCA92, KX-TCA93, KX-TCA94, KX-TCA95 or KX-TCA98. To order, call the accessories telephone number on page 3. Connecting the optional headset to the unit Connect the optional headset to the headset jack as shown below. -
Page 54: Troubleshooting
For assistance, please visit http://www.panasonic.com/phonehelp Cause and Remedy • Unplug the AC adaptor to reset. Plug in, and try again. • The ringer volume is set to OFF and “~” is displayed. - Page 55 Caller ID information is not displayed during message playback (p. 45). For assistance, please visit http://www.panasonic.com/phonehelp Cause and Remedy • You need to subscribe to a Caller ID service. • Check the AC adaptor is connected to the unit. • If you receive a call with the Caller ID information while...
-
Page 56: Specifications
Operating Environment: 5°C – 40°C (41°F – 104°F) • Specifications are subject to change without notice. • The illustrations used in these operating instructions may differ slightly from the actual product. For assistance, please visit http://www.panasonic.com/phonehelp AC adaptor (AC 120 V, 60 Hz) Standby: Approx. 2.4 W Maximum: Approx. -
Page 57: Fcc And Other Information
This device complies with Part 15 of the FCC Rules. Operation is subject to the following two conditions: (1) This device may not cause harmful interference, and (2) this device must accept any interference received, including interference that may cause undesired operation. For assistance, please visit http://www.panasonic.com/phonehelp... - Page 58 • If there is any trouble—disconnect the unit from the telephone line and connect a known working phone. If the known working phone operates properly, have your unit repaired by one of the authorized Panasonic Factory Service Centers. If the known working phone does not operate properly, consult your telephone company.
-
Page 59: Index
FCC and Other Information: 57 Flash Button: 40 Flash time: 40 Greeting Message: 16 Headset: 53 Hold/Ringer: 14 Important Safety Instructions: 4 For assistance, please visit http://www.panasonic.com/phonehelp Useful Information LCD Contrast: 14 Listening to Messages: 44 Making Calls: 21 Mute: 38 Navigator key: 6... -
Page 60: Warranty
Panasonic Consumer Electronics Company or Panasonic Puerto Rico, Inc. (collectively referred to as “the warrantor”) will, for the length of the period indicated on the chart below, which starts with the date of original purchase (“Limited Warranty period”), at its option either (a) repair your product with new or... - Page 61 Limited Warranty period, you may contact your dealer or Servicenter. If the problem is not handled to your satisfaction, then write to the warrantor’s Consumer Affairs Department at the address listed for the warrantor. PARTS AND SERVICE, WHICH ARE NOT COVERED BY THIS LIMITED WARRANTY, ARE YOUR RESPONSIBILITY. For assistance, please visit http://www.panasonic.com/phonehelp...
-
Page 62: Customer Services
Monday-Friday 9 am-9 pm; Saturday-Sunday 10 am-7 pm, EST. TTY users (hearing or speech impaired users) can call 1-877-833-8855. Accessory Purchases Purchase Parts, Accessories and Instruction Books online for all Panasonic Products by visiting our Web Site at: http://www.pasc.panasonic.com or, send your request by E-mail to: npcpart@us.panasonic.com... - Page 63 For assistance, please visit http://www.panasonic.com/phonehelp...
- Page 64 Symptom • Send the unit to an authorized servicenter, prepaid and adequately insured. • Do not send your unit to the Panasonic Consumer Electronics Company listed below or to executive or regional sales office . These locations do not repair consumer products.