Table of Contents
Advertisement
Quick Links
VIBR APHONES
CONCERT
YV1605/1605J
Owner's Manual
Bedienungsanleitung
Mode d'emploi
Manual de instrucciones
Make sure to read "Safety Precautions" and "Cautions when using the instrument".
Lesen Sie unbedingt die „Vorsichtsmaßregeln" und die „Vorsichtshinweise zum Gebrauch des Instruments".
Ne manquez pas de lire les sections « Précautions à observer » et « Précautions d'utilisation de l'instrument ».
Lea sin falta las "Precauciones de seguridad" y las "Precauciones para la utilización del instrumento".
Advertisement
Table of Contents

Related Manuals for Yamaha CONCERTVIBRAPHONES YV1605


Summary of Contents for Yamaha CONCERTVIBRAPHONES YV1605
- Page 1 VIBR APHONES CONCERT YV1605/1605J Owner’s Manual Bedienungsanleitung Mode d’emploi Manual de instrucciones Make sure to read “Safety Precautions” and “Cautions when using the instrument”. Lesen Sie unbedingt die „Vorsichtsmaßregeln“ und die „Vorsichtshinweise zum Gebrauch des Instruments“. Ne manquez pas de lire les sections « Précautions à observer » et « Précautions d’utilisation de l’instrument ». Lea sin falta las “Precauciones de seguridad”...
-
Page 2: Special Message Section
This Product should be used only with the components supplied or; a cart, rack, or stand that is recommended by Yamaha. If a cart, etc., is used, please observe all safety markings and instructions that accompany the accessory product. -
Page 3: Safety Precautions
Safety Precautions Please obey the following instructions in order to use your vibraphone in a safe manner. Particularly in the case of children, a responsible adult should provide proper instruction on how to properly use and treat the instrument before use. In order to prevent fire, electric shock, and injury, make sure that all precautions described below are obeyed. - Page 4 Make sure to hold the side frame when making height when the instrument is not used for any extended pe- adjustments. riod of time. Always use an AC adapter that meets YAMAHA speci- Side Frame fications. The use of any other AC adapter may cause damage.
-
Page 5: Power Switch
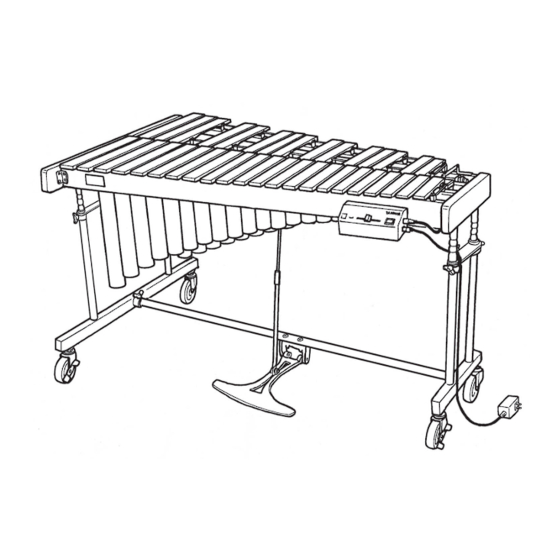
Nomenclature Accidental Tone Bars Natural Tone Bars Controller Fan Belt Frame End (Large) Frame End (Small) Slide Leg Rail No. 1 Resonators (Natural Tone Side) Driver Leg (Large) Leg (Small) Resonators (Accidental Tone Side) Pedal Stay Pedal Caster AC Adapter ■... - Page 6 Confirmation of Packing Contents The shipping carton of your YV1605 should contain the parts shown below. Before assembling the instrument, confirm that all parts are included as listed. * In the event that a part is missing, please contact the shop where the instrument was purchased. q Vibes Main Unit x 1 t Resonators (Natural Tone Side) x 1 y Resonators (Accidental Tone Side) x 1...
- Page 7 Assembly For safety, assembly should be performed by at least 2 persons in a location with sufficient space. We recommend to you to assemble the instrument on a soft rug or carpet to avoid scratches in the tone bars. Loosen the slide leg fixing bolts of the large and the small leg, and remove the four slide legs.
- Page 8 Assembly Place the large leg, small leg and pedal stay so that after assembly each part will be positioned as illustrated. Low Sound Side Leg (Large) Audience Side Leg (Small) High Sound Side Pedal Stay Pedal Player Side Connect the large leg and small leg with the pedal stay. Insert the pedal stay with its notch facing up into the lower joint of the large leg as far as it will go (aligning the notch with the fixing bolt) and tighten the fixing bolt securely.
- Page 9 Assembly Connect the slide legs with the legs. Align the legs from above so that the slide legs slide into the corresponding leg holes. Adjust to the desired height and then securely tighten each slide leg fixing bolt, aligning it with the corresponding notch of the slide leg.
- Page 10 Assembly Attach the resonators. Insert the resonators from underneath the frame and rest the high sound side and then the low sound side onto the resonator holders (rubber). * Make sure not to confuse the natural tone side and accidental tone side resonators. * Take care not to bump the resonators against the legs etc.
- Page 11 Assembly ⁄0 Attach the driver. 10-1 Loosen the fixing bolts at the bottom of rails (2) and (3) on the high sound side, and slide both fittings in the direction of the low sound side. 10-2 Fully insert the driver mount into the support fitting. Bottom View 10-1 10-2...
- Page 12 Assembly ⁄1 Attach the controller. There are two controller mounting pins on the high sound side of rail (1). Align the two holes in the controller mounts with these pins and hook the controller onto the pins one side at a time. Controller mounting pins High Sound Side Controller...
- Page 13 Assembly ⁄3 Attach the round belt (fan belt)*. Slip the round belt (fan belt) over the fan side pulley first, and then pull it over the flange of the driver pulley. Note For Service Personnel If the belt cannot be mounted because the distance between the pulleys is too wide, or the belt slips due to a too narrow pulley distance, loosen the two driver positioning screws (see illustration below) to adjust the pulley distance (belt tension).
-
Page 14: Height Adjustment
Assembly ⁄6 Height Adjustment Height adjustment should always be performed by at least 2 persons. To adjust the height of the tone bars, first remove the round belt (fan belt), driver, controller and tone bars*, and loosen the center rod fixing bolts. (* To remove the tone bars, disengage the springs on the low sound side, and then unhook the string from the post.) Support both frame ends by hand (do not touch the metal parts shown in the illustration), and loosen the slide leg fixing bolts. -
Page 15: Power Supply
Bars .......... Aluminum Alloy, 1-1/2" wide, 1/2" thick Pitch ......... A = 442 Hz Drive Unit ......... YVM-200 (Pause Controller), 25–145 rpm Power Supply ......YAMAHA AC Adapter PA-130 (D.C. 12 V, 700 mA North America), PA-D015 (D.C. 15 V, 1 A Europe), or other adapter recommended by YAMAHA. - Page 16 WQ84190 1410 R1 Printed in Japan...