Table of Contents
Advertisement
CAUTION: READ THIS BEFORE OPERATING YOUR UNIT.
1
To assure the finest performance, please read this manual
carefully. Keep it in a safe place for future reference.
2
Install this unit (RX-E410 and CDX-E410) in a well ventilated,
cool, dry, clean place with at least 10 cm on the top (except for
CDX-E410), 10 cm on the left and right, and 10 cm at the back of
this unit — away from direct sunlight, heat sources, vibration,
dust, moisture, and/or cold.
3
Locate this unit away from other electrical appliances, motors, or
transformers to avoid humming sounds.
4
Do not expose this unit to sudden temperature changes from cold
to hot, and do not locate this unit in an environment with high
humidity (i.e. a room with a humidifier) to prevent condensation
inside this unit, which may cause an electrical shock, fire,
damage to this unit, and/or personal injury.
5
Avoid installing this unit where foreign object may fall onto this
unit and/or this unit may be exposed to liquid dripping or
splashing. On the top of this unit, do not place:
– Other components, as they may cause damage and/or
discoloration on the surface of this unit.
– Burning objects (i.e. candles), as they may cause fire, damage
to this unit, and/or personal injury.
– Containers with liquid in them, as they may fall and liquid
may cause electrical shock to the user and/or damage to this
unit.
6
Do not cover this unit with a newspaper, tablecloth, curtain, etc.
in order not to obstruct heat radiation. If the temperature inside
this unit rises, it may cause fire, damage to this unit, and/or
personal injury.
7
Do not plug in this unit to a wall outlet until all connections are
complete.
8
Do not operate this unit upside-down. It may overheat, possibly
causing damage.
9
Do not use force on switches, knobs and/or cords.
10 When disconnecting the power cable from the wall outlet, grasp
the plug; do not pull the cable.
11 Do not clean this unit with chemical solvents; this might damage
the finish. Use a clean, dry cloth.
12 Only voltage specified on this unit must be used. Using this unit
with a higher voltage than specified is dangerous and may cause
fire, damage to this unit, and/or personal injury. YAMAHA will
not be held responsible for any damage resulting from use of this
unit with a voltage other than specified.
13 Do not attempt to modify or fix this unit. Contact qualified
YAMAHA service personnel when any service is needed.
The cabinet should never be opened for any reasons.
14 When not planning to use this unit for long periods of time (i.e.
vacation), disconnect the AC power plug from the wall outlet.
15 Be sure to read the "Troubleshooting" section on common
operating errors before concluding that this unit is faulty.
16 Before moving this unit, press STANDBY/ON to set this unit in
standby mode, and disconnect the AC power plug from the wall
outlet.
17 Condensation will form when the surrounding temperature
changes suddenly. Disconnect the power cable from the outlet,
then leave the unit alone.
18 When using the unit for a long time, the unit may become warm.
Turn the power off, then leave the unit alone for cooling.
19 Install this unit near the wall outlet and where the AC power plug
can be reached easily.
ii
This unit is not disconnected from the AC power source as
long as it is connected to the wall outlet, even if this unit itself
is turned off. This state is called the standby mode. In this
state, this unit is designed to consume a very small quantity of
power.
CAUTION
Use of controls or adjustments or performance of procedures
other than those specified herein may result in hazardous
radiation exposure.
DANGER
When this unit is plugged to the wall outlet, do not place your
eyes close to the opening of the disc tray and other openings to
look into inside.
The laser component in this product is capable of emitting
radiation exceeding the limit for Class 1.
WARNING
TO REDUCE THE RISK OF FIRE OR ELECTRIC SHOCK,
DO NOT EXPOSE THIS APPLIANCE TO RAIN OR
MOISTURE.
For U.K. customers
If the socket outlets in the home are not suitable for the plug
supplied with this appliance, it should be cut off and an
appropriate 3 pin plug fitted. For details, refer to the instructions
described below.
Note
The plug severed from the mains lead must be destroyed, as a
plug with bared flexible cord is hazardous if engaged in a live
socket outlet.
Special Instructions for U.K. Model
IMPORTANT
THE WIRES IN MAINS LEAD ARE COLOURED IN
ACCORDANCE WITH THE FOLLOWING CODE:
Blue: NEUTRAL
Brown: LIVE
As the colours of the wires in the mains lead of this appa-
ratus may not correspond with the coloured markings
identifying the terminals in your plug, proceed as follows:
The wire which is coloured BLUE must be connected to
the terminal which is marked with the letter N or coloured
BLACK. The wire which is coloured BROWN must be
connected to the terminal which is marked with the letter L
or coloured RED.
Making sure that neither core is connected to the earth
terminal of the three pin plug.
Advertisement
Table of Contents

Related Manuals for Yamaha RX-E410


Summary of Contents for Yamaha RX-E410
- Page 1 Keep it in a safe place for future reference. long as it is connected to the wall outlet, even if this unit itself Install this unit (RX-E410 and CDX-E410) in a well ventilated, is turned off. This state is called the standby mode. In this...
-
Page 2: Table Of Contents
Connecting an MD player or a tape deck ....15 Notes on Discs ............42 Connecting an MD recorder or a CD recorder ..15 Disc information ............42 Connecting a YAMAHA iPod universal dock ..16 Handling a disc ............42 Connecting the Power Cables......17 Glossary..............43 Adjusting the Clock .......... -
Page 3: Features
About this manual • In this manual, “RX-E410” is described as “receiver” and “CDX-E410” is described as “CD player”. • This manual describes how to operate the system using a remote control except when it is not available. Some of these operations are also available using the front panel buttons. -
Page 4: Controls And Functions
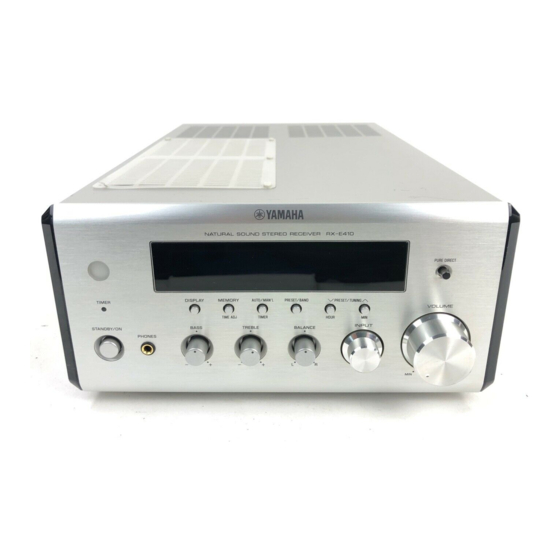
Controls and Functions Receiver (RX-E410) Front panel 3 4 5 NATURAL SOUND STEREO RECEIVER RX-E410 PURE DIRECT DISPLAY MEMORY AUTO/MAN'L PRESET/BAND PRESET/TUNING TIMER VOLUME TIME ADJ TIMER HOUR INPUT BASS TREBLE BALANCE STANDBY/ON PHONES 1 STANDBY/ON 8 PRESET/TUNING d / u (HOUR, MIN) Turns the receiver on or sets it to the standby mode. -
Page 5: Rear Panel
TO CDX-E410 100W MAX. TOTAL 1 DOCK terminal 6 AUX jacks Use to connect a YAMAHA iPod universal dock (such as Use to connect the external components. YDS-10 sold separately) where your iPod can be stationed 7 SUBWOOFER OUT jack (see page 16). - Page 6 Light up the iPod menu currently selected (see page 36). 5 DOCK indicator D iPod operation indicators Lights up when you station your iPod in a YAMAHA iPod Show operable cursor keys when operating the iPod menu universal dock (such as YDS-10 sold separately) with the menu browse mode (see page 36).
-
Page 7: Cd Player (Cdx-E410)
Controls and Functions CD player (CDX-E410) Front panel NATURAL SOUND COMPACT DISC PLAYER CDX-E410 STANDBY/ON 1 Disc tray 6 Front panel display Holds a disc to be played back. Shows the current status of the CD player. 7 b/w Skips to the begining of the current track. Press and hold Opens and closes the disc tray. - Page 8 1 LINE OUT jacks See page 12 for connection information. 2 OPTICAL jack See page 15 for connection information. 3 COAXIAL jack See page 15 for connection information. 4 System connector (TO RX-E410) jack See page 12 for connection information.
-
Page 9: Remote Control
Controls and Functions Remote control This remote control can operate the PianoCraft system components (including tuner functions) and an iPod stationed in a YAMAHA iPod universal dock connected to INPUT VOLUME the receiver. DISPLAY To operate the CD player, tuner functions, or an iPod... - Page 10 Controls and Functions CD mode Operations available in CD mode The following operations are available for the CD player if the CD player is connected to the receiver with the system control connection (see page 12). STANDBY/ON Press CD to set the receiver to the CD mode before carrying out the following operations.
-
Page 11: Tuner Mode
Controls and Functions TUNER mode Operations available in TUNER mode The following operations are available for the receiver. Press TUNER to set the receiver to the TUNER mode before STANDBY/ON carrying out the following operations. 1 Number keys (1 to 8) Selects preset station number (see page 28). - Page 12 Using the remote control control Use the remote control within 6 m (20 feet) of the component you want to control and point it toward its remote control sensor (see page 3). NATURAL SOUND STEREO RECEIVER RX-E410 PURE DIRECT DISPLAY MEMORY AUTO/MAN'L...
-
Page 13: Connecting The System
• The system control connection is used to transmit the remote control signals from the receiver to the CD player. • If you want to connect an amplifier with a digital input instead of the RX-E410, use the DIGITAL OUT (COAXIAL or OPTICAL) -
Page 14: Connecting The Speaker Cable
Connecting the System Connecting the speaker cable Tighten the knob to secure the wire. Notes • Be sure to connect the left channel (L), right channel (R), “+” (red) and “–” (black) properly. If the connections are faulty, no Red: positive (+) sound will be heard from the speakers, and if the polarity of the Black: negative (–) speaker connections is incorrect, the sound will be unnatural... -
Page 15: Connecting Antennas
For details, consult the nearest authorized YAMAHA dealer or service center. Insert the AM loop antenna lead wires into... -
Page 16: Connecting External Components
Connecting External Components You can connect various audio components, such as an MD player, a tape deck or a YAMAHA iPod universal dock to the receiver. Also you can connect an MD recorder or a CD recorder to the CD player using the DIGITAL OUT jacks. For information on your external component, refer to the owner’s manual supplied with each component. -
Page 17: Connecting A Yamaha Ipod Universal Dock
DOCK terminal of the receiver as long as the receiver is turned on. • Depending on the type of the iPod, you may need to insert one of the iPod adapters supplied with a YAMAHA iPod universal dock... -
Page 18: Connecting The Power Cables
(Europe model) To AC OUTLET(S) on the MAINS rear panel of the receiver (or the AC wall outlet ) LINE OUT DIGITAL OUT TO RX-E410 OPTICAL COAXIAL CD player AC OUTLET(S) (SWITCHED) U.K. model............. 1 outlet Other models............2 outlets Use these outlet(s) to supply power to the CD player or any connected components. -
Page 19: Adjusting The Clock
Before starting playback operation, follow the procedure below to adjust the clock setting of the receiver. To set the minute setting ahead, press MIN DISPLAY HOUR MIN repeatedly. To set the minute setting backward, press MIN repeatedly while NATURAL SOUND STEREO RECEIVER RX-E410 holding down PRESET/BAND. PURE DIRECT DISPLAY MEMORY AUTO/MAN'L... -
Page 20: Basic Operations
PURE DIRECT PHONES BALANCE For information on the disc playback, see page 21, and for information on tuning, see page 26. NATURAL SOUND STEREO RECEIVER RX-E410 PURE DIRECT Press VOLUME +/– to adjust the volume to DISPLAY MEMORY AUTO/MAN'L... -
Page 21: Changing The Front Panel Display Settings
Basic Receiver Operations Changing the front panel display settings Follow the procedure below to change the settings of the receiver’s front panel display. To switch the display mode STANDBY/ON You can switch the information displayed in the receiver’s front panel display between the current input and clock. Note You cannot display the clock unless you adjust it (see page 18). -
Page 22: Basic Disc Playback Operations
Basic Disc Playback Operations Basic Disc Playback Operations You can enjoy playback of audio CDs, MP3 CDs, and WMA CDs with the CD player. However, depending on a disc format, some discs may not be compatible with the CD player. Before loading a disc into the CD player, be sure to check the disc compatibility of the CD player (see page 42). -
Page 23: Switching The Playback Information Display
Basic Disc Playback Operations Switching the playback information display You can switch the disc playback information shown in the CD player’s front panel display. Available information differs depending on a disc type. Press TIME/INFO repeatedly while playing back a disc. Each time you press the key, the information display changes as described in “Playback information for audio STANDBY/ON... - Page 24 Basic Disc Playback Operations Playback information for MP3 and WMA discs The following information is available during playback of an MP3 or WMA disc. Scrolling display (Default) Comment Elapsed time of the current file Year Album name Remaining time of the current file File name Artist name Song title...
-
Page 25: Repeating Playback (Repeat Play)
Basic Disc Playback Operations Repeating playback Playing back randomly (Repeat Play) (Random Play) You can repeat the playback of the selected item in a disc. You can play back tracks in the disc in random order. Note When playing back an audio CD with Random Play, the remaining time of the disc cannot be displayed. -
Page 26: Customizing Playback Order (Program Play)
Basic Disc Playback Operations Customizing playback order In case of MP3 or WMA disc (Program Play) PROG. You can customize the playback order for 40 tracks stored in the disc. Note The total number of programmed tracks and the total time of STANDBY/ON programmed tracks are not displayed for MP3 or WMA disc. -
Page 27: Fm/Am Tuning
If the signal received from the station you want to select is strong and there is no interference. weak, tune into it manually. AUTO/MAN’L PRESET/TUNING u / d AUTO/MAN’L PRESET/TUNING u / d NATURAL SOUND STEREO RECEIVER RX-E410 NATURAL SOUND STEREO RECEIVER RX-E410 PURE DIRECT PURE DIRECT DISPLAY... -
Page 28: Automatic Preset Tuning
You can also store up to 40 stations (A1 to E8: 8 preset automatically. station numbers in each of the 5 preset station groups) manually. NATURAL SOUND STEREO RECEIVER RX-E410 PURE DIRECT NATURAL SOUND STEREO RECEIVER RX-E410 PURE DIRECT DISPLAY... -
Page 29: Selecting Preset Stations
Selecting preset stations You can tune into any desired station simply by selecting the preset station group and number under which it was stored (see page 27). PRESET/TUNING u / d NATURAL SOUND STEREO RECEIVER RX-E410 PURE DIRECT DISPLAY MEMORY AUTO/MAN'L... -
Page 30: Radio Data System Tuning (U.k. And Europe Models Only)
Radio Data System Tuning (U.K. and Europe Models Only) Radio Data System (U.K. and Europe models only) is a data transmission system used by FM stations in many countries. The Radio Data System function is carried out among the network stations. This unit can receive various Radio Data System data such as PS (program service), PTY (program type), RT (radio text), CT (clock time), and EON (enhanced other networks) when receiving Radio Data System broadcasting stations. -
Page 31: Displaying The Radio Data System Information
Radio Data System Tuning (U.K. and Europe Models Only) Press PTY SEEK START to start searching DIMMER DIMMER for available Radio Data System preset FREQ/TEXT FREQ/TEXT FREQ/TEXT PROG PROG REPEAT REPEAT stations. PTY SEEK PTY SEEK MODE START MODE START If a station broadcasting the selected program type is RANDOM RANDOM... - Page 32 Radio Data System Tuning (U.K. and Europe Models Only) Additional CT (clock time) settings You can use CT information received from the Radio Data Press PTY SEEK MODE repeatedly to select System stations to adjust the built-in clock of the receiver. “CT→Clock”...
-
Page 33: Setting The Timer
PRESET/BAND up in the front panel display. To set or cancel the clock timer NATURAL SOUND STEREO RECEIVER RX-E410 Press TIMER on the front panel while the clock is PURE DIRECT displayed or the receiver is in the standby mode. -
Page 34: Setting The Sleep Timer
Setting the Timer Setting the sleep timer The sleep timer sets the receiver to the standby mode after the specified time elapses. MENU MENU FOLDER/PRESET FOLDER/PRESET FILE FILE FILE FILE ENTER ENTER /A-E /A-E /A-E /A-E INPUT VOLUME INPUT VOLUME DISPLAY DISPLAY SLEEP... -
Page 35: Setting The Auto-Standby Mode
• Unless you connect the receiver and the CD player with the supplied system control cable properly (see page 12), this feature does not function for the system. • This feature does not function for the system during playback. u / d NATURAL SOUND STEREO RECEIVER RX-E410 PURE DIRECT DISPLAY MEMORY... -
Page 36: Controlling Ipod
Controlling iPod In addition to controlling the receiver (RX-E410) and CD player (CDX-E410), you can operate your iPod stationed in a YAMAHA iPod universal dock connected to the receiver using the supplied remote control. Available iPod operations Operations available in DOCK mode... -
Page 37: Using Ipod
Using iPod Once you have stationed your iPod in a YAMAHA iPod universal dock (such as YDS-10 sold separately) connected to the DOCK terminal of the receiver (see page 16), you can enjoy playback of your iPod using the supplied remote control. - Page 38 Controlling iPod Menu browse mode In the menu browse mode, you can operate the iPod menu Press to select the menu, and then using the receiver’s front panel display. Also you can press or ENTER to enter the selected configure the “Setup” parameters with the menu browse menu.
-
Page 39: Troubleshooting
Refer to the table below when this unit does not function properly. If the problem you are experiencing is not listed below or if the instruction below does not help, turn off this unit, disconnect the power cable, and contact the nearest authorized YAMAHA dealer or service center. Receiver (RX-E410) - Page 40 Troubleshooting Tuner Problem Cause Remedy page FM stereo reception is The characteristics of FM stereo Check the antenna connections. noisy. broadcasts may cause this problem Try using a high-quality directional FM — when the transmitter is too far away or antenna.
- Page 41 Disconnected Your iPod was removed from a YAMAHA Station your iPod back in a YAMAHA iPod universal iPod universal dock (such as YDS-10 sold dock (such as YDS-10 sold separately) connected to separately) connected to the DOCK the DOCK terminal of the receiver.
-
Page 42: Cd Player (Cdx-E410)
Troubleshooting CD player (CDX-E410) Problem Cause Remedy page Power turns on but The power cable is not connected or the Connect the power cable firmly. immediately shuts off. plug is not completely inserted. Power immediately Auto-standby function of the receiver Check the connection of the system control cable shuts off during works when the receiver can not receive... -
Page 43: Notes On Discs
NOTES ON DISCS Notes on Discs Disc information Handling a disc The following tables explain the disc types supported by • Do not touch the surface of the disc. Hold a disc by its edge and the CD player. Also, the CD player can play back 8-cm center hole. -
Page 44: Glossary
Glossary Audio information Copyright and logo marks MPEG Layer-3 audio decoding technology licensed from MP3 (MPEG Audio Layer-3) Fraunhofer IIS and Thomson Multimedia. One of the audio compression methods used by MPEG. It employs the irreversible compression method, which ® iPod achieves a high compression rate by thinning out the data “iPod”... -
Page 45: Specifications
SPECIFICATIONS Specifications RX-E410 CDX-E410 AMPLIFIER SECTION PLAYBACK SYSTEM • Minimum RMS output power per channel • CD, CD-R/RW (6 Ω , 1 kHz, 0.1% THD).......... 55 W + 55 W LASER • Maximum RMS output power per channel (6 Ω , 1 kHz, 1% THD)..........65 W + 65 W •...