Table of Contents
Advertisement
Operating and installation instructions
Refrigerator
with PerfectFresh zone
and dynamic cooling
K 9457 iD
K 9557 iD
K 9757 iD
en - GB
To avoid the risk of accidents or
damage to the appliance, it is
essential to read these instructions
before it is installed and used for the
first time.
M.-Nr. 07 471 430
Advertisement
Table of Contents

Related Manuals for Miele K 9457 iD


Summary of Contents for Miele K 9457 iD
- Page 1 Operating and installation instructions Refrigerator with PerfectFresh zone and dynamic cooling K 9457 iD K 9557 iD K 9757 iD en - GB To avoid the risk of accidents or damage to the appliance, it is essential to read these instructions before it is installed and used for the first time.
-
Page 2: Table Of Contents
Contents Guide to the appliance ..........4 Caring for the environment . - Page 3 Contents Adjusting the interior fittings ........23 Moving the shelves .
-
Page 4: Guide To The Appliance
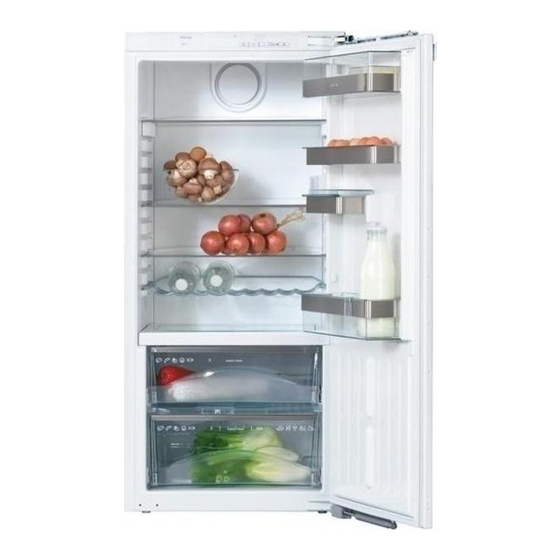
Guide to the appliance a Safety lock indicator light d Temperature selector buttons (+ for warmer; – for colder) b On/Off button e Super cool button and c Refrigerator temperature display indicator light f Alarm off button... - Page 5 Guide to the appliance f Butter and cheese compartment a Fan for dynamic cooling g Egg tray/Condiment tray b Bottle rack h Interior lighting c Adjustable shelves d PerfectFresh zone, dry compartment i Universal container* e PerfectFresh zone, humidity j Condensate channel and controlled compartments drain hole (or compartment, depending on...
-
Page 6: Caring For The Environment
Caring for the environment Disposal of the packing Disposal of your old appliance material Electrical and electronic appliances often contain materials which, if The transport and protective packing handled or disposed of incorrectly, has been selected from materials which could be potentially hazardous to are environmentally friendly for human health and to the environment. -
Page 7: Warning And Safety Instructions
Warning and Safety instructions Correct application This appliance complies with all This appliance is intended for relevant legal safety requirements. domestic use only for the cool storage Improper use of the appliance can, of food and drink. however, present a risk of both Any other usage is not supported by personal injury and material the manufacturer and could be... -
Page 8: Technical Safety
(e.g. electric shock). If the connection cable is faulty it must only be replaced by a Miele approved service technician to protect the user from danger. - Page 9 Warning and Safety instructions Safe operation of the appliance is In countries where there are areas only assured if it has been installed and which may be subject to infestation by connected in accordance with these cockroaches or other vermin, pay operating and installation instructions.
-
Page 10: Disposal Of Your Old Appliance
Warning and Safety instructions Do not use sharp edged objects to Never use a steam-cleaning appliance to clean this appliance. – remove frost and ice, Pressurised steam could reach the – separate food which has become electrical components and cause a frozen. -
Page 11: How To Save Energy
How to save energy Normal energy Increased energy consumption consumption Installation site In a ventilated room. In an enclosed, unventilated room. Protected from direct sunlight. In direct sunlight. Not situated near to a heat source Situated near to a heat source (radiator, oven). -
Page 12: Switching On And Off
(available from the To enable the temperature to get Miele Spare Parts Department or via sufficiently cold inside the appliance, the internet on www.miele.co.uk). allow the appliance to run for a few hours before placing food in it. -
Page 13: Switching Off For Longer Periods Of Time
Switching on and off Switching off for longer Activating or de-activating the safety lock periods of time If the appliance is not going to be used for a longer period of time, e.g. whilst on holiday: ^ Press and hold the Super cool button ^ switch the appliance off, pressed in for approx. -
Page 14: The Correct Temperature
The correct temperature Dynamic cooling It is very important to set the correct temperature for storing food in the The dynamic cooling fan automatically appliance. Micro-organisms will cause switches on when the cooling system food which is not stored at the correct for the refrigerator switches on. -
Page 15: Temperature Range
The correct temperature Approx. 5 seconds after letting go of The Super cool indicator light flashes, the button, the current average and a flashes in the temperature temperature of the refrigerator is display. automatically shown. If you have adjusted the temperature, wait for approx. -
Page 16: Temperature Display
The correct temperature Temperature display ^ You can now adjust the level of brightness by pressing the During normal operation, the temperature selector buttons. You temperature display on the control can choose from settings 1 to 5: panel shows the average temperature 1: dimmest setting, in the refrigerator. -
Page 17: Alarm
Alarm Switching the alarm off early Your appliance has been fitted with an alarm to avoid energy being wasted if the door is left open and to prevent stored food becoming too warm. The alarm will sound if the door is left ^ Press the alarm off button. -
Page 18: Super Cool
Super cool Super cool Switching off Super cool The Super cool function can be used to The Super cool function will switch itself rapidly reduce the temperature in the off automatically after approx. 6 hours. refrigerator section to its lowest setting The indicator light will go out and the (depending on the room temperature). -
Page 19: Using The Refrigerator Efficiently
Using the refrigerator efficiently Different storage zones – pre-packed vegetables and other fresh food with a label stating it Due to the natural circulation of the air should be kept at a temperature of in the appliance, there are different approx. -
Page 20: Food Which Should Not Be Stored In A Refrigerator
Using the refrigerator efficiently Food which should not be Storing food correctly stored in a refrigerator Food should generally be stored covered or packaged in the refrigerator Not all food is suitable for refrigeration. (there are some exceptions to this rule This includes: in the PerfectFresh zone - see below). -
Page 21: Using The Perfectfresh Zone
Using the PerfectFresh zone What are the advantages of the For every type of food, there are ideal storage conditions to ensure it stays PerfectFresh zone? fresh as long as possible, retaining As food remains fresh for up to three both flavour and vitamins. -
Page 22: Humidity-Controlled Compartment
Using the PerfectFresh zone Always keep these foods covered or Take food out of the PerfectFresh wrapped. zone approx. 30 - 60 minutes before Exception: Meat. The surface of the meat dries out slightly, helping to using it. The aroma and taste do not fully develop until the food has prevent the growth of bacteria, which results in the meat lasting longer. -
Page 23: Adjusting The Interior Fittings
Adjusting the interior fittings Moving the shelves To move the split shelf: ^ Take both halves of the split glass The shelves can be adjusted according to the height of the food. shelf out, ^ Raise the shelf, and pull it forwards slightly until the notch at the side is in line with the shelf support. -
Page 24: Adjusting The Condiment Tray/Bottle Shelf
Adjusting the interior fittings PerfectFresh zone Adjusting the condiment compartments tray/bottle shelf ^ Lift the tray/shelf up and out of the The compartments in the PerfectFresh zone are on telescopic rails, and can stainless steel frame to remove. be removed for filling, emptying or ^ Push up the stainless steel frame, cleaning purposes. -
Page 25: Universal Container
Adjusting the interior fittings Universal container Moving the bottle divider (depending on model) (depending on model) The universal container can be used The bottle divider can be moved to the both to store and serve food. left or right to ensure that bottles are held securely in position when the door is opened and shut. -
Page 26: Automatic Defrost
Automatic defrost Refrigerator section and PerfectFresh zone The refrigerator section and the PerfectFresh zone defrost automatically. Condensate and frost can build up on the back wall of the refrigerator section and the PerfectFresh zone whilst in use. You do not need to remove this, as it will defrost and evaporate automatically with the warmth generated by the appliance. -
Page 27: Cleaning And Care
E-Cloth Never use cleaning agents ^ A microfibre “E-Cloth” is available containing abrasive substances from the Miele UK Spare Parts such as sand, soda, acids, chlorides Department, which is suitable for or chemical solvents. "Non-abrasive" cleaning surfaces such as stainless... -
Page 28: Ventilation Gaps
Cleaning and care After cleaning ^ Clean stainless steel surfaces with a suitable non-abrasive stainless steel ^ Replace all shelves and accessories cleaning agent following the in the appliance. manufacturer’s instructions on the ^ Insert the plug in the socket, and packaging. -
Page 29: Problem Solving Guide
^ Check that the fuse is not defective . . . you cannot switch the appliance and that the mains fuse has not off. tripped. If it has, contact the Miele Service Department. The safety lock has been activated..the temperature in the refrigerator . - Page 30 ^ Clean the condensate channel and drain hole. If you still cannot remedy the fault having followed these suggestions, please contact the Miele Service Department. To prevent unnecessary loss of temperature, it is advisable not to open the door while waiting for the...
-
Page 31: Noises
Noises Normal noises What causes them Humming noise made by the motor (compressor). This noise can Brrrrr... get louder for brief periods when the motor is switching on. Blubb, blubb..A gurgling noise can be heard when coolant is circulating through the pipes. -
Page 32: After Sales / Guarantee
– your Miele Dealer – the Miele Service Department (see back cover for contact details). When contacting your Dealer or Miele, please quote the model and serial number of your appliance. This information is given on the data plate inside your appliance. -
Page 33: Electrical Connection
Electrical connection Electrical connection U.K. Non-rewireable plugs (BS 1363) All electrical work should be carried out The fuse cover must be re-fitted when by a suitably qualified and competent changing the fuse, and if the fuse cover person in strict accordance with current is lost, the plug must not be used until a local and national safety regulations suitable replacement is obtained. -
Page 34: Installation
Installation Ventilation To avoid a hazard due to instability Air at the back of the appliance gets of the appliance, it must be fixed in warm. The appliance housing unit must accordance with the instructions. be constructed to allow sufficient space for ventilation. -
Page 35: Before Installation
They are no longer required because the furniture door is now fitted to the appliance door. All the necessary parts are supplied or can be ordered from the Miele Spare Parts Department. Stainless steel front ^ On no account should the spacers... -
Page 36: Building-In Dimensions
Building-in dimensions Niche height [mm] K 9457 iD 1220 - 1236 K 9557 iD 1397 - 1413 K 9757 iD 1772 - 1788... -
Page 37: Adjusting The Door Hinges
Adjusting the door hinges The door hinges are set ex-works to – If you would like the appliance door enable the door to be opened wide. to be cushioned so that it opens more softly, the spring tension on the However, if the opening angle of the appliance door can be adjusted. -
Page 38: Changing The Door Hinging
Changing the door hinging ^ Slide the door outwards and lift it off Before building the appliance in, you will need to decide on which side the door is to be hinged. If left hand door ^ Unscrew the fixing screws d hinging is required, follow the completely, and loosely screw them instructions below. - Page 39 Changing the door hinging ^ Unscrew ball joint b using a ^ Replace the hinges in their diagonally opposite corners b. spanner, and remove soft-close mechanism c together with the ball ^ Use a powered screwdriver to secure joint. the hinges; screws a are self-tapping.
- Page 40 Changing the door hinging ^ Push the appliance door onto the pre-fitted screws, and then tighten the screws. ^ Replace covers a, b and c. ^ Replace the locking pins into the top of the hinges to prevent the doors opening too far.
-
Page 41: Building In The Appliance
Maximum weight of Appliance furniture door in kg The housing unit must be carefully K 9457 iD aligned using a spirit level before K 9557 iD installing the appliance. The unit corners must be at right angles, as... -
Page 42: Preparing The Appliance
Building in the appliance Preparing the appliance ^ Open the appliance door. ^ Slide cover strip a into the holder in the middle of the appliance as illustrated with the bumps facing downwards. The bumps will fit into the keyhole slots. ^ Using a screwdriver, remove cover ^ Position the mains electricity cable so c from the top corner of the... - Page 43 Building in the appliance Building in the appliance ^ Fit cover g onto fixing bracket h. ^ Secure fixing bracket h to the bottom of the appliance with screws i (M5 x 15). ^ Carefully remove the protective foil from sealing strip j. –...
-
Page 44: Securing The Appliance In The Niche
Building in the appliance Securing the appliance in the On furniture with door fittings (e.g. stubs, seals etc) the dimension of niche these must be taken into account when making sure there is a gap all round of 42 mm. ^ Pull the appliance forwards by the dimension of the door fitting to keep the gap at 42 mm all round. -
Page 45: Fitting A Furniture Door
Building in the appliance ^ Break off the protruding end of bottom cover e. It is no longer required. ^ Fit angled cover g onto bottom fixing bracket c. ^ Close the appliance door. Fitting a furniture door ^ Loosen screws b on the top and bottom fixing brackets c. - Page 46 Building in the appliance ^ Using a pencil, lightly mark a line ^ Hang the furniture door onto adjusting bolts h. down the centre of the inside of the furniture door. ^ Loosely attach nuts c on the ^ Hang fixing bracket d with the fitting adjusting bolts.
- Page 47 Building in the appliance Securing the appliance door to the furniture door: ^ Close the door and align it with ^ Screw fixing bracket a into the neighbouring furniture doors. pre-drilled holes in the appliance ^ Whilst counterholding the adjusting door using hexagonal screw b.
- Page 48 Building in the appliance ^ Replace all the covers. To make sure the appliance is correctly fitted: – The door must close properly. – The door must not touch the furniture carcase. – The seal at the top edge of the handle side must fit properly.
- Page 52 Alteration rights reserved / 4008 M.-Nr. 07 471 430 / 00 K 9457 iD, K 9557 iD, K 9757 iD...