Table of Contents
Advertisement
Quick Links
Advertisement
Table of Contents

Related Manuals for NEC US40a


Summary of Contents for NEC US40a
- Page 1 US40a N8120-011F User's Guide 2nd Edition, March 2009 856-122300-111-01...
- Page 2 Use a shielded and properly grounded I/O cable to ensure compliance of this unit to the specified limits of the rules. Notes: (1) No part of this manual may be reproduced in any form without the prior written permission of NEC Corporation. (2) The contents of this manual may be revised without prior notice.
-
Page 3: Safety Indications
Be sure to read this section carefully. NOTES ON SAFETY - Be sure to read this section - The following includes information necessary for proper and safe operation of US40a. For details of component names described in this section, See Chapter 1. Safety Indications Follow the instructions described in this User's Guide for your safety use of US40a. -
Page 4: Symbols Used In This Guide And Warning Labels
Do not touch US40a components with wet hand. Otherwise, an electric shock may be caused. Keep water or liquid away from US40a. Otherwise, an electric shock or a fire may be caused. Indicates a general prohibited action that cannot be specifically identified. -
Page 5: Safety Notes
Safety Notes This section provides notes on using your US40a safely. Read this section carefully to ensure proper and safe use of US40a. For symbols, see "SAFETY INDICATIONS" provided earlier. General WARNING Do not use US40a for services which may directly affect human lives and that critically high reliability is required. -
Page 6: Power Supply And Power Cord Use
Do not install US40a where you need an extension cord. Use of a cord that does not meet the power specifications of your US40a may heat up the cord and cause a fire. -
Page 7: Installation, Relocation, Storage, And Connection
CAUTION Do not install US40a in any place other than specified. Do not install US40a in the following places or any place other than specified in this Guide. Failure to follow this instruction may cause a fire. a dusty place ■... -
Page 8: Battery Unit
Always charge battery by the specified method. When charging battery, follow procedures described in User's Guide of US40a. Using any other method may cause a heat generation, an ignition, and/or liquid leakage. Do not give any shock on the battery unit. -
Page 9: During Operation
US40a including the cables. Failure to follow this warning may cause a fire or an electric shock. Keep pet animals away from US40a. Excreta and/or body hair of the pet animals may enter US40a and result in a fire or an electric shock. Do not block the ventilation opening. -
Page 10: Wireless Features
Keep US40a at least 30 cm away from the internal artificial cardiac pacemaker. Pay attention to use US40a at the place at least 30 cm away from the internal artificial cardiac pacemaker. The internal artificial cardiac pacemaker may be influenced by the radio wave. -
Page 11: Care And Internal Components Handling
Do not disassemble, repair, or alter US40a. Never attempt to disassemble, repair, or alter US40a on any occasion. Failure to follow this instruction may cause an electric shock or fire as well as malfunctions of US40a. Disconnect the power plug before accessing inside US40a. -
Page 12: For Proper Operation
The battery unit may be weakened or dead. Be sure to connect the power cord of US40a to the power outlet if you need to use US40a for a long time. -
Page 13: Features For Future Enhancement
Features for Future Enhancement Please note that currently we do not guarantee the following operation of below mentioned features. These features are reference only for future enhancement. Adding new user Joining domain Transmission of setting information through common.txt Specifying "Auto Delivery of Remote Connections" in Startup Setting Starting in safe mode Regarding the Transportation of this System This system and/or associated options and accessories may be using lithium metal batteries or... -
Page 14: Preface
About This Guide This manual is a guide for proper setup and use of your US40a. This manual also covers useful procedures for dealing with difficulties and problems that may arise during setup or operation of your US40a. -
Page 15: Organization Of This Guide
US40a. Chapter 5 Operation and Maintenance provides you with all the information necessary to maintain successful operation of US40a. This chapter also includes helpful information for solving problems that might occur with... -
Page 16: In The Package
Transfer to Third Party Make sure to provide this guide and all the accessories along with US40a to a third party. Disposal Dispose of US40a, battery, and all the option devices according to all national laws and regulations. -
Page 17: Table Of Contents
Clicking/Double-clicking/Drugging ..................11 Using Expansion Features of Touch Pad ................11 Wireless LAN Features........................12 Notes on Use of Wireless LAN ....................12 Notes on Security in Use of Wireless LAN Devices ..............13 Security Features Available for US40a..................14... - Page 18 Preventing Sniffing (Intercept)....................14 Preventing Unauthorized Accesses ..................14 Setting Security in Higher Level...................15 Setting up Wireless LAN......................15 Available Wireless LAN Features .....................16 Wireless Connection of US40a with Peripheral Supporting Wireless LAN (Host Machine)16 Installation .............................17 Installation ..........................17 Battery............................19 Battery Pack ..........................19 Notes on Use of Battery in US40a.....................20...
- Page 19 Date and Time ........................... 87 Power Options........................... 88 Desktop Background Setting..................... 89 Certificate Import ........................90 Chapter 3 Using Advanced Features ...............91 Using Dual Display in Connection of US40a to Virtual PC ............92 VPN Connection..........................94 System Configuration........................ 94 Structure..........................95 Intranet:..........................95 VPN Setting Procedure for US40a ....................
- Page 20 Returning Write Filter Settings to Factory Default .............135 Auto Logon User Setting......................136 Chapter 5 Operation and Maintenance ............137 Cleaning...........................137 Cleaning of US40a ......................137 Troubleshooting........................138 Problem when Using Combination of Two or More Thin Clients ........138 Problems with Connections of RDP/ICA/Internet Time .............138 Problems with Built-in USB SmartCard Reader ..............138...
-
Page 21: Chapter 1 About Us40A
Chapter 1 About US40a This chapter tells you how to install, connect, and shutdown US40a. -
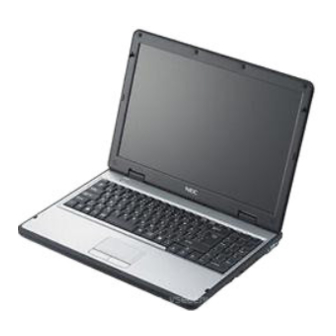
Page 22: Names And Functions Of Components
2 About US40a Names and Functions of Components The names and functions of components in US40a are described below. Front View (in the state where the LCD panel is opened) LCD panel Keyboard (function keys) (see page 7) Touch pads (see page 7, 11) -
Page 23: Left Side View
About US40a 3 Left Side View Microphone connector Connect a microphone to this connector. Lineout connector Connect a headphone or an external speaker to this connector. USB ports (2) Connect a device having the USB interface to each of these ports. -
Page 24: Right Side View
4 About US40a Right Side View Wireless LAN button Slide this button to the right to enable wireless LAN. USB port SmartCard reader Security feature for user authentication VGA port Connect with an external monitor. -
Page 25: Rear View
About US40a 5 Rear View LAN connector Connect with a LAN network system. Supports 10/100BASE-TX network subsystem. Security lock slot Install an antitheft device to this lock. Power connector Connect with the attached AC adapter. -
Page 26: Bottom View
6 About US40a Bottom View Speaker Standard battery bay Battery removal latch Ventilating port Additional battery bay... -
Page 27: Component Functions
About US40a 7 Component Functions Keyboard (Function Keys) The keyboard includes twelve function keys F1 - F12. A function key pressed together with the Fn key performs a specific function. Some of function keys (printed in blue) are previously programmed to have two functions. -
Page 28: Status Leds
Lighting green NUM lock is activated. LAN LED Blinking green The LAN feature is enabled. slowly Blinking green US40a is connected to LAN but data are rapidly being transferred. Lighting green US40a is connected to LAN. Wireless LAN Lighting green US40a is connected to wireless LAN. -
Page 29: Wireless Antennas
2 to 3 cm. USB2.0 Ports Three USB ports are located on US40a to allow peripherals conforming to the USB standard (e.g. printers and DVD drives) to be connected to US40a. -
Page 30: Express Card Slot
US40a. US40a can accept two types of Express Cards, or Express Card/34mm (width 34 mm) and Express Card/54 mm (width 54 mm and L shape). The connectors on Express Cards of both types have the same width (34 mm). -
Page 31: Use Of Touch Pad
About US40a 11 Use of Touch Pad Clicking/Double-clicking/Drugging Clicking Put the pointer on an icon or a folder and press the left click button once. If you press the right click button, you can select one of operations shown by the right button clicking. -
Page 32: Wireless Lan Features
To connect US40a to a network, an optional wireless LAN access point is required. Turn off the power of US40a or switch off the wireless LAN feature in an area where medical authorities prohibit usage of this product. Moreover, even in the medical... -
Page 33: Notes On Security In Use Of Wireless Lan Devices
If you cannot deal with security settings by yourself, contact your service representative. NEC does not assume any responsibility for any losses caused by problems occurred due to no security measures or unavoidable circumstances concerning wireless LAN specification. -
Page 34: Security Features Available For Us40A
US40a completely. Preventing Sniffing (Intercept) The wireless LAN of US40a supports the WEP (Wired Equivalent Privacy) feature. Defining an encryption key by using the WEP feature, you can encrypt wireless LAN communication data among communication devices using the specific encryption key. -
Page 35: Setting Security In Higher Level
To use encryption based on WPA, remote devices to be connected to US40a must support the same security feature. Setting up Wireless LAN For how to set up the wireless LAN of US40a, see "Wireless Network Connection" described in this User’s Guide. -
Page 36: Available Wireless Lan Features
Wireless Connection of US40a with Peripheral Supporting Wireless LAN (Host Machine) Using US40a and an optional peripheral (host machine) supporting wireless LAN allows LAN to be used without cable connections. For example, US40a can be connected to Internet through a router or terminal adapter supporting wireless LAN. -
Page 37: Installation
Do not install US40a in any place other than specified. ■ Do not use US40a on your knee for a long time. ■ Do not use US40a with your hands being put on keyboard or palm rest portion ■ for a long time. * It is recommended that US40a... - Page 38 18 About US40a Do not place US40a in the following places. Placing US40a in such places may cause malfunctions of US40a. Places with drastic changes in temperature (e.g., near a heater, air conditioner, or refrigerator) Places with strong vibration Places where corrosive gases exist (in environment where sulfur vapor may be dispersed in the air).
-
Page 39: Battery
About US40a 19 Battery US40a can be operated only by the attached or optional battery pack without use of the AC adapter. Battery Pack The battery pack available for US40a uses lithium-ion battery. Lithium-ion batteries are valuable and recyclable resources. -
Page 40: Notes On Use Of Battery In Us40A
When US40a is not used for a long period, remove the battery pack with the remaining battery level of about 50% and save it in a cool place. This can lengthen the battery life. When US40a is operated for a long time only by the battery, use the power saving feature of US40a. -
Page 41: Action To Be Taken When Remaining Battery Level Becomes Low During Battery Driving
Terminate applications being used and turn off the power of US40a. If the power of US40a is not turned off still without power supply through an AC outlet, US40a is entered into the state set by [Power Options] in the [Control Panel]. -
Page 42: Battery Charge Procedure
Battery Charge Procedure If you connect the AC adapter to US40a with the battery pack installed and to an AC outlet, then battery charge is automatically started. The battery is charged while the power of US40a is ON. -
Page 43: Battery Refreshing
Neither pull out the AC cable nor turn off the power during battery refreshing. Failure to follow this may cause the battery to operate incorrectly. Turn on the power of US40a and press F2 to display the SETUP screen. Select [Advanced] → [All Battery Calibration]. Select [OK]. -
Page 44: Adding Battery Pack
Always charge battery by the specified method. When charging battery, follow procedures described in User's Guide of US40a. Using any other method may cause a heat generation, an ignition, and/or liquid leakage. Do not give any shock on the battery unit. - Page 45 A dummy battery is installed in the additional battery bay at the front right side of the bottom of US40a. Slide the battery release latch to the depth by using a ballpoint pen o the like to release the lock. Then remove the dummy battery.
-
Page 46: Replacing Battery Pack
Replacement Interval Conduct battery refreshing if US40a can be operated only for a short period after full battery charging (with Battery status LED being on). If the refreshing cannot recover the operation period sufficiently, purchase a new battery pack and replace the old one with the new one. -
Page 47: Battery Pack Replacement Procedure
Windows and turn off the power of US40a. Do not install or remove the battery pack from US40a if not required particularly. Failure to follow this may cause the battery pack to be defected. - Page 48 28 About US40a Remove the battery pack. Push a new battery pack at a slant and push the lock side of the battery pack. A click occurs to lock the battery pack. Note the orientation of the battery pack in the installation.
-
Page 49: Connections
About US40a 29 Connections This section describes the procedure of connecting cables and a power cord to US40a. WARNING Observe the following instructions to use US40a safely. Failure to follow these instructions may result in death or serious personal injury. See pages iv to xi for details. - Page 50 30 About US40a Connect the power connector of the AC adapter to the AC power port on US40a. Connect the power plug of the power cord to an AC outlet. IMPORTANT: Before the connections, turn off the power of US40a and those of peripherals to be connected.
-
Page 51: Turning On Power Of Us40A
This section describes the procedure of turning on the power of US40a. Open the LCD panel of US40a. Press the power button at the upper left corner of the keyboard of US40a. The power of US40a is turned on. After the NEC logo, the desktop screen of US40a appears. POWER button... -
Page 52: Setting Up System Bios
US40a. Because the information provided by the SETUP is specified in the most standard and optimum state at the shipment of US40a, the SETUP is not required in most cases. Use the SETUP in the cases described below as necessary. -
Page 53: Starting
About US40a 33 Starting The NEC logo appears on the display screen after US40 is powered on. When you press F2 in the status, SETUP is started to display the main menu screen. If a password is specified in a previous SETUP activation, the dialog box requiring you to enter the password appears as follows. -
Page 54: Description Of Keys And Screens
34 About US40a Description of Keys and Screens You can use the following keys to operate the SETUP. (The functions of keys appear at the bottom of the screen.) Indicates the menu item appearing currently. Setting item Indicates that there are one or more submenu items. -
Page 55: Parameters And Their Description
About US40a 35 Parameters and Their Description The SETUP screen largely includes five menus as follows: Main menu Advanced menu Boot menu Security menu Exit menu You can select a sub menu out of one of these menus to see a detailed function. The following describe the functions and parameters available in menus displayed on the screen and the values of the parameters at the shipment. - Page 56 After US40a is entered into the suspended state under the environmental condition apart from the range in which the operation of US40a is secured (temperature: 10ºC - 35 ºC and humidity: 20% - 80%) Check the system clock about once per month. It is recommended that, if the system requires high time precision, a proper time server (NTP server) is used to meet the requirement.
-
Page 57: Advanced
About US40a 37 Advanced If you move the cursor to [Advanced], then the Advanced menu appears. The items which can be set on the Advanced menu screen and their functions are described below. See the table below for the items. -
Page 58: Boot
38 About US40a Boot If you move the cursor to [Boot], then the Boot menu appears which allows you to set the booting order. -
Page 59: Security
About US40a 39 Security If you move the cursor to [Security], then the Security menu appears. When you press Enter under selection of Supervisor Password or User Password, the screen for registering or changing the password appears. You can set the password on the screen. -
Page 60: Exit
When you press Enter, [Discard changes and exit setup?] screen appears. If you select [Ok], SETUP is terminated without saving the newly selected information in CMOS. Then US40a automatically reboots the system. Select [Cancel] to return to the Exit menu screen. - Page 61 About US40a 41 Discard Changes Select this item not to save newly selected information in CMOS. When you press Enter, [Discard changes?] screen appears. If you select [Ok], SETUP returns to the Exit menu without saving the newly selected information.
-
Page 62: Using Us40A
US40a is a Thin Client terminal to be connected with a virtual PC. The minimum system configuration of Thin Client system requires only a single US40a and a virtual PC (see "Basic Configuration"). -
Page 63: Basic Configuration
About US40a 43 Basic Configuration The minimum system configuration for the Thin Client system requires only a single US40a and a server which hosts the virtual PC. Configure the network settings of US40a as the initial settings and specify the destination port of a virtual PC using the remote desktop connection. Then, you are ready to connect with the virtual PC. -
Page 64: Extension 1
US40a in the download server, multiple US40a can be configured at one go rather than setting each US40a individually. To adjust the system clock of US40a to those of servers, use the internet time server to synchronize the clock. -
Page 65: Extension 2
DHCP server You can obtain IP address of US40a and other configuration information from the DHCP server. With DHCP option setting, US40a can be set so that the server address of CMO Manager can be obtained automatically. SSC is the server managing the virtual PC operating in VPCC. -
Page 66: Vpn
VPCC (Virtual PC Center) VPN GW US40a can use L2TP as a protocol for VPN. Specify L2TP at VPN gateway to which US40a is connected. Authentication server Authentication server certifies the connected user responding with the request from VPN... -
Page 67: Basic Operations Of Us40A
US40a is a thin client terminal to be connected with virtual PC. Thus, US40a is designed to minimize its setup procedure and operation. Basic operations of US40a are performed by starting the program for connecting it to a virtual PC or a tool in the Control Panel after selecting [Start]. - Page 68 Use Control Panel for any setting change of US40a. You can select the Control Panel from the [Start] menu. At the first startup of US40a, initial settings are applied. Name of each US40a is assigned, and the network is configured initially to obtain the network address from the DHCP server. If you do not need to modify the initial settings, use the [Control Panel] as is.
-
Page 69: Setting Date And Time
You can set the date and time of US40a on the [Control Panel]. Select [Control Panel] out of the [Start] menu and select [Date and Time]. Set the date and time of US40a on the [Date and Time Properties] dialog box. Specify the time zone required if necessary. -
Page 70: Configuring Network
50 About US40a Configuring Network By the initial setting of US40a, the network is configured to obtain the IP address automatically. If you want to change configuration, take the following steps. Check the network to which US40a is to be connected and connect a proper LAN cable to US40a. - Page 71 About US40a 51 The [Local Area Connection Properties] dialog box appears. Select [Internet Protocol (TCP/IP)] and click the [Properties] button.
- Page 72 52 About US40a The [Internet Protocol (TCP/IP) Properties] dialog box appears. Set the IP address, subnet mask, default gateway and other information applicable to the network environment.
-
Page 73: Configuring Connection For Virtual Pc
Select [Remote Desktop Connection] out of the [Start] menu to configure the virtual PC to be connected to US40a. Click [All Programs] out of the [Start] menu and select [Remote Desktop Connection]. Enter the computer name or IP address of the virtual PC to be connected to US40a in the "Computer" field. NOTES: For detailed settings of the virtual PC, click the [Options] button. -
Page 74: Connecting To Virtual Pc
"Computer" field. US40a is connected to the virtual PC. The logon dialog box of the virtual PC appears. After you have logged on the virtual PC, the desktop of the virtual PC appears. You can access various programs out of the [Start] menu. -
Page 75: Logoff From Virtual Pc
Logoff from Virtual PC To quit from the virtual PC, select [Start] → [Logoff] from the task bar of the virtual PC. When you log off from the virtual PC, the screen returns to the desktop screen of US40a. Shutdown of US40a... -
Page 76: Auto Connection To Virtual Pc
56 About US40a Auto Connection to Virtual PC Using the [Startup Setting] feature, you can automatically connect US40a to the virtual PC at logon to US40a.The program initiated at startup can be specified in users. Click [Control Panel] out of the [Start] menu and select [Startup Setting]. -
Page 77: Chapter 2 Using Features Of Us40A
This chapter describes how to use various features of US40a. In US40a you may run the program to connect to a virtual PC from [All Programs] in the [Start] menu or launch a tool from the [Control panel] to perform basic operations. -
Page 78: Local Area Connection
58 Using Features of US40a Local Area Connection The Local Area Connection allows you to provide settings for the wired LAN of US40a. You can specify the IP address of US40a, the DNS server and other information. For the setting procedure, see "Configuring Network". -
Page 79: Wireless Network Connection
Wireless Network Connection To use wireless LAN for US40a, define the network to be used as described below. You can select the wireless network to be connected to US40a, provide detailed settings for the connection and specify the IP address. -
Page 80: Remote Desktop Connection
60 Using Features of US40a Remote Desktop Connection The Remote Desktop Connection is used to connect US40a to a virtual PC. The following window appears when you click [Options] button on [Remote Desktop Connection]. Remote Desktop Connection... -
Page 81: Connection To Citrix Server
Using Features of US40a 61 Connection to Citrix Server Using the [Program Neighborhood], you can connect US40a to the Citrix Presentation Server. You can also use the Citrix XenApp for the connection. Citrix Program Neighborhood... -
Page 82: Terminal Connection Manager
Using the Terminal Connection Manager allows you to connect with virtual PC or terminal server by the simplified operation. US40a supports the following two kinds of connection type: Used to connect with virtual PC or terminal server Used to connect with Citrix XenApp or Presentation Server. -
Page 83: Connect / Disconnect
Terminal Connection Manager, then click the [Connect] button. When connection starts, "Connecting" appears in "State" field. NOTE: "Connecting" appears when the client process for each connection type entry is started. It does not mean US40a has been connected with virtual PC or server. - Page 84 64 Using Features of US40a To exit from the connecting entry, perform logoff on the desktop of virtual PC, XenApp, or Presentation Server you have logged on. Selecting an entry and clicking the [Disconnect] button disconnects the session being connected.
-
Page 85: Create Rdp Connection Entry
Using Features of US40a 65 Create RDP Connection Entry To add an RDP connection entry, click the [New...] button on Terminal Connection Manager. Select "Remote Desktop Protocol (RDP)" on [Connection Type] dialog box, then click the [Next >>] button. On the [New Connection Entry] dialog box, enter the name of new connection entry and... - Page 86 66 Using Features of US40a Now, the new connection entry is added to Terminal Connection Manager. NOTE: The contents of "C:\NEC\Templete\Default.rdp" is applied to parameters for RDP connection entry. If you changed the default parameter value, you need to modify this file.
-
Page 87: Edit Rdp Connection Entry
Using Features of US40a 67 Edit RDP Connection Entry If you intend to modify the connection entry, select an entry you want to change, then click the [Edit] button on Terminal Connection Manager. NOTE: Parameters for [Edit RDP Connection Entry] have the same meaning as those of [Remote Desktop Connection] (mstsc.exe). - Page 88 68 Using Features of US40a To specify options for server authentication and TS gateway, click the [Advanced] button.
-
Page 89: Create Ica Connection Entry
Using Features of US40a 69 Create ICA Connection Entry To add an ICA connection entry, click the [New...] button on Terminal Connection Manager. Select "XenApp ICA Protocol (ICA)" on [Connection Type] dialog box, then click the [Next >>] button. On the [Add New ICA Connection] dialog box, enter the name of new connection. If you want to connect to the server, click the radio button "Server"... -
Page 90: Edit Ica Connection Entry
For the items that cannot be specified in this menu, specify them in the relevant ICA file in "C:\NEC\Connections". See the help of [Program Neighborhood] for details. Terminal Connection Manager does not have the feature to specify... -
Page 91: Integrated Control Panel
Integrated Control Panel By the shipping default, the control panel of Terminal Connection Manager contains [Mosue] and [Keyboard]. NOTE: To add a control panel applet to the Integrated Control Panel, copy the CPL or EXE file in the directory "C:\Program Files\NEC". -
Page 92: Option
72 Using Features of US40a Option Terminal Connection Manager has the following features as option. Set this connection as default selection This feature is useful if you use the specific entry almost every day. Automatically start this connection This feature is useful if you want to connect to the specific virtual PC or server constantly. -
Page 93: Startup Folder
Using Features of US40a 73 Startup Folder The Startup Folder can contain the program automatically initiated at logon. It contains no program in the initial state. Administrator users can save the program in the Startup Folder. -
Page 94: Startup Program Setting
If you fail to run application program using [Startup Program Setting], start the application program in manual mode without using [Startup Program Setting]. US40a does not support "Auto Delivery of Remote Connections". Do not specify this feature in [Startup Program Setting]. -
Page 95: Network Utilities
Using Features of US40a 75 Network Utilities The [Network Utilities] can be used to check network connection. You can use the Ping, Ipconfig, and netstat commands to check the network connection. Network Utilities Run any of the commands Ping, Ipconfig and netstat used to check the network status. - Page 96 Ipconfig Utility Command "Ipconfig" indicates the TCP/IP configuration. NOTE: You can check the MAC address of US40a in the normal network interface in the following steps: 1. Open [Network Utilities] on the [Control Panel]. 2. Select "Ipconfig" and execute it with option "/all". The MAC address appears on the Physical Address line in the execution result.
-
Page 97: Version Information
Using Features of US40a 77 Version Information The [VersionInfo] dialog box allows you to view the system information and version information of application programs updated or installed by using the application installer. Version Information NOTE: If the system is not updated, a message "Update information file is not found"... -
Page 98: Update
Click [Update] on the Update dialog box to start the update. Auto update Checks download servers on US40a booting to obtain files subject to update if any and update them automatically. The auto update takes place if you check [Automatically update on booting] on the [Update Settings] dialog box. - Page 99 [Startup Setting] runs at the system reboot, quit the program. When Update feature reboot the system, the program being run is quitted. Update feature applies US40a-specific format for the update file of MSI or EXE format. MSI or EXE file of general format cannot be used in Update feature.
- Page 100 80 Using Features of US40a NOTES: The download server is required for update. To verify the operation of auto update, first perform update with [The check dialog of an automatic update start is displayed] being checked. Then, uncheck to [The check dialog of an automatic update start is displayed] if no confirmation message is needed during operation.
-
Page 101: Update Settings
DHCP option number shown in the "DHCP Option No." field. Protocol Select the protocol used to connect US40a to a download server (HTTP or FTP). Server Name and Server Relative Path Enter the name (or IP address) and server relative path of the download server (with up to... - Page 102 Set the retry count when the network is not ready for update. Automatically update on booting Enables or disables the auto update on US40a booting. The check dialog of an automatic update start is displayed Selects whether the dialog to reconfirm update execution is displayed or not when finding...
-
Page 103: Sounds And Audio Devices
Using Features of US40a 83 Sounds and Audio Devices Use the [Sounds and Audio Devices Properties] dialog box to set the information on sound and audio device including the volume of US40a. Sounds and Audio Devices Properties... -
Page 104: Keyboard
84 Using Features of US40a Keyboard Use the [Keyboard Properties] dialog box to set the information on the keyboard including the character repeat rate. Keyboard Properties... -
Page 105: Mouse
Using Features of US40a 85 Mouse Use the [Mouse Properties] dialog box to set the information on the mouse including double-click speed and pointer options. Mouse Properties... -
Page 106: Display
86 Using Features of US40a Display Use the [Display Properties] dialog box to set the information on the display including screen saver and resolution. Display Properties... -
Page 107: Date And Time
Using Features of US40a 87 Date and Time Use the [Date and Time Properties] dialog box to set the information on the date and time of US40a including time zone and Internet time. Date and Time Properties... -
Page 108: Power Options
88 Using Features of US40a Power Options The [Power Options Properties] dialog box allows you to set the information on the power including battery alarm and power saving. Power Options Properties... -
Page 109: Desktop Background Setting
Using Features of US40a 89 Desktop Background Setting You can use the image file obtained by Update feature as desktop background. Desktop Background Setting... -
Page 110: Certificate Import
90 Using Features of US40a Certificate Import You can import the certificate file obtained by Update feature to Thin Client. Certificate Import... -
Page 111: Chapter 3 Using Advanced Features
Chapter 3 Using Advanced Features This chapter describes how to use advanced features of US40a. -
Page 112: Using Dual Display In Connection Of Us40A To Virtual Pc
[Settings] in the [Display Properties], the dual display is disabled. To use a virtual PC in the dual display mode, connect US40a to the virtual PC in the following steps: Connect the secondary display to US40a. - Page 113 Select [RDP Client for Dual Display] out of the dropdown list and click [OK]. Startup Program Setting Reboot US40a or, after logging off US40a once, log on to US40a with the same user. The desktop screen appears. The [Remote Desktop Connection] dialog box automatically appears.
-
Page 114: Vpn Connection
US40a Installation site Intranet When US40a starts VPN connection using L2TP + IPSec protocol, the IP address of intranet is given and US40a comes into the state as if it is connected with the intranet, allowing an access to VPCC. -
Page 115: Structure
– IPSec is used for data encryption. For authentication of IPSec, [Pre-shared Key] is used. The character string of Pre-shared Key specified here will also be specified in US40a. – Selects a policy to assign an IP address for US40a (to assign at L2TP gateway or at external authentication server). -
Page 116: Vpn Setting Procedure For Us40A
Creating VPN (L2TP) Connection Establish VPN (L2TP) connection in the following steps: Invalidate the write filters of US40a according to "Write Filter Setting". Log on to US40a as Administrator. Click [Connect to] in the [Start] menu and select [Show all connections]. - Page 117 Using Advanced Features 97 On the dialog box for selecting the Network Connection Type, select [Connect to the network at my workplace] and click [Next >]. Network Connection Type On the dialog box for selecting Network Connection, select [Virtual Private Network connection] and click [Next >].
- Page 118 98 Using Advanced Features On the dialog box for specifying Connection Name, enter a proper connection name and click [Next>]. Connection Name On the dialog box for selecting a proper VPN server, enter the name or IP address of the VPN server and click [Next >].
- Page 119 Using Advanced Features 99 On the screen for selecting the use of Smart Cards, specify whether your smart card is used or not and click [Next >]. Select [Do not use my smart card] here. Smart Cards On the [Completing the New Connection Wizard] dialog box, click [Finish]. Completing New Connection Wizard...
- Page 120 100 Using Advanced Features Click [Properties] on the [Connect vpn] dialog box. Connect vpn Select the [Security] tab on the [vpn Properties] dialog box and click [IPSec Settings]. Select [Use pre-shared key for authentication] on the [IPSec Settings] dialog box, enter the value of the pre-shared key assigned to the L2TP gateway, and click [OK].
- Page 121 Select the [Networking] tab on the [vpn Properties] dialog box, select [L2TP IPSec VPN] out of [Type of VPN:] and click [OK]. Type of VPN Validate write filters of US40a according to "Write Filter Setting and Releasing Procedures". Adding Created VPN Connection to [Start] Menu...
-
Page 122: Vpn Connection For Us40A
102 Using Advanced Features VPN Connection for US40a Provide VPN connection for US40a in the following steps: Open the [Network Connection] dialog box and click the [Connections] icon created above. If the created VPN connection is added to the [Start] menu, select the added connection out of [All Programs] in the [Start] menu. -
Page 123: Setting Rdp Encryption Level
Using Advanced Features 103 Setting RDP Encryption Level With the Terminal Service of Windows Server 2003, you can specify the encryption level in terminal service configuration. Select [Terminal Service Configuration] → [Connections] → [RDP-Tcp Properties]. Then you can see the encryption level in the [General] tab. Available options are FIPS-compliant, High, Client-compatible and Low. -
Page 124: Time Synchronization
104 Using Advanced Features Time Synchronization To connect US40a to the Internet time server to synchronize the time, follow the steps below: Select [Start] → [Control Panel] → [Date and Time] and activate [Date and Time Properties]. Select the [Internet Time] tab, provide settings as described below, and click [OK]. -
Page 125: Software Update
The software update files for US40a will be stored in the folder of either the FTP or HTTP server. In addition to the above, the list of files "list.txt" that specifies the files to be obtained by US40a is also stored in the FTP or HTTP server folder. -
Page 126: Preparation
HTTP: C: \Inetpub\wwwroot\US40aUPDATE Store the update file in the folder you have created. Store file "list.txt" in the same folder. Create a list of files in list.txt which US40a captures from the folder. Create the list in the Unicode format. -
Page 127: Using Advanced Features
2.2 Setup of DHCP Server By the factory default, US40a obtains network addresses from DHCP server. In the network that uses the DHCP server, you may skip the procedure to provide settings for update on US40a by using DHCP options. - Page 128 108 Using Advanced Features 2.3 Setup for Update for US40a Update US40a in the following steps: On the [Control Panel] of US40a, click the [Update] icon. Update...
- Page 129 Using Advanced Features 109 Check the current settings in [Update] dialog box. If you want to change settings, click [Modify] and set parameters appropriately. Update Settings Use DHCP Options Check the [Use DHCP Options] checkbox to obtain settings information for update. Then, select DHCP Option numbers for items [Protocol], [Server Name], and [Server Relative Path].
- Page 130 If the network is not ready at update, connections are retried by the specified count. Automatically update on booting If checked, US40a accesses to the specified server every time when it is booted, and checks the software version. If any updated software is found, US40a performs update automatically.
-
Page 131: Executing Software Update
Using Advanced Features 111 3. Executing Software Update Provide software update in the following steps. In Manual Mode Open [Update] out of the [Control Panel] of US40a. Press the [Update] button. Then the update processing is executed. In Auto Mode (at US40a booting) Select [Control Panel] →... -
Page 132: Checking Software Version Of Us40A
112 Using Advanced Features 4. Checking Software Version of US40a To check the version information on US40a, select [Start] → [Control Panel] → [Version Information]. NOTES: US40a manages internally the versions of common.txt, certificates (.cer or others) and background image (.bmp) based on the time at which each of the files is created. -
Page 133: Chapter 4 Administrator Features
Chapter 4 Administrator Features This chapter describes the administrator features of US40a. -
Page 134: Changing Computer Name
114 Administrator Features Changing Computer Name The procedure of changing the computer name of US40a is described below. Log on to US40a as Administrator. Select [Start] → [Control Panel] → [System] and activate the [System Properties]. Open the [Computer Name] tab and click [Change]. - Page 135 Change the computer name on [Computer Name Changes] dialog, and click [OK]. Computer Name Changes Rebooting is requested. Reboot US40a. After rebooting, make sure that the computer name of US40a is changed and the new name appears. IMPORTANT: Joining domain feature is not supported.
-
Page 136: Default User Accounts
Administrator (Windows logon user name: Administrator, Default password: Administrator) In the Administrator account, all features of US40a can be used. Possible features are as follows: installation of additional application software, installation of additional devices including printers, addition of application software available in the User and PowerUser accounts and change of other settings. - Page 137 Administrator Features 117 The table below lists the programs and setting tools available for each of the accounts. User PowerUser Administrator Local Area Connection Local Area Connection Local Area Connection • • • Programs Wireless network Wireless network Wireless network •...
-
Page 138: Startup Setting
This section describes how to add a new option to the startup setting. IMPORTANT: This modification should be done just after US40a is booted. This allows unnecessary modification not to be stored by saving the settings of write filters (or running fbwfmgr /commit). - Page 139 Administrator Features 119 Start [Command Prompt]. To start [Command Prompt], select [Start] → [Run], enter "cmd" in the [Open] field and press [OK]. Run fbwfmgr /commit C: "\WINDOWS\system32\us_startup_option.txt". Confirm that the following message appears: Changes made to file \WINDOWS\system32\us_startup_option.txt on volume C: are committed.
-
Page 140: Usb Storage Device Setting
120 Administrator Features USB Storage Device Setting US40s can specify whether USB storage devices are available or not. Conduct the procedure described here with the Administrator account. Starting [USB Storage Device Setting] Select [Start] → [Control Panel] → [USB Storage Device Setting] and open [USB Storage Device Setting]. - Page 141 Administrator Features 121 Disabling Use of USB Storage Devices (Read and Write Disabled) On the [USB Storage Device Setting] dialog box, select [Disabled (D)] in [USB Storage Device] block. Disabling Use of USB Storage Device Click [OK]. The [Settings Modify] dialog box appears. Click [OK].
- Page 142 122 Administrator Features Enabling Use of USB Storage Devices in Read-only Mode (Read Enabled but Write Disabled) On the [USB Storage Device Setting] dialog box, select [Enabled (E)] in [USB Storage Device] block. Select [Read Only (R)] in [Access Permissions] block. Read-only Click [OK].
- Page 143 Administrator Features 123 Enabling Use and Update of USB Storage Devices (Read and Write Enabled) On the [USB Storage Device Setting] dialog box, select [Enabled (E)] in [USB Storage Device] block. Select [Write Enabled (W)] in [Access Permissions] block. Write Enabled Click [OK].
- Page 144 US40a operates as follows: With [Disabled (D)] being selected, the [Found New Hardware Wizard] appears when a new USB storage device is connected to US40a for the first time. Then you will perform either of the following operations. In either operation, driver installation fails and the USB storage device is unavailable for US40a.
- Page 145 Administrator Features 125 NOTE: - Continued Found New Hardware Wizard Found New Hardware Wizard...
-
Page 146: Write Filter Settings
Therefore, before additional software and/or drivers can be installed in the Administrator account, write filters must always be invalidated. After US40a is modified completely, be sure to validate the settings of write filters to protect US40a file system. Write Filter Setting and Releasing Procedures Write filters can be set on the command prompt. - Page 147 Setting File Folders for Invalidating Write Filter Protection The FBWF write filter protection can be invalidated per file folder. Data written in a file folder whose protection is invalidated remains unchanged if US40a is rebooted. Setting Procedure Run the following command on the command prompt screen: FbwfMgr /addexclusion C: [file folder whose protection is to be invalidated] Ex.: Invalidating protection of folder C: \Program Files\NEC\TEST\Config...
-
Page 148: Adding Device Such As Printer
128 Administrator Features Adding Device Such As Printer This section describes how to add a device such as a printer for US40a. Log on to US40a as Administrator. To install the required driver from the relevant USB storage device, first enable the use of the USB storage device according to "USB Storage Device Setting"... -
Page 149: Using Additional Software
Installing software updating files periodically including antivirus software: In use of US40a with their settings changed or due to the policy of the operation system, antivirus software may be installed in US40a. Any antivirus software updates virus pattern files periodically. To use such software as antivirus software, according to "Write Filter Setting and... -
Page 150: Installing Vpcc Tools
130 Administrator Features Installing VPCC Tools US40a stores the installer for the following software. You can install them on Administrator menu. CMO1.1 CMO2.0 DPM1.3 DPM2.0 Select [Start] → [All Programs] → [VPCC Tools] and select a desired installer. (For CMO and DPM, up-version/down-version is not supported. -
Page 151: Using Dpm
If you apply the DPM package that was created in usual way, the application of package is disabled at the next startup due to the feature of write filter. To perform package distribution by DPM, you need to create a scenario/package dedicated to US40a to control the write filter, according to the examples below. -
Page 152: Updating Software By Using Application Installer
USB storage device. To use USB storage device, create a folder named US40a in the USB storage device and save files to be installed and their list (list.txt) to be needed to be updated in the folder. -
Page 153: Using Internet Explorer And Windows Media Player With User Account
Mover to "C: \US40a\Tools". Run "IE_Enable.bat". At end of the setting change, "Done." appears. Log on to US40a with the User account. Make sure that the icon of Internet Explorer is added and available in [All Programs] in the [Start] menu. -
Page 154: Disabling Change Of Network Settings With User Account
Disabling Change of Network Settings with User Account For the factory default of US40a, you can modify network settings including IP addresses with the User account. To make it impossible to change network settings with the User account, follow the procedure below. -
Page 155: Enhancing Write Filter Setting
Open [My Computer] out of the [Start] menu. Move to "C:\NEC\Tools". Run "WF_SetDefault.bat". US40a is automatically rebooted and the original write filter settings are applied. IMPORTANT: If the settings of write filters are enhanced, any settings changed through the Control Panel are not kept but returned to the original settings after rebooting US40a. -
Page 156: Auto Logon User Setting
136 Administrator Features Auto Logon User Setting You can specify the user who can automatically logon to the system when US40a starts. The Auto Logon User can be set on [Control Panel] using Administrator account. Auto Logon User Setting IMPORTANT:... -
Page 157: Chapter 5 Operation And Maintenance
Do not disassemble, repair, or alter US40a. ■ Cleaning of US40a Wipe off dirt on the surface of US40a with soft cloth. If dirt is hard to be removed, it can be cleaned in the following steps. IMPORTANT: Do not use volatile solvent including thinner and benzine for cleaning. -
Page 158: Troubleshooting
For example, if the color depth of the first connection of US40a to a virtual PC is 16 bits, then set the color depth of the next connection to the other Thin Client (e.g.: US100 or RDP Client of WindowsXP) to 16 bits. -
Page 159: Problems With Ic Card Manager
* Authentication by Windows SmartCard using the certificate is available. With IC card of Std-9 format, a message "Failed to change/unlock PIN" is displayed: When the IC card is inserted into the IC card reader built-in US40a, you will fail →... -
Page 160: Relocation And Storage
Do not disassemble, repair, or alter US40a. ■ Do not remove the lithium battery. ■ Do not handle US40a with the power cord of US40a being connected to a power ■ source. CAUTION Observe the following instructions to use US40a safely. Failure to follow these instructions may cause a fire, personal injury, or property damage. -
Page 161: Appendix A Wireless Lan Specification List
Such factors as connected devices, radiowave environment, surrounding obstacles, installation environment, usage status and used OS, applications and software may affect communication rate and distance. *2: It may take much time to connect US40a to a passive scanning channel. -
Page 162: Ieee802.11N Draft2.0
Such factors as connected devices, radiowave environment, surrounding obstacles, installation environment, usage status and used OS, applications and software may affect communication rate and distance. *3 It may take much time to connect US40a to a passive scanning channel. -
Page 163: Appendix B Lcd Display
Appendix B LCD Display While LCD displays are manufactured based on extremely high-precise technology, dead pixels* (slightest black pixels or bright red, blue or green pixels) may appear. Depending on the view angle against LCD display, color and/or brightness irregularities may occur. Please note that these are caused by the characteristics of LCD displays and thus are not defects. -
Page 164: Appendix C Specification
Appendix C Specification Item Specification VIA C7-M ULV 1.2GHz Chipset VIA CN896, 8237A (for Core) & ITE 8512 (for KB controller) Dual DDRII-SODIMM sockets for 512MB (2GB) Display 15.4" WXGA TFT (1280 x 800) Storage DOM : 2GB Pointing device Touch Pad with 2 buttons Express card Express card 34/54... -
Page 165: Appendix D Re-Installation Cd
Connect the CD-ROM drive to US40a with the power being off. Insert "Disk #1" into the CD-ROM drive and turn on the power of US40a. Message "Press any key to boot from CD ..". appears during boot of US40a. Press any key. - Page 166 (This page is intentionally left blank.)