Table of Contents
Advertisement
Advertisement
Table of Contents

Related Manuals for Beko CSM 87300 G


Summary of Contents for Beko CSM 87300 G
- Page 1 CSM 87300 G Oven Manual User...
- Page 2 Please read this user manual first! Dear Customer, Thank you for purchasing this Beko product. We hope that you get the best results from your product which has been manufactured with high quality and state-of-the-art technology. Therefore, please read this entire user manual and all other accompanying documents carefully before using the product and keep it as a reference for future use.
-
Page 3: Table Of Contents
Important instructions and warnings How to use the hob for safety and environment General information about cooking ....18 General safety ..........4 Using the hobs ..........18 Electrical safety ..........4 ~ How to operate the oven Product safety ..........5 Intended use .......... -
Page 4: For Safety And Environment
This section contains safety installation, read the instructions instructions that will help protect from carefully. risk of personal injury or property .. Do not operate the product if it is damage. Failure to follow these defective or has any visible instructions shall void any warranty. -
Page 5: Product Safety
• If the power connection cable for • Any work on electrical equipment the product is damaged, it must and systems should only be be replaced by the manufacturer, carried out by authorized and its service agent or similary qualified persons. qualified persons in order to avoid •... - Page 6 • Keep all ventilation slots clear of • Unattended cooking on a hob with obstructions. fat or oil can be dangerous and may result in fire. NEVER try to • Do not heat closed tins and glass jars in the oven. The pressure extinguish a fire with water, but that would build-up in the tin/jar switch off the appliance and then...
-
Page 7: Intended Use
Intended use • Electrical products are dangerous to children. Keep children away • This product is designed for from the product when it is domestic use. Commercial use operating and do not allow them will void the guarantee. to play with the product. •... -
Page 8: Package Information
Compliance with RoHS Directive: The product you have purchased complies with EU RoHS Directive (2011/65/EU). It does not contain harmful and prohibited materials specified in the Directive. Package information • Packaging materials of the product are manufactured from recyclable materials in accordance with our National Environment Regulations. -
Page 9: General Information
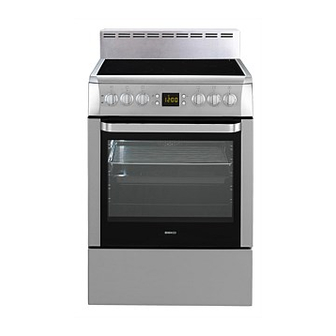
Overview 5--+-----+ 4--+----+ Front door Burner plate Handle Fan rnotor (behind steel plate) Bottorn drawer Larnp Tray Grill heating elernent Shelf positions Wire shelf Control panel Warning larnp Therrnostat larnp Function knob Single-circuit cooking plate Rear left Dual-circuit cooking plate Front left Digital tirner Single-circuit cooking plate Front right Single-circuit cooking plate Rear right... -
Page 10: Package Contents
Placing the wire shelf and tray onto the Package contents telescopic racks properly ccessories supplied can vary depending on Telescopic racks allow you to install and he product model. Not every accessory remove the trays and wire shelf easily .... - Page 11 Placing the wire shelf and tray onto the S lash back assembl wire racks properly Products without telescopic pUll-out: With product without a telescopic pull-out, the baking tray and grill are pushed in with their edges between the runners on the side mounts.
-
Page 12: Technical Specifications
Basics: Information on the energy label of electrical ovens is given in accordance with the EN 50304 standard. Those values are determined under standard load with bottom-top heater or fan assisted heating (if any) functions. echnical specifications may be changed alues stated on the product labels or in the ithout prior notice to improve the quality of documentation accompanying it are... -
Page 13: Before Installation
Product must be installed by a qualified person in accordance with the regulations in force. The manufacturer shall not be held responsible for damages arising from procedures carried out by unauthorized persons which may also void the warran . Preparation of location and electrical installation for the product is under .. -
Page 14: Installation And Connection
using the product without a grounding installation in accordance with the local re ulations. ttDANGER: \The product must be connected to the I'-..L..~ mains supply only by an authorised and qualified person. The product's warranty period starts only after correct installation. -
Page 15: Future Transportation
accordance with lEE directives. Failure to obey • Adjusting the feet of oven this instruction may cause operational problems Vibrations during use may cause cooking and invalidate the product warranty. vessels to move. This dangerous situation can be avoided if the product is level and balanced. -
Page 16: Preparation
Tips for saving energy Initial use The following information will help you to use Time setting your appliance in an ecological way, and to save Before you can use the oven, the time must energy: be set. If the time is not set, oven will not •... -
Page 17: First Cleaning Of The Appliance
WARNING Hot surfaces cause bums! Current time settings are cancelled in case II-..Product may be hot when it is in use. Never f power failure. It needs to be readjusted. touch the hot burners, inner sections of the oven, heaters and etc. Keep children away. To change the time of the day you have Always use heat resistant oven gloves when previously set:... -
Page 18: How To Use The Hob
When you want to move the saucepan onto General information about cooking another cooking zone, lift and place it onto the cooking zone you want instead of sliding Never fill the pan with oil more than one third of it. Do not leave the hob unattended when heating oil. - Page 19 Dual-circuit cooking plate 18-20/12-14 cm Single-circuit cooking plate 14-16 cm Single-circuit cooking plate 18-20 cm is list Turning off the ceramic plates of advised diameter of pots to be used on Turn the plate knob to OFF (upper) position. related burners. Using multi-segmented cooking zones Multi-segmented cooking zones allows to cook with different size of saucepans on the same...
-
Page 20: How To Operate The Oven
roast and does not run out when the meat is General information on baking, cut. roasting and grilling • Fish should be placed on the middle or lower rack in a heat-resistant plate. tHot surfaces cause bums! Tips for grilling Product may be hot when it is in use. -
Page 21: Operating Modes
heating r~Trted 2. Set the Function knob to the desired bottom/tOp Top heating, bottom heating plus fan operating mode. On the rear wall) are in operation. Hot Oven heats up to the adjusted temperature and » air is evenly distributed throughout maintains it. -
Page 22: Using The Oven Clock
Grill+Fan If no cooking setting is made, time of the day cannot be set. Grilling effect is not as strong as in Full Grill Cooking time will be displayed once the • Put small or medium-sized cooking starts. portions in correct shelf position under the grill Cooking by specifying the cooking time: heater for grilling. -
Page 23: Using The Keylock
up to the set temperature. It maintains this Once the keylock is activated, "On" appears » temperature until the end of cooking time. on the display and the Keylock symbol (10) 7. After the cooking process is completed, remains lit. "End"... - Page 24 Setting the alarm clock 1. Press Program key (1) to activate the alarm time s mbol +" / .. -" 2. Adjust the alarm time using .. (5/6) keys. » Alarm symbol will remain lit and the alarm time will appear on the display once the alarm time is set.
-
Page 25: Cooking Times Table
Cooking times table Baking and roasting 1 st rack of the oven is the bottom rack. timings in this chart are meant as a . Timings may vary due to tem food, thickness, type and your own .._IUI preference of cooking. Rack position (**) In a cooking that requires preheating, preheat •... -
Page 26: How To Operate The Grill
cooking time. Dampen the layers of dough . WARNING with a sauce composed of milk, oil, egg and 'IClose oven door during grilling. yoghurt. Hot surfaces may cause burns! • If the pastry takes too long to bake, pay Switching on the grill care that the thickness of the pastry you 1. -
Page 27: Maintenance And Care
Do not use stearn cleaners to clean the appliance as this rnay cause an electric Service life of the product will extend and the shock. possibility of problems will decrease if the roduct is cleaned at re ular intervals. Cleaning the hob Glass ceramic surfaces Disconnect the product from mains Wipe the glass ceramic surface using a piece of... -
Page 28: Cleaning The Control Panel
Removing the oven door 1. Open the front door (1). 2. Open the clips at the hinge housing (2) on the right and left hand sides of the front door Cleaning the control panel by pressing them down as illustrated in the Clean the control panel and knobs with a damp fi ure. -
Page 29: Removing The Door Inner Glass
Pin housing Removing the door inner glass Metal frame The inner glass panel of the oven door can be removed for cleaning. Use the spade provided with the product to Install the inner glass panel so that the remove the inner glass for cleaning. printed side will face upwards. - Page 30 Ed •• I.III.I~III$I. »> • .. It is normal thatsteam escapes during operation: This is not a fault. Igl!!I •• m.I"!.$.i!II.I"g!gg!I!lg~ »> • .. When the metal parts are heated, they may expand and cause noise. This is not a fault. Igl!!lggg~g!r@.
- Page 32 Part no: 285.3013.40 Rev: AB/22.02.2013...