
Related Manuals for Miele KM 470


Summary of Contents for Miele KM 470
-
Page 1: Operating Instructions
Operating instructions Ceramic hobs KM 470 KM 473 It is essential to read these operating instructions before installing or using the machine, to avoid the risk of accident or damage to the machine M.-Nr. 05 144 100... -
Page 2: Table Of Contents
Contents Contents Description of the appliance ......... 3 Model description . -
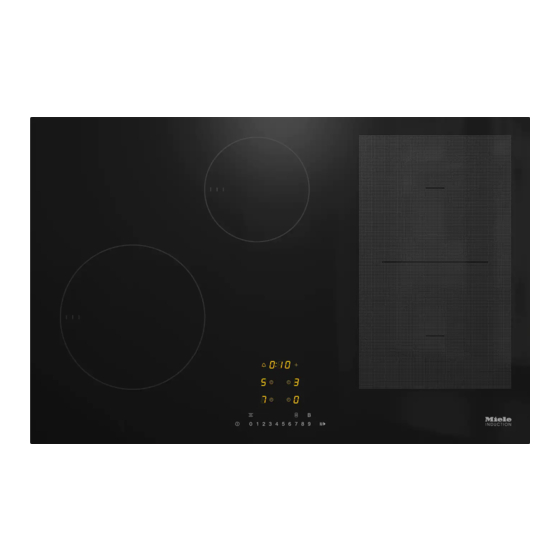
Page 3: Description Of The Appliance
Description of the appliance Description of the appliance Model description KM 470 b d e Induction cooking zones Induction cooking zone with booster function BOOSTER Control area KM 473 b d e Induction cooking zones Induction cooking zone with booster function... -
Page 4: Control Area
Description of the appliance Control area Sensor switches for: Hob ON/OFF Child safety lock Cooking zone controls and displays (see appropriate section) Booster function for rear left cooking zone (see section on “Booster function”) Indicator lights for: Booster function Child safety lock... -
Page 5: Cooking Zone Controls And Displays
Description of the appliance Cooking zone controls and displays sensor switches for selecting the power settings Cooking zone symbol Displays: = Cooking zone ready for use 1 to 9 = Power settings = Residual heat = Auto-heat up active (alternates with the selected continued cooking setting) ß... -
Page 6: Warning And Safety Instructions
Warning and Safety instructions Warning and Safety instructions Do not connect the appliance to Building in and connection the mains electrical supply by an The appliance must be installed extension lead. Extension leads do not and connected by a suitably quali- guarantee the required safety of the ap- fied and competent person in strict ac- pliance. - Page 7 Warning and Safety instructions Use this appliance for the prepara- Correct usage tion of meals only. Any other usage Before installing and using the ap- is at the owner’s risk and could be dan- pliance for the first time, read the gerous.
- Page 8 Warning and Safety instructions Remove any soiling as quickly as Protection from damage possible to prevent it from burning Do not drop anything on the ap- on to the ceramic surface and ensure pliance. Even a light object such that pan bases are clean, dry and free as a salt cellar, could cause damage in of grease before use.
- Page 9 Warning and Safety instructions Do not use the hob as a resting Protection from burning place for anything else and never The surface of the hob is hot when place metallic objects on it. This could in use, and remains hot for a time lead to danger of the article, depend- after being switched off.
- Page 10 Warning and Safety instructions Any repairs may only be carried Appliance fault out by suitably qualified and com- In the event of damage or any petent persons to ensure safety. Re- breakages or cracks the ceramic pairs and other work by unqualified per- hob must be switched off immediately sons could be dangerous.
- Page 11 Warning and Safety instructions Do not use plastic or aluminium foil Further safety notes containers. These melt at higher temperatures and could damage the For people fitted with a heart pace ceramic surface. Fire hazard. maker: Please note that the area immediate- Do not use pans with very thin ly surrounding the hob is electro bases and never heat up empty...
-
Page 12: Before Using For The First Time
Before using for the first time Before using for the first time The data plate for your appliance is General notes supplied with this documentation. This Before using for the first time or after a should be stuck into the space pro- power cut you will have to de-activate vided at the end of the instruction the child safety lock. -
Page 13: Disposal Of The Packing Material
Before using for the first time Disposal of the packing ma- Disposal of your old appliance terial Old appliances contain materials which can be reclaimed or recycled. Please The transport and protective packing contact your dealer, your local waste has been selected from materials collection centre or scrap merchant which are environmentally friendly for about potential recycling schemes. -
Page 14: Cleaning And Heating-Up For The First Time
Before using for the first time Metal components have a protective Cleaning and heating-up for coating which may give off a slight the first time smell when the hob is heated up for Before using for the first time, clean the the first time. -
Page 15: Use
– Induction cooking zones do not work The induction principle with unsuitable pans or with no pan An induction coil is located under each on them. cooking zone. When a zone is switched If a pan is taken off the zone during on this coil creates a magnetic field. -
Page 16: Saucepans
Pan size Saucepans The diameter of the pan base must be Types of pans of a minimum size for the induction zone to function. If the pan is too small Induction cooking zones only work the zone may not switch on and the when covered by a pan which has a symblol ß... -
Page 17: Function Of The Sensor Switches
Function of the sensor swit- Switching on the hob ches The hob must be switched on before any of the zones can be used. This hob is equipped with electronic sensor switches. These react to finger Proceed as follows: contact. Touch the ON /OFF sensor switch s. -
Page 18: Settings
Settings The range of settings is the same for all cooking zones: Cooking process Settings Melting butter, chocolate etc. 1 - 2 Dissolving gelatine Preparing yoghurt Thickening sauces containing egg yolk and butter 1 - 3 Warming small quantities of food / liquid Keeping warm food which sticks easily Cooking rice Warming liquid and half-set foods... -
Page 19: Auto Heat-Up
Auto heat-up Continued cook- Heat-up time ing setting in minutes and When Auto heat-up has been acti- seconds vated, the cooking zone switches on (approx.) automatically at the highest setting (heat up) and then switches to the con- 1 : 15 tinued cooking setting which you have 1 : 40 previously selected. -
Page 20: Booster Function
This extra boost of energy is only avail- Booster function able for the rear left zone by taking a The rear left cooking zone is equipped proportion of energy away from the with a Booster function, i.e. an increase front left cooking zone. Whilst the Boos- to the power level. -
Page 21: Switching Off
Switching off Residual heat indicator After the cooking zones or the hob To switch off a cooking zone: have been switched off, the residual Touch the sensor switches heat of the cooking zones which are still hot is indicated by an H : at the same time . -
Page 22: Child Safety Lock
To activate the child safety lock: Child safety lock Touch the sensor switch for the child Keep children away from the hob for safety lock a until the indicator their own safety. In addition, your ap- light above it comes on. pliance is equipped with a child safety lock to prevent children switching on the hob and the cooking zones or alter-... -
Page 23: Safety Switch-Off
If you wish to use the cooking zones Safety switch-off once again, switch the hob back on again in the usual way by touching Safety switch-off with an the ON / OFF sensor s . over-long cooking time Your hob is fitted with a safety switch- Safety switch-off if the sensor swit- off feature in case you forget to switch ches are covered... -
Page 24: Overheating Protection
To prevent he overheating protection Overheating protection from cutting in again observe the follow- The induction coil on a cooking zone ing advice: can overheat if: – only use pots and pans which con- – the pan does not conduct the heat duct the heat properly, properly. - Page 25 If the cooling elements overheat: Proceed as follows: The cooking zone cooling elements If a drawer is fitted directly under- can overheat if the appliance does not neath the hob, ensure that there is have sufficient ventilation. sufficient space between the drawer and its contents and the underside The overheating protection affects the of the appliance in order to ensure...
-
Page 26: Cleaning And Care
Cleaning and care Cleaning and care Never use a steam cleaner to clean The ceramic surface can be this appliance. Pressurised steam cleaned using a proprietary clean- could cause permanent damage to ing agent for ceramic surfaces. Fol- the surface and to components for low the manufacturer’s instructions which the manufacturer cannot ac- on the packaging. - Page 27 Cleaning and care The ceramic surface should be Should any sugar, plastic or alumi- cleaned regularly, preferably after each nium foil spill or fall on to the hob while use. it is in use, first switch off the hob. Then immediately, while the surface is still Before cleaning allow the hob to cool hot, use a shielded scraper blade to...
-
Page 28: Problem Solving Guide
Problem solving guide Problem solving guide ... a ß appears in the display for a Repairs to electrical appliances cooking zone must only be carried out by a suit- ably qualified and competent per- – Check whether the zone was son to ensure safety. - Page 29 Problem solving guide ... one of the following faults has oc- ... The cooling fan continues to run cured: after the appliance has been switched off – The Booster function has been auto- matically switched off early . This is not a fault. The fan will continue running until the appliance has cooled –...
-
Page 30: Electrical Connection
Electrical connection Electrical connection switch (including switch, fuses and re- Electrical connection U.K./Z.A. lays according to EN 60 335). Read the separate installation instruc- tion booklet before installing and con- Important U.K. necting this appliance. The appliance is supplied for connec- tion to an a.c. -
Page 31: Customer Contact
Electrical connection Customer contact The address of the nearest Service Department is given on the back page. The voltage and rated load are given on the data plate. Please quote these data, together with the model description and serial number when contacting the Ser- vice Department. - Page 32 Alterations right reserved 04/5100 This paper consists of cellulose which has been bleached without the use of chlorine.