
Related Manuals for Electrolux GourmeXpress


Summary of Contents for Electrolux GourmeXpress
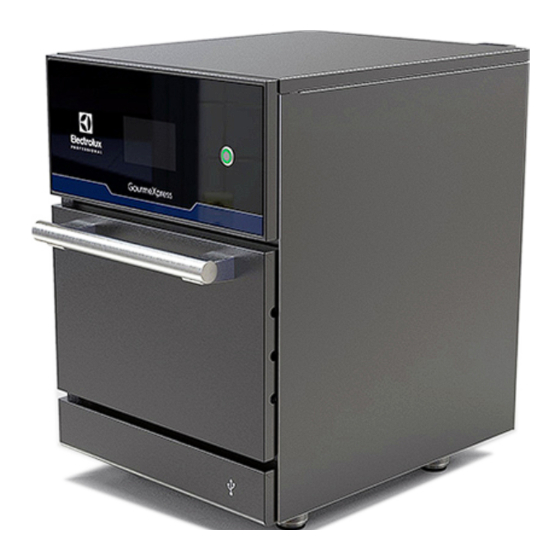
- Page 1 High Speed Oven GourmeXpress Installation and operating manual * EPR-PROBT-D- 2023.07 *Original instructions...
- Page 2 Installation diagram 60mm(Min.) 60mm 1.8m...
- Page 3 EI = Electrical Inlet C = Side with open door view EQ = Equipotential screw D = Power cable length max. 1.8 m A = Side view E = Circuit breaker B = Front view...
- Page 4 Foreword Read the following instructions, including the warranty terms before installing and using the appliance. Visit our website www.electroluxprofessional.com and open the Support section to: Register your product Get hints & tips of your product, service and repair information The installation, use and maintenance manual (hereinafter Manual) provides the user with information necessary for correct and safe use of the appliance.
-
Page 5: Table Of Contents
Contents A WARNING AND SAFETY INFORMATION....................7 General information ........................7 Personal protection equipment ......................7 General safety ..........................8 Protection devices installed on the appliance ..................8 Safety signs to be placed on the appliance or near its area ..............9 Reasonably foreseeable improper use .................... - Page 6 G.4.1 Copy appliance from/to USB....................22 G.4.2 Display brightness......................22 G.4.3 Beeper Volume......................... 22 G.4.4 Alarm Sound ........................22 G.4.5 Temperature Unit ......................22 G.4.6 Edit Recipe image ......................22 G.4.7 Recipe Passcode ......................23 G.4.8 Appliance Passcode ......................23 G.4.9 Demo Mode ........................
-
Page 7: Awarning And Safety Information
WARNING AND SAFETY INFORMATION General information To ensure safe use of the appliance and a proper understanding of the manual it is necessary to be familiar with the terms and typographical conventions used in the documentation. The following symbols are used in the manual to indicate and identify the various types of hazards: WARNING Danger for the health and safety of operators. -
Page 8: General Safety
Stage Protective Safety footwear Gloves Glasses Safety helmet garments ○ ● ○ ○ — Scrapping Key: ● PPE REQUIRED ○ PPE AVAILABLE OR TO BE USED IF NECESSARY — PPE NOT REQUIRED During these operations, gloves must be cut-resistant. Failure to use the personal protection equipment by operators, specialized personnel or users can involve exposure to damage to health (depending on the model). -
Page 9: Safety Signs To Be Placed On The Appliance Or Near Its Area
Safety signs to be placed on the appliance or near its area Prohibition Meaning do not remove the safety devices do not use water to extinguish fires (placed on electrical parts) Keep the area around the appliance clear and free from combustible materials. Do not keep flammable materials in the vicinity of the appliance Danger Meaning... -
Page 10: Transport, Handling And Storage
Residual risk Description of hazardous situation Electrocution Contact with live parts during maintenance operations carried out with the electrical panel powered Crushing or shearing Possible risk of injury to upper limbs during the closing operation of the appliance door. Tipping of loads When handling the appliance or the packing containing it, using unsuitable lifting systems or accessories or with the unbalanced load Chemical... -
Page 11: Positioning
5. This appliance must be grounded. Connect only to properly grounded outlet. See "GROUNDING INSTRUCTIONS" in D.10 Electrical connection chapter. 6. Install or locate this appliance only in accordance with the provided installation instructions. 7. Some products such as whole eggs and sealed containers – for example, closed glass jars – can explode and should not be heated in this appliance. -
Page 12: Appliance Space Limitations
• Do not spray water or use water jets, steam cleaner or high pressure cleaner. A.16 Preventive Maintenance In order to ensure the safety and performance of your equipment, it is recommended that service is undertaken by Electrolux Professional authorised engineers every 12 months, in accordance with Electrolux Professional Service Manuals. Please contact your local Electrolux Professional Service Centre for further details. -
Page 13: Appliance Disposal
– plumbing parts, components or consumable cleaning subject to local terms and conditions. products that are not approved by the manufacturer; Check on Electrolux Professional website the list of authorized customer care. GENERAL INFORMATION NOTE! -
Page 14: Copyright
Manufacturer Electrolux Professional SpA or any other Any supplements to the installation, use and maintenance service centre authorised by Electrolux manual the Customer receives from the Manufacturer will form Professional SpA. -
Page 15: Dinstallation And Assembly
INSTALLATION AND ASSEMBLY Introduction WARNING Refer “WARNING SAFETY INFORMATION“. To ensure correct operation of the appliance and maintain safe conditions during use, carefully follow the instructions given in this chapter. Check and, if necessary, level the appliance after positioning. Incorrect levelling can cause appliance malfunctioning. CAUTION Keep the ventilation openings in the appliance casing or in the installation... -
Page 16: Positioning
Back spacers installation The parts in wood and cardboard can be disposed of, respecting the current regulations in the country where the appliance is used. Positioning Appliance space limit Min distance for the passages enabling personnel to operate on the appliance. -
Page 17: Grounding Instructions
maximum leakage current must comply with current D.10.1 GROUNDING INSTRUCTIONS regulations. WARNING • Connect the mains plug to the mains socket only at the end of the installation. • Improper use of the grounding • Always use a correctly installed shockproof socket. can result in a risk of electric •... -
Page 18: Fproduct Description
Plastic containers Other instruments Special plastic containers suitable for oven use. Sealing tap, label Please carefully check if the plastic container can support medium-high Tableware temperature Temperature sensor Tableware CAUTION Do not use: When heating, you cannot have any • flammable container (paper/cardboard); cooking utensils inside the oven. -
Page 19: Usb Port
F.4.1 USB port F.4.2 Accessories provided 1. Remove the USB front panel from the lower part of the appliance. Oven shovel IMPORTANT Make sure to install the oven shovel support on the top of the appliance. non-stick tray with mesh NOTE! The panel is locked by magnets and pins. -
Page 20: Gappliance Set-Up
Main touch screen icons (cont'd.) Main touch screen icons (cont'd.) Back icon Cooling down icon Preheat icon Microwave icon Cavity temperature icon (the oven has reached the Fan speed icon [impingement] set temperature) Cancel Icon Customize programme icon Confirm icon Settings icon Important message icon Left arrow icon... -
Page 21: Set Auto Start
G.2.7 Energy save mode Touch the “Energy save mode“ button to set after how long the System Time appliance enter in energy saving mode. 03:03:30 NOTE! The countdown starts at the latest interaction with the touch screen and not when the set point AM/PM temperature has been reached. -
Page 22: Copy Appliance From/To Usb
Touch this button repeatedly to increase the brightness of the Appliance Copy Appliance from display. The display shows immediately the new setting. Copy Appliance to Once you reach the highest value, it starts again from the lowest one. Display Brightness 5 •... -
Page 23: Recipe Passcode
Delete button Demo Mode Yes • touch the image frame to select it or touch “ALL“ button to select all the stored images; • once selected, the image frame turns green; When “Demo mode“ is activated, standard appliance use (settings, cooking cycle, etc.) can be simulated, but heating •... -
Page 24: Use Expiration
Preheat Low Fan • microwave and impigment percentages for each cooking Speed stage. NOTE! Touch this button repeatedly to increase the speed of the fan. Before to start the cooking cycle, it is possible to The display shows immediately the new setting. change the programme settings and start the programme with new values, if Show Recipe Once you reach the highest value, it starts again from the... -
Page 25: Create A New Recipe
• Percentage of impingement (from 10% to 100% - each Search here... steps increases by 10%). Touch right arrows to create a new stage for the current recipe. Skweres Arancino Chicken Wings NOTE! It is possible to create up to 15 stages. To move among all cooking stages, touch right or left Sandwiches... -
Page 26: Create A New Recipe From Existing One
5. Touch here to assign an alarm to a cooking stage or a Stage index: preset time. Please refer to G.4.16 Alarm Type to choose if assign the Alarm Enable: alarm to cooking stage or a preset time. You can programme up to 3 different alarm time points Manual Cancel: during the cooking process to receive an alert through the... -
Page 27: How To Change A Preheat Temperature Value
• Touch the “Boot up“ icon , the display will show the main screen. Warning Search here... 20/06/2023 11:59:00 AM Food in the oven? 00:01:50 Skweres Arancino Chicken Wings Sandwiches Croissants Pizza Confirm with “Confirm“ icon to continue the cooking cycle or touch “Cancel“... -
Page 28: Iappliance Cleaning
IMPORTANT • Confirm with “Confirm“ icon if you want to proceed The same message also appears when door anyway or touch “Cancel“ icon to exit and return to the closing is hindered by an object or dirt. recipe start display. Be sure to remove the obstacle or clean the dirty area. - Page 29 7. Remove all the debris in the cooking area. 2. Touch the “Shutdown“ icon for 3 seconds. 28/02/2023 11:59:00 AM Search Here. . . Skweres Arancino Chicken Wings Sandwiches Croissants Pizza 3 sec • The appliance starts the rapid cooling phase. 3.
-
Page 30: Removable Bottom Rack
9. Allow to soak for 5 minute and scrub the stainless steel 11. Rinse with a clean damp cloth and fresh water. surface with a abrasive sponge. 5 min 12. Clean the upper impingement plate only with a damp cloth with neutral soap. -
Page 31: Non-Stick Trays Cleaning
3. Rinse with fresh water. I.4.3 Oven shovel cleaning 1. Wipe the aluminium shovel with a damp soft cotton cloth (or dish towel), neutral detergent and warm water. 40°C NOTE! Removable bottom rack is dishwasher safe. 2. Shake off the excess of water and lay flat to dry. I.4.2 Non-stick trays cleaning CAUTION... -
Page 32: Bottom Air Intake Filter Cleaning
I.4.5 Bottom air intake filter cleaning I.5.1 Replace the catalytic filters 1. Remove the USB front panel. 1. Unscrew manually the wing nuts of the punched filters cover and replace the catalytic filters. NOTE! The panel is locked by magnets and pins. 2. -
Page 33: Rear Chimney Cleaning
4. Rinse with fresh water. Shake off the excess of water and I.5.2 Rear chimney cleaning lay flat to dry. 1. Unscrew the 2 screws using a Phillips screwdriver. IMPORTANT Do not remove them completely. 2. Unlock the rear chimney from the two screws on the rear of the appliance. -
Page 34: Ktroubleshooting
Maintenance, inspections, checks and Frequency Responsability cleaning Appliance structure • Yearly • tightening of main bolts (screws, fixing sys- • Service tems, etc.) of appliance Safety signs • Yearly • check the readability and condition of safety • Service signs Electrical control panel •... -
Page 35: L Appliance Disposal
Anomaly Type of Possible causes Actions anomaly Oven cavity is dirty. Refer to chapter I APPLIANCE CLEANING. Wrong programme or menu Check programme or menu list and selected. choose right one. Loss of Bad cooking results. performance. Initial food condition is wrong Make sure to insert into oven cavity (frozen or chilled) food at the recommended condition. - Page 38 Electrolux Professional SPA Viale Treviso 15 33170 Pordenone www.electroluxprofessional.com...