
Related Manuals for Bosch GAL 18V-160


Summary of Contents for Bosch GAL 18V-160
- Page 1 GAL 18V-160 9 26 04 338 00 0 English (en) Français (fr) Español (es) 3 41 01 366 21 0 2022-10-21...
- Page 2 Instruction Manual Mode d'emploi Instrucciones de uso...
-
Page 3: For Your Safety
For your safety. Read all safety warnings and Do not use this battery charger WARNING all instructions. Failure to before you have thoroughly read and follow the warnings and instructions may completely understood this Instruc- result in electric shock, fire and/or serious tion Manual. - Page 4 Remove the battery from the charger and Disconnect the charger by pulling the plug pull the mains plug when not using for and not the cable. Do not operate the char- extended periods. Saving energy helps to ger with a damaged cable or plug; replace save the environment.
-
Page 5: Extension Cable
120 V – sin- and conductor cross-section must be ade- gle-phase a. c., with only GAL 18V-160 con- quate for the applicational case, in order to nected: prevent a voltage drop in the extension cable, power loss and overheating of the Max. -
Page 6: Fcc Warning
FCC Warning. The manufacturer is not responsible for radio or television reception, which can be radio interference caused by unauthorized determined by turning the device off and on, modifications to this device. Such modifica- the user is encouraged to try to correct the tions could void the user's authority to interference by one or more of the follow- operate the device. - Page 7 Symbols, Abbreviations and Terms Used. Symbol, character Explanation Make sure to read the enclosed documents such as the Instruction Manual and the General Safety Instructions. Before commencing this working step, pull the mains plug out of the socket. AMPShare is the shared battery system that allows you to use many tools from many professional brands with just one battery.
- Page 8 Character Unit of measurement, Explanation international Rated supply voltage Rated output direct voltage (rated battery voltage) Power input Frequency Maximum rated output direct current (max. charging current) Capacity Charge duration °C/ °F Temperature...
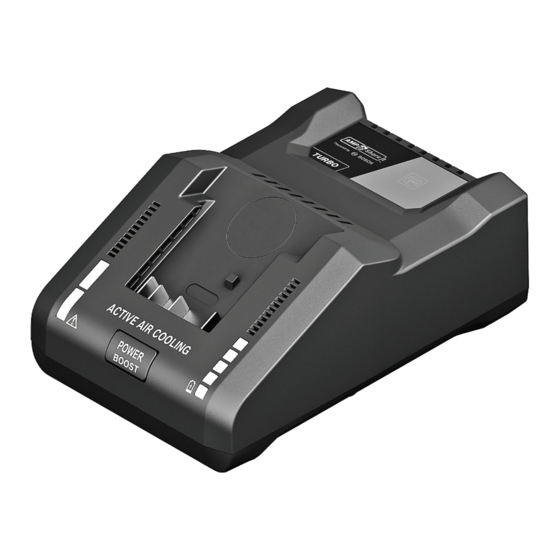
- Page 9 Technical description and specifications. Fig. 1 Charging compartment Red temperature monitoring/ error indicator Power boost button Wall mount Green battery charge- control indicator...
- Page 10 Type GAL 18V-160 Order number 9 26 04 338 00 0 Battery charging voltage (automatic voltage detection) 18 V Charging current 16.0 A Permissible battery temperature during charging 0 °C – 45 °C CORE18V... batteries: approx. 50 % / approx. 80 % Charging duration at battery capacity, approx.
-
Page 11: Installation
Installation. Before any work on the battery charger itself, pull the mains plug from the WARNING socket outlet. Wall mounting. e) Screw two round-head screws (not included in delivery scope) with a diam- Use mounting material suitable for the wall eter of 13/64"... -
Page 12: Starting Operation
Starting Operation. Observe the mains voltage! The voltage of The intelligent charging process automati- the power source must correspond with the cally detects the battery's charge condition data on the type plate of the battery charger. and charges it with the optimal charging cur- rent depending on the battery temperature Charging procedure. -
Page 13: Audio Signal
Power boost button. When the rapid charging is completed (approx. 50 % battery capacity reached), the Pressing the power boost button activates power boost button goes out. If the battery the rapid-charging mode. This can be done remains in the charger, it will continue to be before the battery is inserted or when the charged. -
Page 14: Working Instructions
Working instructions. A significantly reduced operating period During continuous or several successive after charging indicates that the battery is charging cycles without interruption, the worn out and must be replaced. charger may heat up. However, this is harm- less and does not indicate a technical defect of the battery charger. -
Page 15: Maintenance And Cleaning
Maintenance and Cleaning. Perform cleaning once a week in case of fre- – Ensure that metal chips do not enter the quent use. Observe the following guidelines: charger housing. – Keep the contacts in the slide-on shoe When the charger's power supply cord is clean. -
Page 16: Lithium-Ion Batteries
LITHIUM-ION BATTERIES. If equipped with a lithium-ion battery, the United States or Canada. The RBRC pro- battery must be collected, recycled or dis- gram provides a convenient alterative to posed of in an environmentally sound man- placing used Li-ion batteries into the trash or ner. -
Page 17: Pour Votre Sécurité
Pour votre sécurité. Lire tous les avertisse- Ne pas utiliser ce chargeur avant AVERTISSEMENT ments de sécurité et d’avoir bien lu et complètement toutes les instructions. Ne pas suivre les compris cette notice d’utilisation. avertissements et instructions peut donner Bien garder ces documents pour une utilisa- lieu à... - Page 18 Toujours veiller à une aération suffisante S’assurer que le câble est placé de manière pendant l’utilisation. Ne pas faire fonction- à ce qu’il ne soit pas possible de marcher ner le chargeur dans des armoires fermées dessus, de trébucher dessus ou de l’endom- ou à...
-
Page 19: Utilisation Du Chargeur
120 V courant alternatif monophasé si seu- de celle-ci doivent être appropriées à l’utili- lement GAL 18V-160 est connecté : sation afin d’éviter une baisse de tension dans la rallonge, une perte de puissance et Longueur du câble... -
Page 20: Avertissement Fcc
Avertissement FCC. Le fabricant n’est pas responsable des inter- la radio ou de la télévision, ce qui peut être férences radio provoquées par des modifica- déterminé en allumant et en éteignant tions non autorisées de cet appareil. De l’appareil, l’utilisateur est invité à essayer de telles modifications peuvent entraîner la corriger ces interférences en prenant une ou perte de l’autorisation de l’utilisateur à... - Page 21 Symboles, abréviations et termes utilisés. Symbole, signe Explication Lire impérativement les documents ci-joints tels que la notice d’uti- lisation et les instructions générales de sécurité. Avant d’effectuer ce travail, retirer la fiche de la prise de courant. AMPShare est le système de batterie commun qui vous permet d’utiliser de nombreux outils de nombreuses marques profession- nelles avec une seule batterie.
- Page 22 Signe Unité internationale Explication Tension d’entrée nominale Tension continue de sortie assignée (tension nominale de la batterie) Puissance absorbée Fréquence courant continu de sortie nominale max.(cou- rant de charge max.) Capacité Durée de charge °C/ °F Température...
- Page 23 Description technique et spécification. Fig. 1 Douille du chargeur Voyant rouge du contrôle de température/défaut Touche Power Boost Accrochage au mur Voyant vert de l'état de charge de la batterie...
- Page 24 Type GAL 18V-160 Référence 9 26 04 338 00 0 Tension de charge de la batterie (détermination auto- matique de la tension) 18 V Courant de charge 16.0 A Température autorisée de la batterie pendant la charge 0 °C – 45 °C Batteries CORE18V...
-
Page 25: Montage Au Mur
Montage. Avant d’effectuer des travaux sur le chargeur, retirer la fiche de la AVERTISSEMENT prise de courant. Montage au mur. f) Positionner les fentes de fixation murale du chargeur au-dessus des vis de fixation. Utiliser du matériel de fixation adapté au Pousser le chargeur vers le mur et le faire type de mur et au poids du chargeur et du glisser vers le bas pour fixer le chargeur... -
Page 26: Mise En Marche
Mise en marche. Tenir compte de la tension du réseau ! La Le processus intelligent de charge permet de tension de la source de courant doit corres- déterminer automatiquement l’état de pondre aux indications se trouvant sur la charge de la batterie et de charger cette der- plaque signalétique du chargeur. -
Page 27: Signal Sonore
Bouton Power Boost. Une fois la charge rapide terminée (environ 50 % de la capacité de la batterie est En appuyant sur le bouton Power Boost, le atteinte), le bouton Power Boost s’éteint. Si mode de charge rapide est activé. Cela peut la batterie reste dans le chargeur, elle conti- se faire avant d’insérer la batterie ou quand nue à... - Page 28 Indications pour le travail. Si l’autonomie de la batterie diminue consi- Des cycles de charge continus ou successifs dérablement après qu’une recharge a été et sans interruption peuvent entraîner un effectuée, c’est que la batterie est usagée et réchauffement du chargeur. Ceci est sans qu’elle doit être remplacée.
-
Page 29: Entretien Et Nettoyage
Entretien et nettoyage. En cas d’utilisation fréquente, effectuer un – Veiller à ce qu’aucun copeau métallique nettoyage une fois par semaine. Respecter ne pénètre dans le boîtier du chargeur. les indications suivantes : Si le câble d’alimentation du chargeur est –... - Page 30 BATTERIES LITHIUM-ION. Si le produit est équipé d’une batterie au Canada. Le programme du RBRC offre lithium-ion, la batterie doit être ramassée, une alternative pratique à la mise des piles au recyclée ou mise au rebut d’une manière qui Li-ion usées au rebut ou au ramassage ne soit pas nocive pour l’environnement.
-
Page 31: Para Su Seguridad
Para su seguridad. Lea íntegramente estas No emplee este cargador sin haber ADVERTENCIA advertencias de peligro e leído detenidamente antes estas ins- instrucciones. En caso de no atenerse a las trucciones de uso y sin haberlas com- advertencias de seguridad siguientes, ello prendido en su totalidad. - Page 32 Cuide que el cargador esté suficientemente Asegúrese de que la línea esté colocada de ventilado durante el funcionamiento. No deje manera que no se pueda pisar, tropezar con funcionar el cargador ni en armarios cerra- la misma, ni que pueda ser dañada de forma dos ni en la proximidad de fuentes de calor.
- Page 33 GAL 18V-160: de potencia y el sobrecalentamiento del car- gador. De lo contrario, se ocasionarán ries- Longitud de la línea Longitud de la línea...
- Page 34 Aviso FFC. El fabricante no se responsabiliza de las – Oriente la antena en otra dirección o interferencias de radio causadas por modifi- cámbiela de lugar. caciones no autorizadas en este aparato. – Aumente la distancia entre aparato y Dichas modificaciones pueden anular el receptor.
- Page 35 Simbología, abreviaturas y términos empleados. Símbolo Definición Es imprescindible leer los documentos que se adjuntan, como las ins- trucciones de servicio y las instrucciones generales de seguridad. Antes de realizar este paso de trabajo, sacar el enchufe de la red. AMPShare es el sistema de batería compartido que le permite usar muchas herramientas de muchas marcas profesionales con tan solo una batería.
- Page 36 Símbolo Unidad internacional Definición Tensión de entrada nominal Tensión continua de salida en vacío (Tensión nominal de la batería) Potencia absorbida Frecuencia corriente continua de salida, máx.(corriente máx. de carga) Capacidad Tiempo de carga °C/ °F Temperatura...
- Page 37 Descripción técnica y especificaciones. Fig. 1 Alojamiento de carga Indicador rojo de control de temperatura/falla Botón Power Boost Soporte de Indicador verde de pared estado de carga de batería...
- Page 38 Tipo GAL 18V-160 Nº de referencia 9 26 04 338 00 0 Tensión de carga de la batería (detección automática de tensión) 18 V Corriente de carga 16.0 A Temperatura admisible de la batería durante la carga 0 °C – 45 °C Baterías CORE18V...:...
-
Page 39: Montaje
Montaje. Siempre saque la clavija del enchufe antes de realizar cualquier trabajo ADVERTENCIA en el cargador. Montaje a la pared. e) Atornille en la pared o en los tacos dos tornillos de cabeza redonda (no inclui- Use un material de sujeción apropiado para dos en el suministro) con un diámetro el tipo de pared al que va ir sujeto el carga- de 13/64"... -
Page 40: Puesta En Marcha
Puesta en marcha. ¡Atención a la tensión de red! La tensión de Gracias al inteligente procedimiento de alimentación deberá coincidir con las indica- carga utilizado, el estado de carga de la bate- ciones en la placa de características del car- ría es detectado automáticamente y se gador. -
Page 41: Señal Acústica
Botón Power Boost. Al finalizar la carga rápida (tras alcanzar aprox. un 50% de la capacidad de la batería) Pulsando el botón Power Boost se activa el se apaga el botón Power Boost. La batería se modo de carga rápida. Esto se puede realizar sigue cargando si se deja dentro del carga- antes de insertar la batería o estando ésta ya dor. -
Page 42: Instrucciones Para La Operación
Instrucciones para la operación. Si después de haberla recargado, el tiempo En caso de efectuar recargas continuas o de funcionamiento de la batería fuese muy muy seguidas puede que llegue a calentarse corto, ello es síntoma de que está agotada y el cargador. -
Page 43: Mantenimiento Y Limpieza
Mantenimiento y limpieza. Límpielo semanalmente en caso de usarlo – Preste atención a que no penetren virutas con frecuencia. Observe las instrucciones metálicas en el interior del cargador. que a continuación se indican: Si la línea del cargador está dañada ésta –... - Page 44 BATERÍAS DE IONES DE LITIO. Si este producto está equipado con una Estados Unidos y Canadá. El programa batería de iones de litio, dicha batería debe RBRC proporciona una alternativa conve- recogerse, reciclarse o eliminarse de manera niente a tirar las baterías de Li-ion usadas a la segura para el medio ambiente.
- Page 45 FEIN Service FEIN Power Tools, Inc. FEIN Power Tools, Inc. 1000 Omega Drive 2735 Hickory Grove Road Suite 1180 Davenport, IA 52804 Pittsburgh, PA 15205 magdrillrepair@feinus.com www.feinus.com Canada Headquarter FEIN Canadian Power Tool Company C. & E. Fein GmbH Hans-Fein-Straße 81 323 Traders Boulevard East 73529 Schwäbisch Gmünd-Bargau, Germany Mississauga, Ontario L4Z 2E5...