Cuisinart Mix It In ICE-48 Series - Frozen Yogurt & Ice Cream Maker Manual
- Instruction and recipe booklet (16 pages) ,
- Instruction and recipe booklet (11 pages)
Advertisement
- 1 IMPORTANT SAFEGUARDS
- 2 BEFORE FIRST USE
- 3 FREEZING TIME AND BOWL PREPARATION
- 4 REFERENCE CARD
- 5 FEATURES AND BENEFITS
- 6 ASSEMBLY
- 7 MAKING SOFT SERVE ICE CREAM AND FROZEN DESSERTS
- 8 RECOMMENDED MIX-INS
- 9 SUGGESTED LIQUID TOPPINGS
- 10 DISASSEMBLING FOR CLEANING
- 11 CLEANING
- 12 STORAGE
- 13 TROUBLESHOOTING
- 14 Documents / Resources
IMPORTANT SAFEGUARDS


When using an electrical appliance, basic safety precautions should always be taken to reduce the risk of fire, electric shock, and/or injury, including the following:
- READ ALL INSTRUCTIONS BEFORE USING.
![shock hazard]() To protect against risk of electric shock, do not place cord, plug, or base of appliance in water or any other liquids.
To protect against risk of electric shock, do not place cord, plug, or base of appliance in water or any other liquids.- This appliance is not intended for use by persons (including children) with reduced physical, sensory, or mental capabilities, or lack of experience and knowledge, unless they are closely supervised and instructed concerning use of the appliance by a person responsible for their safety. Close supervision is necessary when any appliance is used by or near children. Children should be supervised to ensure that they do not play with the appliance.
- Turn the appliance OFF, then unplug from the outlet when not in use, before assembling or disassembling parts, and before cleaning. To unplug, grasp the plug and pull from the outlet. Never pull from the power cord. Make sure appliance is OFF when not in use, before putting on or taking off parts, and before cleaning.
- Avoid contact with moving parts. Keep hands, hair, clothing, as well as spatulas and other utensils away from appliance during operation to reduce the risk of injury and/or damage to the appliance.
- Do not operate any appliance with a damaged cord or plug, or after the appliance malfunctions or is dropped or damaged in any manner. Contact the manufacturer for information on examination, repair, or adjustment.
![burn hazard]()
![shock hazard]()
The use of attachments other than those made by Cuisinart may cause fire, electric shock or risk of injuries.- Do not use outdoors.
- Do not let cord hang over edge of table or counter, or touch hot surfaces.
- Keep hands and utensils out of freezer bowl while in use to reduce the risk of injury to persons or damage to the appliance.
DO NOT USE SHARP OBJECTS OR UTENSILS INSIDE THE FREEZER BOWL!
Sharp objects will scratch and damage the inside of the freezer bowl. A rubber spatula or wooden spoon may be used when the appliance is in the OFF position. - This appliance is for household use. Any servicing other than cleaning and user maintenance should be done only by authorized Cuisinart repair personnel.
![burn hazard]()
![shock hazard]()
Do not use the freezer bowl on flames, hot plates or stoves. Do not expose to heat source. Do not wash in dishw asher; doing so may cause risk of fire, electric shock or injury.- Close supervision is necessary when any appliance is used by or near children.
- Do not use appliance for other than its intended use.
SAVE THESE INSTRUCTIONS
FOR HOUSEHOLD USE ONLY
SPECIAL CORD SET INSTRUCTIONS
A short power supply cord is provided to reduce the risks resulting from becoming entangled in or tripping over a longer cord.
Longer extension cords are available and may be used if care is exercised in their use.
If a long extension cord is used, the marked electrical rating of the extension cord should be at least as great as the electrical rating of the appliance. The longer cord should be arranged so that it will not drape over the countertop or tabletop where it can be pulled on by children or animals, or tripped over.
NOTICE
This appliance has a polarized plug (one blade is wider than the other). To reduce the risk of electric shock, this plug will fit in a polarized outlet only one way. If the plug does not fit fully in the outlet, reverse the plug. If it still does not fit, contact a qualified electrician. Do not attempt to defeat this safety feature.
CAUTION
This appliance is for household use. Any servicing other than cleaning and user maintenance should be performed by an authorized service representative.
- Do not immerse base in water.
![burn hazard]()
![shock hazard]()
To reduce the risk of fire or electric shock, do not disassemble the base.
NOTE: The base does not contain any user-serviceable parts.- Repairs should be made only by authorized personnel.
- Check voltage to be sure that the voltage indicated on the nameplate agrees with your voltage.
- Never clean with scouring powders or hard implements.
BEFORE FIRST USE
DO NOT immerse this product in water. Wipe it with a damp cloth. Wash the lid, freezer bowl, mixing arm, topping containers, topping chute, and drip tray in warm, soapy water to remove any dust or residue from the manufacturing and shipping process. DO NOT clean any of the parts with abrasive cleaners or hard implements.
FREEZING TIME AND BOWL PREPARATION
The freezer bowl must be completely frozen before you begin your recipe. Before freezing, wash and dry the bowl. Wrap it in a plastic bag to prevent freezer burn. We recommend that you place the freezer bowl in the back of your freezer where it is coldest. Be sure to place the freezer bowl on a flat surface in its upright position for even freezing. The length of time needed for the bowl to freeze completely depends on how cold your freezer is. For the most convenient frozen desserts, leave the bowl in the freezer at all times. You can take it out any time for immediate use. In general, freezing time should be a minimum of 24 hours. To determine whether the bowl is completely frozen, shake it. If you do not hear liquid moving, the cooling liquid is frozen.
Reminder: Your freezer should be set to 0°F to ensure proper freezing.
REFERENCE CARD
If you lose the paper instruction booklet, there is a QR code to access the online instruction booklet and recipes. Pull the "INFO" tray on the side of the drip tray and scan the QR code.
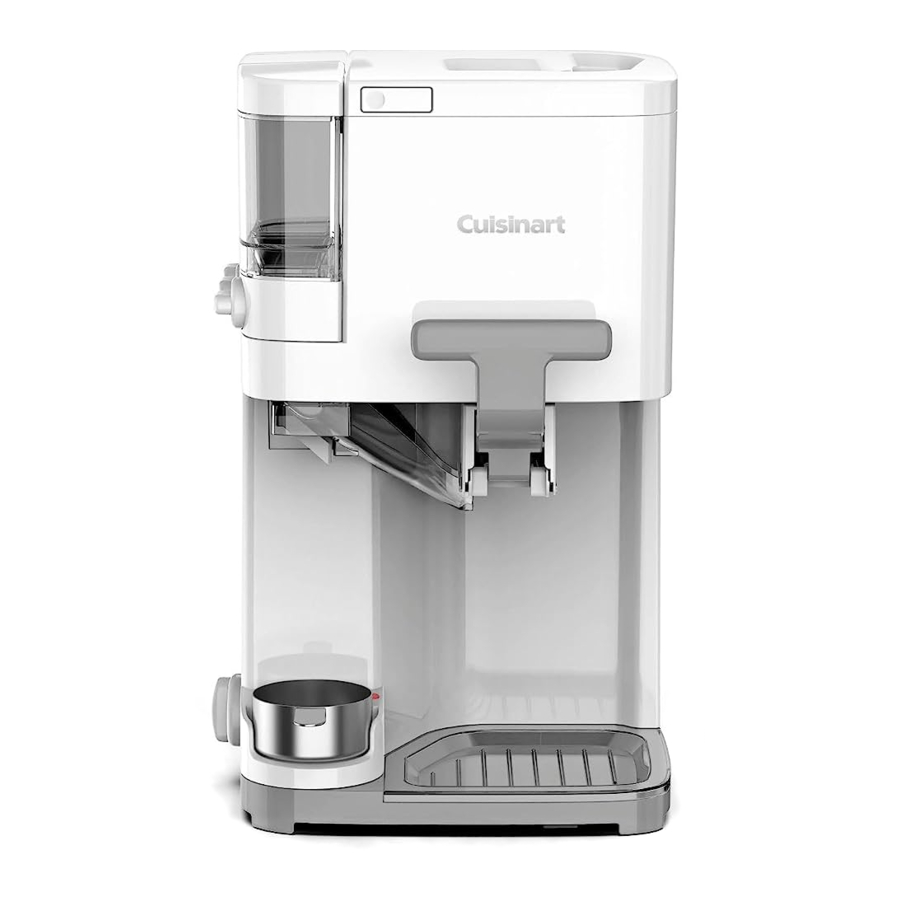
FEATURES AND BENEFITS

- Easy-Lock Lid with Opening – Lid is designed to remove and lock easily. An ingredient opening allows you to pour ingredients directly through the top and watch the freezing process.
- Mixing Paddle – Mixes and aerates ingredients in freezer bowl to create smooth, soft ice cream.
- 1½-Quart Freezer Bowl – Contains cooling liquid within a double-insulated wall to create fast and even freezing. Double wall keeps the bowl cool and at an even temperature.
- Three Topping Containers – Dispense the mix-ins of your choice. The three topping containers dispense mix-ins such as sprinkles, mini chocolate chips, hard-shelled candies, and many more. The topping containers can dispense and mix add-ins into the ice cream or they can be taken off the machine to add toppings onto ice cream right at the table.
- Topping Dispensing Knobs – Turn one of three knobs to dispense the mix-ins of your choice into your soft ice cream.
- Topping Chute – Mix-ins are dispensed from the chute into your ice cream cone or bowl while you dispense ice cream. Removable for easy cleaning.
- Dispensing Handle Assembly – Dispenses soft ice cream when handle is pulled down. Removable for easy cleaning.
- Base – Contains heavy-duty motor strong enough to make and dispense ice cream.
- Power Control Knob
- 4 oz. Keep Warm Cup and Heating Plate – Keep liquid toppings warm.
- Cone Holder – Conveniently holds a stack of ice cream cones. Can hold both waferstyle and sugar cones.
- Removable Drip Tray – Can be removed for easy cleaning.
- Mix-in Gauge – Check the size of mix-ins by dropping them through. Mix-ins that do not fit through will clog the ice cream maker.
- Rubber Feet – Nonslip feet keep base stationary during use.
- Removable Quick Reference Card (Not Shown)
ASSEMBLY
- Insert the topping containers into the indent on the top left side of the Cuisinart Mix It In Soft Serve Ice Cream Maker so that they are firmly in place. The topping containers with the rounded edge should be inserted into the front and rear spaces.
- Place the cover over each of the topping containers.
- Attach the dispensing handle assembly by inserting the round opening under the top part of the unit, aligning the handle with "LOCK" on the side of the unit, then rotating the assembly clockwise until it locks into place (the Dispensing Handle should be in the center of the front of the unit).
- Slide the topping chute into the space provided under the topping containers. Be sure to slide it all the way in until it snaps in place (the Dispensing Handle must be in the upright position).
- Place the drip tray on the base under the dispensing handle.
- Place the keep warm cup on the warming plate, if heating up toppings.
MAKING SOFT SERVE ICE CREAM AND FROZEN DESSERTS
- Fill the topping containers with the desired mix-ins using the mix-in gauge.
- Do not place liquid toppings in toppings containers. Liquid toppings should be placed in keep warm cup over the heater. Do not exceed 4 oz. of liquid toppings in keep warm cup.
NOTE: keep warm cup should only be used to keep liquid toppings warm. - Use Cuisinart's recipes from the pages that follow. Do not fill the freezer bowl higher than ½ inch from the top, as the frozen dessert base will increase in volume during the freezing process. For best results, prepare frozen dessert base in a container from which it is easy to pour.
- Push the upper part of the mixing paddle into the hole on the bottom of the lid.
- Remove the freezer bowl from the freezer. (Remove plastic bag if you have wrapped freezer bowl.) Lift the lid and place freezer bowl inside the base.
NOTE: Bowl will begin to defrost quickly once it has been removed from freezer. Use immediately after removing from freezer. - Place lid with mixing paddle on base and push down until it locks into place.
- Turn the power control knob to "Ice Cream," if only preparing ice cream. Turn the dial to "Ice Cream + Warm," if preparing ice cream and warming a liquid topping. Mixing paddle will begin to turn and the warming heater will start if selected.
- Add frozen dessert base to the freezer bowl by pouring through the opening in the lid.
- Soft ice cream will be finished in as little as 30 minutes. The time will depend on the recipe and volume of the dessert you are making. Frozen dessert base should be refrigerated to reduce mixing time.
NOTE: Ensure optimal soft serve consistency by checking ice cream at least 5 minutes before specified finish time. If it does become too hard to dispense, simply remove the freezer bowl, scoop, serve, and enjoy! - Hold an ice cream cone or bowl 1 inch below the ice cream chute and pull down the handle to dispense the ice cream. Turn cone or bowl as you dispense to swirl ice cream.
- Turn desired knob(s) to add toppings of your choice to soft serve ice cream or dessert.
- When finished filling the cone or bowl, push the handle back up to stop the flow of ice cream.
NOTES: Some liquid may initially come out of the dispensing handle assembly when first pulled down. Use a cup to collect this liquid, pour liquid back into bowl, then proceed with filling the first bowl or cone.
Do not store frozen desserts in the freezer bowl. Desserts will stick to the side of the freezer bowl and may damage the bowl. Transfer to an airtight container.
Ice cream will lose its soft consistency and harden after it is stored in the freezer. - If you want to use the Keep Warm Cup, make sure the unit is turned to "Ice Cream + Warm."
NOTE: The Keep Warm feature is intended to keep only prepared toppings soft enough to pour over ice cream (hot fudge, caramel, and butterscotch).
RECOMMENDED MIX-INS
These items can be found in most well-stocked grocery stores.
Mini candy-coated chocolates
Mini chocolate chips
Confetti sprinkles
Chocolate sprinkles
Caramel sprinkles
Praline crunch
Decorative Crunch Bits
Finely Chopped Nuts
NOTE: Always use the mix-in gauge; some mixins may be too large to dispense and will need to be chopped.
SUGGESTED LIQUID TOPPINGS
Chocolate syrup
Prepared hot fudge
Prepared caramel sauce
Prepared fruit sauce, such as strawberry, blueberry, or raspberry
Butterscotch sauce
DISASSEMBLING FOR CLEANING
- Turn the unit OFF and unplug.
- Remove the lid by pushing in and lifting the two side tabs. Disconnect the mixing paddle.
- Lift the freezer bowl up and out of the base. Make sure all ice cream has been dispensed before removing.
- Remove the topping chute by pulling it toward you.
- Remove the dispensing handle assembly by turning counterclockwise to unlock. Once unlocked, it can be lowered from the unit.
CLEANING
- Follow section on disassembling.
- Base: Wipe with a damp cloth and dry.
Never use abrasives or immerse in water. - Freezer Bowl and Lid: Wash by hand in warm, soapy water and dry thoroughly.
DO NOT PUT IN THE DISHWASHER. DO NOT CLEAN WITH ABRASIVE CLEANSERS. - Dispensing Handle Assembly: Wash thoroughly by hand in warm, soapy water. Be sure to eliminate all ice cream residue by cleaning it while it is opened (with the handle pushed down) and closed (with handle up).
- Mixing Paddle, Topping Containers, Topping Chute, Keep Warm Cup and Drip Tray: Hand-wash in warm, soapy water and dry thoroughly. These items are also top rack dishwasher safe.
STORAGE
DO NOT put freezer bowl in freezer if bowl is wet. DO NOT store lid, mixing paddle, base, drip tray, or topping containers in the freezer. You may store the freezer bowl in the freezer, in its upright position, for convenient, immediate use. We recommend, before freezing, wrap the bowl in a plastic bag to prevent freezer burn. DO NOT store frozen desserts in the freezer bowl. Transfer desserts to an airtight container for longer storage in the freezer. When filled topping containers are not in use, store in a cool, dark place. Empty containers if not used within a week.
NOTE: Ice cream will lose its soft consistency and harden after it is stored in the freezer.
TROUBLESHOOTING
Ice cream is not ready in recommended time |
Solution:
|
Ice cream is not dispensing |
Solution:
|
Motor stalls |
Solution:
|
Mix-ins are not dispensing |
Solution:
|
Ice cream paddle is not turning |
Solution:
|

Documents / ResourcesDownload manual
Here you can download full pdf version of manual, it may contain additional safety instructions, warranty information, FCC rules, etc.
Download Cuisinart Mix It In ICE-48 Series - Frozen Yogurt & Ice Cream Maker Manual
Advertisement
Thank you! Your question has been received!


Need Assistance?
Do you have a question about the Mix It In ICE-48 Series that isn't answered in the manual? Leave your question here.