Advertisement
Available languages
Available languages
Quick Links
This manual is made with 100% recycled paper.
Built-in
DA68-01312H(0.0).indb 1
DA68-01312H(0.0).indb 1
Refrigerator
user manual
imagine
the possibilities
Thank you for purchasing a Samsung product.
To receive more complete service or accessory parts,
please register your product at or contact
www.samsung.com/register
1-800-SAMSUNG (726-7864)
English
Code No. DA68-01312H REV(0.0)
2012.2.16 5:2:20 PM
2012.2.16 5:2:20 PM
Advertisement

Related Manuals for Samsung RS627LHQESR


Summary of Contents for Samsung RS627LHQESR
- Page 1 English This manual is made with 100% recycled paper. imagine the possibilities Thank you for purchasing a Samsung product. To receive more complete service or accessory parts, please register your product at or contact www.samsung.com/register 1-800-SAMSUNG (726-7864) Built-in Code No.
- Page 2 fi nd help and ignite or cause an eye injury. If a leak is information online at www.samsung.com. detected, avoid any naked fl ames or potential sources of ignition and air the room in which the appliance is standing for several minutes.
- Page 3 • When moving the refrigerator, be careful not to SEVERE WARNING SIGNS FOR roll over or damage the power cord. INSTALLATION WARNING This constitutes a fi re hazard. • Do not install this appliance near a • The appliance must be positioned so that the heater, infl...
- Page 4 If any dust or water is in the refrigerator, pull • Do not use a hair dryer to dry the inside of the out power plug and contact your Samsung refrigerator. Electronics service center. Do not place a lighted candle in the refrigerator There is a risk of fi...
- Page 5 This may result in a fi re or an explosion. neither covered under Samsung warranty • Do not spray cleaning products directly on the service, nor is Samsung responsible for safety display. issues and damages that result from 3rd party Printed letters on the display may come off.
- Page 6 SETTING UP YOUR SIDE-BY-SIDE REFRIGERATOR …………………………… 07 OPERATING THE SAMSUNG SIDE-BY-SIDE REFRIGERATOR………………… 10 TROUBLESHOOTING ………………………………………………………………… 42 06_ safety information DA68-01312H(0.0).indb 06 DA68-01312H(0.0).indb 06 2012.2.16 5:2:21 PM...
- Page 7 Check if the product can clear the doors on its way to the installation position. (mm) If the product is not able to clear the doors, it is Model not possible to install. RS627LHQESR 1068 42” 2120Min 2140Max RS757LHQESR 1220 48”...
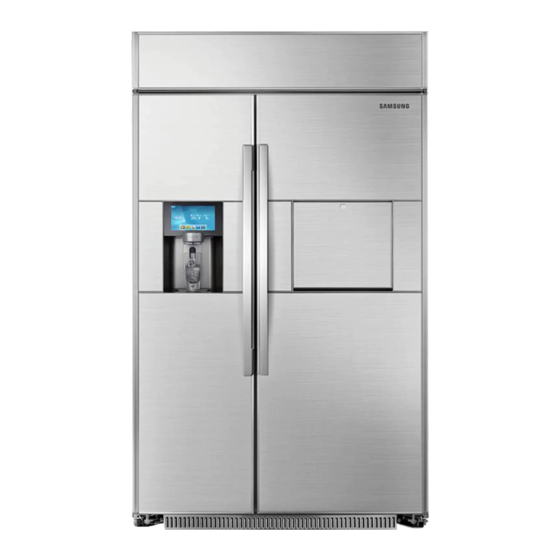
- Page 8 Earth the product REMEMBER EACH PART NAME Make sure to earth the product to prevent electric Unit grill Unit grill leakage or an electric shock. Display Part (Touch Screen) : The part that shows Display P Display P • When the product fails to operate : Make sure the confi...
- Page 9 ALIGNING THE HEIGHTS OF THE CHECKPOINTS BEFORE USE REFRIGERATOR DOORS Before using the refrigerator, make sure to check the followings. If the Fridge door is lower than the Freezer door, It will show ways to use the product safely and adjust the door height by turning the door height effi...
- Page 10 Operating the SAMSUNG side- by-side refrigerator HOME SCREEN • The Home screen is the starting point for all functions. In the center of the Home screen, basic refrigerator information such as Time, Date, Temperature, and Dispenser Selection appears. The indicator icons at the top left of the screen display information about the refrigerator’s status.
- Page 11 At the bottom of the Screen: Menu Icons Memo : Lets you create, save, or check memos. Photos : Lets manage stored photos and import photos from memory cards. Temperature : You can change the temperature setting for the refrigerator and turn the power freeze and power cool functions on or off.
- Page 12 • The freezer or fridge temperature may change depending on how often you open and close the door, the food quantity, the ambient temperature, etc. • Temperatures vary in each food storage section in the freezer and fridge compartments. • If the room temperature becomes unusually warm, it can cause temperatures in the Fridge and Freezer to rise abnormally.
- Page 13 SETTING THE DISPENSER To select the ice type, follow these steps: Touch Dispenser Status on the Home screen. The Dispenser pop-up appears. Touch the desired dispenser type, and then touch the CLOSE button. DOOR OPEN ALARM If the fridge / freezer door remains open more than 2 minutes, a warning window pops up accompanied by alarm sounds.
- Page 14 MEMO You can use the Memo function to leave a memo for yourself or someone else. How to leave a new memo. Touch the Memo button on the Home screen. Touch the New button. Select the memo tools you want by touching the tool buttons above the memo entry area.
- Page 15 Touch the Save button after you have completed your memo. • If you want to display the memo on the Home screen, press the Attach to Home Screen button, and then touch the Save button. See below. • You can “put away” the memo being displayed on the Home screen by touching the Detach button or hide it temporarily by touching the Hide Memo button.
- Page 16 Touch the memo you want to display. To view multiple memos, press the Multi Select button. • When you press the Select All button, the Multi-Select mode lets you select a Multi Selection screen shows. number of memos and then view them one after another by pressing the •...
- Page 17 Touch the View Selected button. Check the saved memo by using the buttons. Each time you press the button, the next menu in sequence appears. • In the Detail View screen, you can delete a memo or attach it to or detach it from the Home screen.
- Page 18 How to delete memos. Touch the Memo button on the Home screen. To delete multiple memos, continue here. Touch the memo you want to delete. To delete multiple memos, press the Multi Select button. Touch the Delete button. Touch the memos you want to delete. 18_ operating DA68-01312H(0.0).indb 18 DA68-01312H(0.0).indb 18...
- Page 19 Touch the Yes button. Touch the Delete button. Touch the Yes button. PHOTOS You can upload photos from a Memory card into My Album on your refrigerator. How to copy photos from a Memory Card to My Album • Images with a resolution of 4096*4096 or less are recognized. Pull out the cover over the card slot and move it to the side.
- Page 20 • The Memory slot is only for SD/SDHC/MMC/HS MMC type memory cards. • The slot can read only JPEG(JPG) images. • The Panel has a capacity of about 300 photos. • When saving photos from a memory card to the panel, the refrigerator automatically changes the photo size to 800 x 480 pixels, regardless of the original size.
- Page 21 Touch the photo you want to save to My To store multiple photos, press the Multi Album. Select button. • When you press the Select All button, the Multi Selection screen appears. • When there are multiple pages with many photos, there will be page numbers on the bottom of the screen.
- Page 22 • When you select a photo, its detail information • When you press the Select All button, all the will appear. photos on the current page are selected and the Select All button shifts to the Unselect All button. • When you press the View Selected button, you will see its larger version.
- Page 23 How to run a the slide show. Touch the Photos button on the Home screen. Touch My Album in the Photos list. Touch the Multi Select button. Touch the photos you want for the slide show, and then touch the View Selected button. (Select more than two photos.) •...
- Page 24 The slide show starts. Touch the screen to change the view option. • The slide show runs once. When it fi nishes, the view options appear on the screen. • By touching the button, you can move to the previous or next photo. •...
- Page 25 10. Use the - and + buttons to change the slide show transition time, and then touch the OK button. 11. To change the order of the photos in the slide show, select the button. 12. Touch Normal or Shuffl e, and then touch the OK button. operating _25 DA68-01312H(0.0).indb 25 DA68-01312H(0.0).indb 25...
- Page 26 How to rotate photos. Touch My Album in the Photos list. Touch the photo you want to rotate. Press the Multi Select button to rotate multiple photos. Touch the -90° Rotate or 90° Rotate button. Touch the photos you want to rotate, and then touch the View Selected button.
- Page 27 Saving photos to a memory card. Insert a memory card into the refrigerator’s memory card slot. Touch My Album in the Photos list. Touch the photo you want to save. To save multiple photos, press the Multi Select button. Touch the Save To Memory Card button. Touch the photos you want to save, and then touch the Save To Memory Card button.
- Page 28 Touch the photos you want to delete, and then touch the Delete button. Touch the Yes button. Touch the Yes button. • There are 10 photos that have been pre-loaded by Samsung. These photos explain product features and cannot be deleted. 28_ operating DA68-01312H(0.0).indb 28 DA68-01312H(0.0).indb 28 2012.2.16 5:2:46 PM...
- Page 29 SCREENSAVER THEME Select the themes for the Display screen screensaver. Touch the Settings button. Touch the Screensaver Theme on the Settings list. Select at least 2 screen themes and touch [save] button. • The themes you select may not display if the data underlying them is not ready or unavailable.
- Page 30 QUICK ICE MAKING Use this function to make ice quickly. • When the fast freeze function is turned on, the ( icon is displayed on the home screen. WATER FILTER The Water Filter status icon on the Home screen enables you to check the current status of the water fi...
- Page 31 For a replacement water fi lter, visit your local home improvement center or Samsung’s offi cial on-line parts distributor at http://www.samsungparts.com. Be sure the replacement water fi lter has the SAMSUNG logo on the box and on the water fi lter. DISPLAY Lets you set the brightness of the LCD and the running time of the Screensaver.
- Page 32 VOLUME Lets you control the volume of the alert sounds. Touch the button in the bottom right corner of the Settings list. Touch Volume in the Settings list. Select a volume level button to change the alert sound level. Touch the Save button to set the new volume level. •...
- Page 33 DATE SETTING Lets you can set the current date. Touch the button in the bottom right corner of the Settings list. Touch Date in the Settings list. Use the buttons to revise the month. Select the desired day, and then touch the Save button. DISPENSER LIGHT Lets you set the operation of the dispenser lamp light.
- Page 34 TOUCH SCREEN CORRECTION You can calibrate the stylus touch point to best meet your needs. To adjust the stylus touch point on the touch screen: Touch the button in the bottom right corner of the Settings list. Touch Screen Correction in the Settings list. Touch the Yes button.
- Page 35 • The update is provided as a fi le. For the update, copy the update fi le onto an SD card and connect the card to the panel. The update will be performed. • Open Source License Notice - This product uses open source software.
- Page 36 Remove Capacity glass or ceramic container. Standard • If discolored ice is extracted, stop using NSF 42 Smell, Chloride the product and contact the Samsung Pathogene, insecticide, asbestos, slime, NSF 53 Electronics service center. benzol,organic compound, mercury 36_ operating DA68-01312H(0.0).indb 36 DA68-01312H(0.0).indb 36...
- Page 37 DO NOT use generic brands of WARNING be maintained at 0°C regardless of the fridge water fi lers in your SAMSUNG Refrigerator. compartment’s temperature setting. USE ONLY SAMSUNG BRAND WATER The temperature (0°C) of 0 Zone falls into the FILTERS.
- Page 38 When Cool is selected. • White Wines When Cool is selected, the temperature of the They are made of ripe white grapes and some CoolSelect Zone will be set to 3°C and will of red grapes. be maintained at 3°C regardless of the fridge Being golden brown in color, they have layers compartment’s temperature setting.
- Page 39 The region the wine comes from How to use the refrigerator effectively The appellation or the overall quality • To make cold air to fl ow freely. classifi cation of the wine To maintain the fridge compartment temperature The name and address of the wine bottler to 4°C, it sends out cold air near 0°C .
- Page 40 • To frost the surface of beer cup. • To store potatoes freshly. After pouring warm water into the cup, empty Because potato buds contain toxins, you need the cup when it gets warmed up. to get rid of the buds. And, turn it upside down and put it in the To store potatoes that went sprout up, wrap freezer compartment for about 30 minutes...
- Page 41 • Dispenser • Veggie/Fruit Box After wiping with a wet cloth, Hold it with one hand, pull wipe dry with a dry cloth. it forward while lifting it up slightly to remove. If the spill shelf is stained with slime, wipe with a clean cloth lightly dampened with vinegar.
- Page 42 troubleshooting PROBLEM POSSIBLE CAUSES WHAT TO DO Fridge or freezer Master power control set to O (OFF). Switch on the power (“I” pressed). compartment too Refrigerator is unplugged. Plug in the power plug again. warm. (Low cooling Temperature controls set at the warmest Press the FRE.
- Page 43 PROBLEM POSSIBLE CAUSES WHAT TO DO Water is warm. The fridge compartment is too warm. Press the REF.TEMP button and set to a colder setting. Six glassfuls of water have been used When more than six glasses of water are continuously.
- Page 44 PROBLEM SOLUTION Display does not • Press the Reset button over one second to reset the memory. With this, the user information is not to be reset. work! • If the “Memory card is connected” messages do not appear on the screen, check if Photos not the memory type is SD / SDHC / MMC / HS MMC.
- Page 45 memo DA68-01312H(0.0).indb 45 DA68-01312H(0.0).indb 45 2012.2.16 5:2:59 PM 2012.2.16 5:2:59 PM...
- Page 46 Ambient Room Temperature Limits This fridge/freezer is designed to operate in ambient temperatures specifi ed by its temperature class marked on the rating plate. Class Symbol Ambient Temperature range(°C) Extended Temperate +10 to +32 Temperate +16 to +32 Subtropical +16 to +38 Tropical +16 to +43 Internal temperatures may be affected by such factors as the location of the fridge/freezer,...
- Page 47 Manuel d'utilisation Français Ce manuel est réalisé à partir de papier 100 % recyclé. un monde de possibilités Merci d'avoir choisi un produit Samsung. Pour bénéfi cier du service clientèle et technique, enregistrez votre produit sur ou contactez www.samsung.com/register 1-800-SAMSUNG (726-7864) Intégré...
- Page 48 En cas de fuite, le plus proche ou procurez-vous de l'aide et des n'approchez pas de fl amme nue ou de matière informations en ligne sur www.samsung.com. potentiellement infl ammable et aérez la pièce pendant plusieurs minutes.
- Page 49 • Lorsque vous déplacez le réfrigérateur, veillez à SYMBOLES D'AVERTISSEMENT ne pas le faire passer sur le cordon d'alimentation IMPORTANTS CONCERNANT (risque d'endommagement des fi ls électriques). L'INSTALLATION DE L'APPAREIL AVERTISSEMENT Risque d'incendie. • N'installez pas cet appareil près d'une source •...
- Page 50 Ne placez pas et n'utilisez pas d'appareil dans le réfrigérateur, débranchez la prise et contactez électrique à l'intérieur du réfrigérateur, sauf cela est le centre de réparation Samsung Electronics. recommandé par le fabricant de l'appareil concerné. Le non-respect de cette consigne peut •...
- Page 51 Le réfrigérateur a été conçu exclusivement pour un tiers ne sont pas couverts par le service le stockage des produits alimentaires. de garantie Samsung ; Samsung ne saurait être tenu responsable en cas de problème Le non-respect des consignes peut entraîner de sécurité...
- Page 52 Table des matières INSTALLATION DE VOTRE RÉFRIGÉRATEUR AMÉRICAIN …………………… 07 FONCTIONNEMENT DU RÉFRIGÉRATEUR AMÉRICAIN SAMSUNG ………… 10 DÉPANNAGE ………………………………………………………………………… 42 06_ Consignes de sécurité DA68-01312H(0.0).indb 06 DA68-01312H(0.0).indb 06 2012.2.16 5:3:3 PM...
- Page 53 : • Veuillez vérifi er les points suivants avant d'installer (mm) le produit. Vérifi ez qu'aucun obstacle n'empêche Modèle la fermeture des portes lorsque l'appareil est RS627LHQESR 1068 42” 2120 mini. situé à son emplacement d'installation. 2140 maxi. RS757LHQESR 1220 48”...
- Page 54 Mettez à la terre l'appareil N'OUBLIEZ PAS LE NOM DE CHAQUE PARTIE Assurez-vous de mettre à la terre l'appareil afi n d'éviter les fuites électriques et les électrocutions. Grille de l'unité Grille de l'unité • Lorsque l'appareil ne fonctionne pas : assurez- vous de mettre à...
- Page 55 ALIGNEMENT DE LA POINTS DE VÉRIFICATION AVANT HAUTEUR DES PORTES DU L'UTILISATION RÉFRIGÉRATEUR Avant d'utiliser le réfrigérateur, assurez-vous de vérifi er les points ci-dessous. Ces points indiquent comment Si la hauteur de la porte du réfrigérateur est utiliser l'appareil de manière sûre et effi cace. inférieure à...
- Page 56 Fonctionnement du réfrigérateur américain SAMSUNG ÉCRAN D'ACCUEIL • L'écran d'accueil permet d'accéder à toutes les fonctions. Les informations de base sur le réfrigérateur, telles que Time (heure), Date (date), Temperature (température) et Dispenser Selection (distributeur) s'affi chent au centre de l'écran d'accueil.
- Page 57 En bas de l'écran : Icônes de menu Memo (Mémo) : vous pouvez créer, enregistrer ou vérifi er des mémos. Photos (Photos) : vous pouvez gérer les photos stockés et importer des photos à partir de cartes mémoires. Temperature (Température) : vous pouvez modifi er le réglage de la température du réfrigérateur et activer ou désactiver l'alimentation du congélateur ou les fonctions de refroidissement.
- Page 58 • La température du congélateur ou du réfrigérateur peut changer suivant la fréquence d'ouverture et de fermeture de la porte, la quantité de nourriture, la température ambiante, etc. • La température est différente selon les niveaux dans le congélateur ou le réfrigérateur. •...
- Page 59 RÉGLAGE DU DISTRIBUTEUR Pour choisir le type de glace, procédez de la façon suivante : Appuyez sur l'icône du distributeur sur l'écran d'accueil. La fenêtre contextuelle du Dispenser (Distributeur) apparaît. Choisissez le type souhaité, puis appuyez sur le bouton CLOSE (FERMER). SIGNAL D'ALARME PORTE OUVERTE Si la porte du congélateur/réfrigérateur reste ouverte pendant plus de 2 minutes, une fenêtre d'avertissement...
- Page 60 MÉMO Vous pouvez utiliser la fonction Mémo pour laisser des mémos sur l'appareil, pour vous-même ou pour quelqu'un d'autre. Créer un nouveau mémo. Appuyez sur le bouton Memo (Mémo) de l'écran d'accueil. Appuyez sur le bouton New (Nouveau). Sélectionnez les outils de mémo que vous souhaitez en appuyant sur les boutons d'outils situés au- dessus de la zone d'entrée du mémo.
- Page 61 Appuyez sur le bouton Save (Enregistrer) une fois votre mémo terminé. • Si vous souhaitez affi cher le mémo sur l'écran d'accueil, appuyez sur le bouton Attach to Home Screen (Lier à l'écran d'accueil), puis sur le bouton Save (Enregistrer). Voir ci-dessous.
- Page 62 Appuyez sur le mémo que vous voulez Pour visualiser plusieurs mémos, appuyez affi cher. sur le bouton Multi Select (Multi-sélection). • Lorsque vous appuyez sur le bouton Select All Le mode Multi Selec (Multi-sélection) (Sélectionner tout), l'écran de multi-sélection vous permet de sélectionner plusieurs s'affi...
- Page 63 Appuyez sur le bouton View Selected (Voir la sélection). Vous pouvez faire défi ler les mémos à l'aide des boutons A chaque fois que vous appuyez sur le bouton , le menu suivant s'affi che en séquence. • Sur l'écran Detail View (Vue détaillée), vous pouvez supprimer un mémo, le fi...
- Page 64 Comment supprimer les mémos. Appuyez sur le bouton Memo (Mémo) de l'écran d'accueil. Pour supprimer plusieurs mémos, continuez ici. Appuyez sur le mémo que vous souhaitez Pour supprimer plusieurs mémos, appuyez supprimer. sur le bouton Multi Select (Multi-sélection). Appuyez sur le bouton Delete (Supprimer). Appuyez sur les mémos que vous souhaitez supprimer.
- Page 65 Appuyez sur le bouton Yes (Oui). Appuyez sur le bouton Delete (Supprimer). Appuyez sur le bouton Yes (Oui). PHOTOS (PHOTOS) : Vous pouvez télécharger des photos à partir d'une carte mémoire dans le dossier My Album (Mon album) du réfrigérateur. Copier des photos d'une carte mémoire dans My Album (Mon album) •...
- Page 66 • La fente ne prend en charge que les cartes mémoire SD/SDHC/MMC/HS MMC. • La fente peut uniquement lire les images au format JPEG (JPG). • Vous pouvez stocker jusqu'à 300 photos. • La dimension des photos transférées passe automatiquement à 800 x 480 pixels, quelle que soit leur taille d'origine.
- Page 67 Sélectionnez la photo que vous souhaitez Pour enregistrer plusieurs photos, appuyez enregistrer dans My Album (Mon Album). sur le bouton Multi Select (Multi-sélection). • Lorsque vous appuyez sur le bouton Select All (Sélectionner tout), l'écran de multi-sélection s'affi che. • Lorsqu'il y a plusieurs pages avec de nombreuses photos, les pages seront numérotées en bas de l'écran.
- Page 68 • Lorsque vous sélectionnez une photo, ses • Lorsque vous appuyez sur le bouton Select informations détaillées apparaissent. All (Sélectionner tout), toutes les photos de la page active sont sélectionnées et le bouton Unselect All (Désélectionner tout) remplace le bouton Select All (Sélectionner tout). •...
- Page 69 Lancer un diaporama. Appuyez sur le bouton Photos (Photos) sur l'écran d'accueil. Sélectionnez My Album (Mon Album) dans la liste Photos. Appuyez sur le bouton Multi Select (Multi-sélection). Sélectionnez les photos que vous voulez insérer dans le diaporama et appuyez sur le bouton View Selected (Voir la sélection).
- Page 70 Le diaporama commence. Appuyez sur l'écran pour changer l'option d'affi chage. • Le diaporama défi le une fois. Lorsqu'il est terminé, les options d'affi chage apparaissent à l'écran. • En appuyant sur le bouton , vous pouvez revenir à la photo précédente ou passer à la suivante.
- Page 71 10. Utilisez les boutons + et - pour changer le temps de transition entre les images, puis appuyez sur le bouton 11. Pour modifi er l'ordre des photos du diaporama, appuyez sur le bouton 12. Appuyez sur Normal ou Shuffl e (mélanger), puis appuyez sur le bouton OK.
- Page 72 Faire pivoter des photos. Sélectionnez My Album (Mon Album) dans la liste Photos. Appuyez sur la photo que vous souhaitez Appuyez sur le bouton Multi Select (Multi- faire pivoter. sélection) pour faire pivoter plusieurs photos. Appuyez sur le bouton -90° Rotate (Faire Sélectionnez les photos que vous souhaitez pivoter de 90°...
- Page 73 Enregistrement de photos sur une carte mémoire. Introduisez une carte mémoire dans la fente dédiée du réfrigérateur. Sélectionnez My Album (Mon Album) dans la liste Photos. Appuyez sur la photo que vous souhaitez Pour enregistrer plusieurs photos, appuyez enregistrer. sur le bouton Multi Select (Multi-sélection). Appuyez sur le bouton Save To Memory Sélectionnez les photos que vous désirez Card (Enregistrer sur la carte mémoire).
- Page 74 Delete (Supprimer). Appuyez sur le bouton Yes (Oui). Appuyez sur le bouton Yes (Oui). • Le logiciel contient déjà 10 photos choisies par Samsung. Ces photos expliquent les caractéristiques du produit et ne peuvent être supprimées. 28_ fonctionnement DA68-01312H(0.0).indb 28 DA68-01312H(0.0).indb 28...
- Page 75 SCREENSAVER THEME (THÈME DE L'ÉCRAN DE VEILLE) Sélectionnez les thèmes pour l'affi chage de l'écran de veille. Appuyez sur le bouton Settings (Réglages). Sélectionnez Screensaver Theme (Thème de l'écran de veille) dans la liste Settings (Réglages). Sélectionnez au moins deux thèmes d’écran et appuyez sur le bouton [save] (enregistrer).
- Page 76 FABRICATION RAPIDE DE GLAÇONS Utilisez cette fonction pour fabriquer des glaçons rapidement. • Lorsque la fonction de congélation rapide est activée, l'icône ( ) est affi chée à l'écran d'accueil. FILTRE À EAU L'icône indiquant l'état du fi ltre à eau sur l'écran d'accueil vous permet de surveiller en temps réel l'état du fi...
- Page 77 Pour un fi ltre à eau de remplacement, rendez-vous chez votre quincaillier ou contactez un revendeur offi ciel de pièces Samsung sur : http://www.samsungparts.com. Veillez à ce que le fi ltre à eau de remplacement porte le logo SAMSUNG sur la boîte et sur le fi ltre à eau.
- Page 78 VOLUME Cette fonction permet de régler le volume des signaux sonores. Appuyez sur le bouton situé dans le coin inférieur droit de la liste Settings (Réglages). Appuyez sur Volume dans la liste Settings (Réglages). Appuyez sur le bouton de volume sonore de votre choix. Appuyez sur le bouton Save (Enregistrer) pour enregistrer le nouveau volume sonore.
- Page 79 RÉGLAGE DE LA DATE Cette fonction permet de régler la date du jour. Appuyez sur le bouton situé dans le coin inférieur droit de la liste Settings (Réglages). Appuyez sur Date dans la liste Settings (Réglages). Utilisez les boutons pour régler le mois. Sélectionnez le bon jour, puis appuyez sur le bouton Save (Enregistrer).
- Page 80 TOUCH SCREEN CORRECTION (CORRECTION DE L'ÉCRAN TACTILE) Vous pouvez calibrer la zone de contact du stylet pour répondre au mieux à vos besoins. Pour régler la zone de contact du stylet sur l'écran tactile : Appuyez sur le bouton situé dans le coin inférieur droit de la liste Settings (Réglages). Appuyez sur Touch Screen Correction (Correction de l'écran tactile) dans la liste Settings (Réglages).
- Page 81 • La mise à jour est fournie sous forme de fi chier. Pour effectuer la mise à jour, copiez le fi chier pertinent sur une carte SD et insérez la carte dans le panneau. La mise à jour est alors effectuée. •...
- Page 82 à cause de la glace. • Si la glace extraite est décolorée, arrêtez Norme de Capacité d'élimination d'utiliser l'appareil et contactez le centre certifi cation d'assistance Samsung Electronics. NSF 42 Odeur, chlorure Pathogénie, insecticide, amiante, NSF 53 substance visqueuse, benzène, composé organique, mercure 36_ fonctionnement DA68-01312H(0.0).indb 36...
- Page 83 fi ltre à eau générique. Les réfrigérateurs SAMSUNG sont conçus pour fonctionner UNIQUEMENT avec un fi ltre à eau SAMSUNG. Retirez le fi ltre de purifi cation d'eau. 0 Zone (Zone 0) permet de maintenir la viande ou Ouvrez le cache en haut du réfrigérateur, tournez le...
- Page 84 Lorsque l'option Cool (Refroidissement) est • Vins blancs sélectionnée. Ces vins sont faits à partir de raisins blancs et Lorsque l’option Cool (Refroidissement) est certains raisins rouges. De couleur dorée, ils sélectionnée, la température de CoolSelect offrent plusieurs types de saveurs telles que Zone est réglée sur 3ºC et elle est maintenue à...
- Page 85 La région d'origine du vin Comment utiliser le réfrigérateur de L'appellation ou le classement général de la manière effi cace qualité du vin • Pour générer de l'air froid circulant librement. Le nom et l'adresse de l'embouteilleur Pour conserver une température du La quantité...
- Page 86 • Pour geler la surface d'un verre à bière. • Pour stocker les pommes de terre et les garder fraîches. Après avoir versé de l'eau chaude dans le verre, videz celui-ci lorsqu'il est chaud. Il est nécessaire de retirer les bourgeons des Ensuite, placez-le dans le sens dessus pommes de terre, car ceux-ci contiennent des dessous et insérez le dans le compartiment...
- Page 87 • Distributeur • Bac à légumes/fruits Après avoir passé un chiffon mouillé, Tenez-le avec une main, essuyez à l'aide d'un chiffon sec. retirez-le en le soulevant légèrement. Si la clayette anti-éclaboussures contient du dépôt, essuyez- la avec un chiffon légèrement humidifi...
- Page 88 dépannage PROBLÈME CAUSES POSSIBLES QUE FAIRE Compartiment du Alimentation coupée (interrupteur placé sur Mettez sous tension (placez l'interrupteur O (OFF)). sur "I"). réfrigérateur ou du congélateur trop Le réfrigérateur est débranché. Branchez à nouveau la prise chaud. d'alimentation. (Faible puissance Température paramétrée sur le réglage le Appuyez sur le bouton FRE.
- Page 89 PROBLÈME CAUSES POSSIBLES QUE FAIRE L'eau est chaude. Le compartiment du réfrigérateur est trop Appuyez sur le bouton REF.TEMP (TEMP. chaud. REF.) et réglez-le sur un réglage plus froid. Six verres d'eau ont été utilisés à la suite. Lorsque plus de six verres d'eau ont été servis, cela prend plus longtemps pour refroidir l'eau.
- Page 90 PROBLÈME SOLUTION L’affi chage ne • Appuyez sur le bouton Reset (Réinitialisation) une seconde environ pour réinitialiser la mémoire. Cette action ne supprime pas les informations de l’utilisateur. fonctionne pas. • Si le message « Memory card is connected » (Une carte mémoire est connectée) ne Les photos ne s’affi...
- Page 91 note DA68-01312H(0.0).indb 45 DA68-01312H(0.0).indb 45 2012.2.16 5:3:41 PM 2012.2.16 5:3:41 PM...
- Page 92 Température ambiante mini./maxi. Le réfrigérateur américain est conçu pour fonctionner à la température ambiante mentionnée sur la plaque signalétique. Classe Symbole Plage de température ambiante (°C) Température étendue +10 à +32 Climat tempéré +16 à +32 Subtropical +16 à +38 Climat tropical +16 à...
- Page 93 ﻣﻌﺪﻝ درﺟﺔ ﺣﺮارة اﻟﻐﺮﻓﺔ اﶈﻴﻄﺔ .ﰎ ﺗﺼﻤﻴﻢ اﻟﺜﻼﺟﺔ/اﺠﻤﻟﻤ ﱢ ﺪ ﻟﻴﺘﻢ ﺗﺸﻐﻴﻠﻬﻤﺎ ﻓﻲ درﺟﺎت ﺣﺮارة ﻣﺤﻴﻄﺔ ﻣﺤﺪدة ﺑﻮاﺳﻄﺔ ﻓﺌﺔ درﺟﺔ اﳊﺮارة اﳌﺸﺎر إﻟﻴﻬﺎ ﻋﻠﻰ ﻟﻮﺣﺔ اﻟﺘﻘﻨﲔ (ﻧﻄﺎﻕ درﺟﺔ اﻟﺤﺮارة اﻟﻤﺤﻴﻄﺔ )ﺑﺎﻟﺪرﺟﺔ اﻟﻤﺌﻮﻳﺔ اﻟﺮﻣﺰ اﻟﻔﺌﺔ +٣٢ ٠١+ إﻟﻰ اﻻﻋﺘﺪاﻝ اﻟﻤﻮﺳﻊ +٣٢ ٦١+ إﻟﻰ ﻣﻌﺘﺪﻝ...
- Page 94 ﻣﺬﻛﺮة DA68-01312H(0.0).indb 2 DA68-01312H(0.0).indb 2 2012.2.16 5:3:42 PM 2012.2.16 5:3:42 PM...
- Page 95 ﻣﺬﻛﺮة DA68-01312H(0.0).indb 3 DA68-01312H(0.0).indb 3 2012.2.16 5:3:42 PM 2012.2.16 5:3:42 PM...
- Page 96 ﻣﺬﻛﺮة DA68-01312H(0.0).indb 4 DA68-01312H(0.0).indb 4 2012.2.16 5:3:43 PM 2012.2.16 5:3:43 PM...
- Page 97 اﺳﺘﻜﺸﺎﻑ اﻷﺧﻄﺎء ﻭإﺻﻼﺣﻬﺎ اﳊﻞ اﳌﺸﻜﻠﺔ !ﺷﺎﺷﺔ اﻟﻌﺮض ﻻ ﺗﻌﻤﻞ ، )إﻋﺎدة اﻟﻀﺒﻂ( ﻷﻛﺜﺮ ﻣﻦ ﺛﺎﻧﻴﺔ ﻹﻋﺎدة ﺿﺒﻂ اﻟﺬاﻛﺮةReset اﺿﻐﻂ اﻟﺰر • .ﻋﻠﻤ ﹰ ﺎ ﺑﺄﻧﻪ ﻫﺬا اﻹﺟﺮاء ﻻ ﻳﺆدﻱ إﻟﻰ إﻋﺎدة ﺿﺒﻂ ﻣﻌﻠﻮﻣﺎت اﳌﺴﺘﺨﺪﻡ ﻻ ﺗﻈﻬﺮ اﻟﺼﻮر ﻋﻨﺪ ﺗﻮﺻﻴﻞ )ﰎ ﺗﻮﺻﻴﻞ اﻟﺬاﻛﺮة( ﻋﻠﻰ اﻟﺸﺎﺷﺔ، ﻓﺘﺄﻛﺪ ﻣﺎ إذاMemory card is connected ﻓﻲ ﺣﺎﻟﺔ ﻇﻬﻮر اﻟﺮﺳﺎﻟﺔ •...
- Page 98 ﻣﺎ اﻟﺬﻱ ﻳﺠﺐ ﻋﻠﻴﻚ ﻓﻌﻠﻪ اﻷﺳﺒﺎب اﶈﺘﻤﻠﺔ اﳌﺸﻜﻠﺔ ﻫﻨﺎﻙ ﺿﻮﺿﺎء ﻟﻠﻤﻴﺎﻩ ﻗﺪ ﻳﺆدﻱ ﺗﺪﻓﻖ اﳌﺒﺮدات ﻣﻦ ﺧﻼﻝ ﻣﻠﻔﺎت اﻟﺘﺒﺮﻳﺪ إﻟﻰ ﺣﺪﻭث ﺿﻮﺿﺎء ﺗﺪﻓﻖ اﳌﻴﺎﻩ )ﻣﺜﻞ: اﻟﻐﺮﻏﺮة، اﻷزﻳﺰ، اﻟﻔﺮﻗﻌﺔ( أﻭ ﻗﺪ ﲢﺪث .اﳌﺘﺪﻓﻘﺔ .ﺿﻮﺿﺎء ﺗﺴﺎﻗﻂ اﳌﻴﺎﻩ أﺛﻨﺎء دﻭرة إذاﺑﺔ اﻟﺜﻠﺞ ﺣﻴﺚ ﻳﺬﻭب اﻟﺜﻠﺞ ﻭﺗﺘﺪﻓﻖ اﳌﻴﺎﻩ .ﻫﺬا...
- Page 99 اﺳﺘﻜﺸﺎﻑ اﻷﺧﻄﺎء ﻭإﺻﻼﺣﻬﺎ ﻣﺎ اﻟﺬﻱ ﻳﺠﺐ ﻋﻠﻴﻚ ﻓﻌﻠﻪ اﻷﺳﺒﺎب اﶈﺘﻤﻠﺔ اﳌﺸﻜﻠﺔ ﺣﺠﺮة اﻟﺜﻼﺟﺔ أﻭ اﺠﻤﻟﻤ ﹼ ﺪ ("I" ﻗﻢ ﺑﺘﺸﻐﻴﻞ ﻣﻔﺘﺎح اﻟﻄﺎﻗﺔ )اﺿﻐﻂ ﻋﻠﻰ )إﻳﻘﺎﻑO ﻣﻔﺘﺎح ﲢﻜﻢ اﻟﻄﺎﻗﺔ اﻟﺮﺋﻴﺴﻲ ﻣﻀﺒﻮط إﻟﻰ داﻓﺌﺔ ﻟﻠﻐﺎﻳﺔ. )ﻃﺎﻗﺔ اﻟﺘﺒﺮﻳﺪ .(اﻟﺘﺸﻐﻴﻞ (ﻣﻨﺨﻔﻀﺔ .ﻗﻢ ﺑﺘﻮﺻﻴﻞ ﻗﺎﺑﺲ اﻟﺘﻴﺎر اﻟﻜﻬﺮﺑﻲ ﻣﺮة أﺧﺮﻯ .اﻟﺜﻼﺟﺔ...
- Page 100 ﻋﻠﺒﺔ اﳋﻀﺮاﻭات/اﻟﻔﻮاﻛﻪ • اﳌﻮ ز ﹼ ع • أﻣﺴﻜﻬﺎ ﺑﺈﺣﺪﻯ ﻳﺪﻳﻚ، ﺛﻢ اﺳﺤﺒﻬﺎ ﺑﻌﺪ ﻣﺴﺤﻪ ﺑﻘﻄﻌﺔ ﻗﻤﺎش رﻃﺒﺔ، ﻗﻢ .ﻟﻸﻣﺎﻡ ﻣﻊ رﻓﻌﻬﺎ ﻗﻠﻴ ﻼ ﹰ ﻟﻸﻋﻠﻰ ﻹﺧﺮاﺟﻬﺎ .ﺑﺘﺠﻔﻴﻔﻪ ﺑﺎﺳﺘﺨﺪاﻡ ﻗﻄﻌﺔ ﻗﻤﺎش ﺟﺎﻓﺔ ﻓﻲ ﺣﺎﻟﺔ اﺗﺴﺎخ اﻟﺮﻑ اﻟﺰﺟﺎﺟﻲ، ﻗﻢ ﲟﺴﺤﻪ .ﺑﻘﻄﻌﺔ ﻗﻤﺎش ﻧﻈﻴﻔﺔ ﻣﺒﻠﻠﺔ ﻗﻠﻴ ﻼ ﹰ ﺑﺎﳋﻞ ﻏﻄﺎء...
- Page 101 .ﻟﺘﺨﺰﻳﻦ اﻟﺒﻄﺎﻃﺲ ﺑﺼﻮرة ﻃﺎزﺟﺔ • .ﻟﺘﻜﻮﻳﻦ ﺻﻘﻴﻊ ﻋﻠﻰ اﻟﺴﻄﺢ اﳋﺎرﺟﻲ ﻟﻜﻮب اﻟﻌﺼﻴﺮ • ﻧﻈﺮ ﹰ ا ﻻﺣﺘﻮاء ﺑﺮاﻋﻢ اﻟﺒﻄﺎﻃﺲ ﻋﻠﻰ ﻣﻮاد ﺳﺎﻣﺔ، ﻓﻴﺠﺐ ﻋﻠﻴﻚ إزاﻟﺔ .ﺑﻌﺪ ﺻﺐ اﳌﻴﺎﻩ اﻟﺪاﻓﺌﺔ ﻓﻲ اﻟﻜﻮب، ﻗﻢ ﺑﺘﻔﺮﻳﻐﻪ ﻋﻨﺪﻣﺎ ﻳﺼﻴﺮ داﻓ ﺌ ﹰ ﺎ .اﻟﺒﺮاﻋﻢ ﻭﺑﻌﺪ...
- Page 102 ﻛﻴﻔﻴﺔ اﺳﺘﺨﺪاﻡ اﻟﺜﻼﺟﺔ ﺑﻔﻌﺎﻟﻴﺔ اﳌﻨﻄﻘﺔ اﳌﻨﺸﺄ اﻟﺘﻲ ﺗﺄﺗﻲ ﻣﻨﻬﺎ اﻟﻌﺼﺎﺋﺮ ١ . ﺗﺴﻤﻴﺔ أﻭ ﺗﺼﻨﻴﻒ ﺟﻮدة اﻟﻌﺼﺎﺋﺮ ٢ . .ﳉﻌﻞ اﻟﻬﻮاء اﻟﺒﺎرد ﻳﺘﺪﻓﻖ ﺑﺤﺮﻳﺔ • اﺳﻢ اﻟﻘﺎﺋﻢ ﺑﺘﻌﺒﺌﺔ زﺟﺎﺟﺎت اﻟﻌﺼﺎﺋﺮ ﻭﻋﻨﻮاﻧﻪ ٣ . ﻟﻠﺤﻔﺎظ ﻋﻠﻰ درﺟﺔ ﺣﺮارة ﺣﺠﺮة اﻟﺜﻼﺟﺔ ٤° درﺟﺔ ﻣﺌﻮﻳﺔ، ﻓﺈﻧﻬﺎ ﻛﻤﻴﺔ...
- Page 103 اﻟﻌﺼﺎﺋﺮ اﻟﺒﻴﻀﺎء • .( )اﻟﺘﺒﺮﻳﺪCool ﻋﻨﺪﻣﺎ ﻳﺘﻢ ﲢﺪﻳﺪ ٣ . CoolSelect ﻋﻨﺪ ﲢﺪﻳﺪ ﻧﻈﺎﻡ »اﻟﺘﺒﺮﻳﺪ«، ﻳﺘﻢ ﺿﺒﻂ درﺟﺔ ﺣﺮارة .ﻳﺘﻢ ﲢﻀﻴﺮﻫﺎ إﻣﺎ ﻣﻦ اﳌﻮز أﻭ اﳉﻮاﻓﺔ ﻋﻠﻰ ٣ درﺟﺔ ﻣﺌﻮﻳﺔ، ﻭﺳﺘﻈﻞ ﻋﻠﻰ ﻫﺬﻩ اﻟﺪرﺟﺔ ﺑﻐﺾ اﻟﻨﻈﺮZone ﻭﺗﺘﻤﻴﺰ ﺗﻠﻚ اﻟﻌﺼﺎﺋﺮ ﺑﻠﻮﻧﻬﺎ اﻷﺑﻴﺾ اﻟﺬﻱ ﳝﻴﻞ أﺣﻴﺎ ﻧ ﹰ ﺎ إﻟﻰ اﻟﻠﻮﻧﲔ .ﻋﻦ...
- Page 104 .إﻋﺪادات درﺟﺔ ﺣﺮارة ﺣﺠﺮة اﻟﺜﻼﺟﺔ .SAMSUNG اﳌﻴﺎﻩ ﺑﺎﻟﻌﻼﻣﺔ اﻟﺘﺠﺎرﻳﺔ ﺳﺘﻨﻄﺒﻖ درﺟﺔ اﳊﺮارة )٠°( ﻟﻠﻤﻨﻄﻘﺔ ٠ ﻋﻠﻰ ﻧﻄﺎﻕ درﺟﺔ ﺣﺮارة أﻱ ﻣﺴﺆﻭﻟﻴﺔ ﻗﺎﻧﻮﻧﻴﺔ ﻋﻨﺪ ﺣﺪﻭث أﻱSAMSUNG ﻻ ﺗﺘﺤﻤﻞ .٠ اﳌﻨﻄﻘﺔ ﺗﻠﻒ ﻳﻘﻊ ﲢﺖ ﻫﺬا اﻟﺒﻨﺪ، ﻭﻻ ﻳﻘﺘﺼﺮ ﻋﻠﻰ إﺗﻼﻑ اﳌﻤﺘﻠﻜﺎت...
- Page 105 اﳌﻮاد اﻟﻠﺰﺟﺔ، اﻟﺒﻨﺰﻭﻝ، اﳌﺮﻛﺒﺎت اﻟﻌﻀﻮﻳﺔ، اﻟﺰﺋﺒﻖ .ﺧﺰﻓﻲ ﺗﻨﺒﻴﻪ .ﻗﺪ ﻳﺆدﻱ ﻫﺬا إﻟﻰ ﻛﺴﺮ اﻟﺰﺟﺎج أﻭ اﻟﻮﻋﺎء اﳋﺰﻓﻲ ﻓﻲ ﺣﺎﻟﺔ اﺳﺘﺨﺮاج ﺛﻠﺞ ﻣﺘﻐﻴﺮ اﻟﻠﻮﻥ، ﺗﻮﻗﻒ ﻋﻦ اﺳﺘﺨﺪاﻡ • .Samsung Electronics اﳌﻨﺘﺞ ﻭاﺗﺼﺎﻝ ﲟﺮﻛﺰ ﺻﻴﺎﻧﺔ ٦٣_ اﻟﺘﺸﻐﻴﻞ DA68-01312H(0.0).indb 13 DA68-01312H(0.0).indb 13 2012.2.16 5:3:49 PM 2012.2.16 5:3:49 PM...
- Page 106 ﻳﺘﻢ ﺗﻮﻓﻴﺮ اﻟﺘﺤﺪﻳﺚ ﻛﻤﻠﻒ. ﻟﺘﺤﺪﻳﺚ اﻟﺒﺮاﻣﺞ، اﻧﺴﺦ ﻣﻠﻒ اﻟﺘﺤﺪﻳﺚ ﻋﻠﻰ ﻰ • .، ﻭﻗﻢ ﺑﺘﻮﺻﻴﻞ اﻟﺒﻄﺎﻗﺔ إﻟﻰ اﻟﻠﻮﺣﺔ. ﺳﻴﺘﻢ إﺟﺮاء اﻟﺘﺤﺪﻳﺚSD ﺑﻄﺎﻗﺔ إﺷﻌﺎر ﺗﺮﺧﻴﺺ ﻣﻔﺘﻮح اﳌﺼﺪر - ﻳﺴﺘﺨﺪﻡ ﻫﺬا اﳌﻨﺘﺞ ﺑﺮﻧﺎﻣﺠ ﹰ ﺎ ﻣﻔﺘﻮح • .اﳌﺼﺪر ﺗﺘﻮﻓﺮ ﺗﺮاﺧﻴﺺ ﻣﻔﺘﻮﺣﺔ اﳌﺼﺪر ﻓﻲ ﻗﺎﺋﻤﺔ اﳌﻨﺘﺠﺎت. اﺿﻐﻂ ﻋﻠﻰ اﻟﺰر ...
- Page 107 ﺗﺼﺤﻴﺢ ﺷﺎﺷﺔ اﻟﻠﻤﺲ :ﳝﻜﻨﻚ ﻣﻌﺎﻳﺮة ﻧﻘﻄﺔ ﳌﺲ اﻟﻘﻠﻢ ﻟﺘﻨﺎﺳﺐ اﺣﺘﻴﺎﺟﺎﺗﻚ ﺑﺸﻜﻞ أﻓﻀﻞ. ﻟﻀﺒﻂ ﻧﻘﻄﺔ ﳌﺲ اﻟﻘﻠﻢ ﻋﻠﻰ ﺷﺎﺷﺔ اﻟﻠﻤﺲ .١ ".ﻓﻲ اﻟﺮﻛﻦ اﻟﺴﻔﻠﻲ اﻷﳝﻦ ﻣﻦ ﻗﺎﺋﻤﺔ "اﻹﻋﺪادات اﳌﺲ اﻟﺰر .٢ .( )اﻹﻋﺪاداتSettings )ﺗﺼﺤﻴﺢ اﻟﺸﺎﺷﺔ( ﻓﻲ ﻗﺎﺋﻤﺔScreen Correction اﳌﺲ .٣ ....
- Page 108 ﺿﺒﻂ اﻟﺘﺎرﻳﺦ .ﺗﺘﻴﺢ ﻟﻚ ﻫﺬﻩ اﳌﻴﺰة ﺿﺒﻂ اﻟﺘﺎرﻳﺦ اﳊﺎﻟﻲ .١ .( )اﻹﻋﺪاداتSettings ﻓﻲ اﻟﺮﻛﻦ اﻟﺴﻔﻠﻲ اﻷﳝﻦ ﻣﻦ ﻗﺎﺋﻤﺔ اﳌﺲ اﻟﺰر .٢ .( )اﻹﻋﺪاداتSettings )اﻟﺘﺎرﻳﺦ( ﻓﻲ ﻗﺎﺋﻤﺔDate اﳌﺲ .٣ .ﳌﺮاﺟﻌﺔ اﻟﺸﻬﺮ ﻭ اﺳﺘﺨﺪﻡ اﻟﺰرﻳﻦ .٤ .( )ﺣﻔﻆSave اﺧﺘﺮ اﻟﻴﻮﻡ اﳌﺮﻏﻮب، ﺛﻢ اﳌﺲ اﻟﺰر ﺿﻮء...
- Page 109 ﻣﺴﺘﻮﻯ اﻟﺼﻮت .ﺗﺘﻴﺢ ﻟﻚ ﻫﺬﻩ اﳌﻴﺰة اﻟﺘﺤﻜﻢ ﻓﻲ ﻣﺴﺘﻮﻯ ﺻﻮت اﻹﻧﺬار .١ .( )اﻹﻋﺪاداتSettings ﻓﻲ اﻟﺮﻛﻦ اﻟﺴﻔﻠﻲ اﻷﳝﻦ ﻣﻦ ﻗﺎﺋﻤﺔ اﳌﺲ اﻟﺰر .٢ .( )اﻹﻋﺪاداتSettings )ﻣﺴﺘﻮﻯ اﻟﺼﻮت( ﻓﻲ ﻗﺎﺋﻤﺔVolume اﳌﺲ .٣ .ﺣﺪد زر ﻣﺴﺘﻮﻯ اﻟﺼﻮت ﻟﺘﻐﻴﻴﺮ ﻣﺴﺘﻮﻯ ﺻﻮت اﻹﻧﺬار .٤...
- Page 110 .ﻓﻲ ﺣﺎﻟﺔ ﺗﺴﺎﻗﻂ اﳌﻴﺎﻩ ﻣﻦ اﳌﻮ ز ﹼ ع، ﻓﻴﻌﻨﻲ ذﻟﻚ أﻧﻪ ﻣﺎزاﻝ ﻫﻨﺎﻙ ﻛﻤﻴﺔ ﻣﻦ اﻟﻬﻮاء ﻓﻲ اﳋﻂ ﻋﺒﺮ اﻹﻧﺘﺮﻧﺖ ﻣﻦ ﺧﻼﻝ ﻣﻮﻗﻊ اﻟﻮﻳﺐSamsung ﻻﺳﺘﺒﺪاﻝ ﻣﺮﺷﺢ اﳌﻴﺎﻩ، ﻗﻢ ﺑﺰﻳﺎرة ﻣﺮﻛﺰ ﺻﻴﺎﻧﺔ ﻣﺤﻠﻲ، أﻭ ﻣﻮ ز ﱢ ع رﺳﻤﻲ ﻷﺟﺰاء...
- Page 111 إﻧﺘﺎج اﻟﺜﻠﺞ اﻟﺴﺮﻳﻊ .اﺳﺘﺨﺪﻡ ﻫﺬﻩ اﻟﻮﻇﻴﻔﺔ ﻹﻧﺘﺎج اﻟﺜﻠﺞ ﺑﺸﻜﻞ ﺳﺮﻳﻊ ( ﻋﻠﻰ اﻟﺸﺎﺷﺔ ) ﻋﻨﺪ ﺗﺸﻐﻴﻞ ﻭﻇﻴﻔﺔ اﻟﺘﺠﻤﻴﺪ اﻟﺴﺮﻳﻊ، ﻳﻈﻬﺮ رﻣﺰ • .اﻟﺮﺋﻴﺴﻴﺔ ﻣﺮﺷﺢ اﳌﻴﺎﻩ )ﻣﺮﺷﺢ اﳌﻴﺎﻩ( ﺑﺎﻟﺸﺎﺷﺔ اﻟﺮﺋﻴﺴﻴﺔ ﻣﻦ اﻟﺘﺤﻘﻖ ﻣﻦ ﺣﺎﻟﺔ ﻣﺮﺷﺢ اﳌﻴﺎﻩ اﳊﺎﻟﻴﺔ. اﺗﺒﻊ اﻹرﺷﺎدات أدﻧﺎﻩ ﻟﻔﺤﺺ ﻭ/أﻭ اﺳﺘﺒﺪاﻝWater Filter ﳝ ﻜ ﹼﻨﻚ رﻣﺰ ﺣﺎﻟﺔ .ﻣﺮﺷﺢ...
- Page 112 ﺳﻤﺔ ﺷﺎﺷﺔ اﻟﺘﻮﻗﻒ .ﲢﺪﻳﺪ ﺳﻤﺎت ﻟﺸﺎﺷﺔ ﺗﻮﻗﻒ ﺷﺎﺷﺔ اﻟﻌﺮض .١ .( )اﻹﻋﺪاداتSettings اﳌﺲ زر .٢ .( )اﻹﻋﺪاداتSettings )ﺳﻤﺔ ﺷﺎﺷﺔ اﻟﺘﻮﻗﻒ( ﻓﻲ ﻗﺎﺋﻤﺔScreensaver Theme اﳌﺲ .٣ .( )ﺣﻔﻆSave ﺣﺪد ﺳﻤﺘﲔ ﻟﻠﺸﺎﺷﺔ ﻋﻠﻰ اﻷﻗﻞ، ﺛﻢ اﳌﺲ اﻟﺰر ﻗﺪ ﻻ ﻳﺘﻢ ﻋﺮض اﻟﺴﻤﺎت اﻟﺘﻲ ﲢﺪدﻫﺎ إذا ﻛﺎﻧﺖ اﻟﺒﻴﺎﻧﺎت اﻟﺘﻲ ﺗﺴﺘﻨﺪ •...
- Page 113 .Delete اﳌﺲ اﻟﺼﻮر اﻟﺘﻲ ﺗﺮﻏﺐ ﻓﻲ ﺣﺬﻓﻬﺎ، ﺛﻢ اﳌﺲ اﻟﺰر .( )ﺣﺬﻑDelete اﳌﺲ زر .٤ .٤ .( )ﻧﻌﻢYes اﳌﺲ زر .( )ﻧﻌﻢYes اﳌﺲ زر .Samsung ﻫﻨﺎﻙ ﻋﺸﺮ ﺻﻮر ﻣﺤﻤ ﹼ ﻠﺔ ﻣﺴﺒﻘﹰ ﺎ ﺑﻮاﺳﻄﺔ • .ﻫﺬﻩ اﻟﺼﻮر ﺗﺸﺮح ﻣﻴﺰات اﳌﻨﺘﺞ، ﻭﻻ ﳝﻜﻦ ﺣﺬﻓﻬﺎ ٨٢_ اﻟﺘﺸﻐﻴﻞ DA68-01312H(0.0).indb 21 DA68-01312H(0.0).indb 21 2012.2.16 5:3:58 PM...
- Page 114 .ﺣﻔﻆ اﻟﺼﻮر إﻟﻰ ﺑﻄﺎﻗﺔ اﻟﺬاﻛﺮة .١ .أدﺧﻞ ﺑﻄﺎﻗﺔ اﻟﺬاﻛﺮة ﻓﻲ ﻓﺘﺤﺔ ﺑﻄﺎﻗﺔ ذاﻛﺮة اﻟﺜﻼﺟﺔ .٢ .( )اﻟﺼﻮرPhotos )أﻟﺒﻮﻣﻲ( ﻓﻲ ﻗﺎﺋﻤﺔMy Album اﳌﺲ .٣ .٣ ﳊﻔﻆ ﺻﻮر ﻣﺘﻌﺪدة، اﺿﻐﻂ ﻋﻠﻰ زر .اﳌﺲ اﻟﺼﻮرة اﻟﺘﻲ ﺗﺮﻏﺐ ﻓﻲ ﺣﻔﻈﻬﺎ .( )ﲢﺪﻳﺪ ﻣﺘﻌﺪدMulti Select .٤...
- Page 115 .ﻛﻴﻔﻴﺔ ﺗﺪﻭﻳﺮ اﻟﺼﻮر .١ .( )اﻟﺼﻮرPhotos )أﻟﺒﻮﻣﻲ( ﻓﻲ ﻗﺎﺋﻤﺔMy Album اﳌﺲ .٢ .٢ )اﻟﺘﺤﺪﻳﺪ اﳌﺘﻌﺪد( ﻟﺘﺪﻭﻳﺮ ﺻﻮرMulti Select اﺿﻐﻂ ﻋﻠﻰ زر .اﳌﺲ اﻟﺼﻮرة اﻟﺘﻲ ﺗﺮﻏﺐ ﻓﻲ ﺗﺪﻭﻳﺮﻫﺎ .ﻣﺘﻌﺪدة .٣ .٣ اﳌﺲ اﻟﺼﻮر اﻟﺘﻲ ﺗﺮﻏﺐ ﻓﻲ ﺗﺪﻭﻳﺮﻫﺎ، ﺛﻢ اﳌﺲ اﻟﺰر ...
- Page 116 .١٠ اﺳﺘﺨﺪﻡ اﻷزرار - ﻭ+ ﻟﺘﻐﻴﻴﺮ ﻭﻗﺖ اﻧﺘﻘﺎﻝ ﻋﺮض اﻟﺸﺮاﺋﺢ، ﺛﻢ اﳌﺲ اﻟﺰر .( )ﻣﻮاﻓﻖOK .١١ ﻟﺘﻐﻴﻴﺮ ﺗﺮﺗﻴﺐ اﻟﺼﻮر ﻋﺮض اﻟﺸﺮاﺋﺢ، ﺣﺪد اﻟﺰر .١٢ .( )ﻣﻮاﻓﻖOK )ﻋﺸﻮاﺋﻲ(، ﺛﻢ اﳌﺲ اﻟﺰرShuffle )ﻋﺎدﻱ( أﻭNormal اﳌﺲ ٢٥_ اﻟﺘﺸﻐﻴﻞ DA68-01312H(0.0).indb 24 DA68-01312H(0.0).indb 24 2012.2.16 5:4:2 PM 2012.2.16 5:4:2 PM...
- Page 117 .٦ .ﺳﻴﺒﺪأ ﻋﺮض اﻟﺸﺮاﺋﺢ. اﳌﺲ اﻟﺸﺎﺷﺔ ﻟﺘﻐﻴﻴﺮ ﺧﻴﺎر اﻟﻌﺮض .ﻳﺘﻢ ﺗﺸﻐﻴﻞ ﻋﺮض اﻟﺸﺮاﺋﺢ ﳌﺮة ﻭاﺣﺪة. ﻋﻨﺪ اﻧﺘﻬﺎء ﻋﺮض اﻟﺸﺮاﺋﺢ، ﺗﻈﻬﺮ ﺧﻴﺎرات اﻟﻌﺮض ﻋﻠﻰ اﻟﺸﺎﺷﺔ • .، ﳝﻜﻨﻚ اﻻﻧﺘﻘﺎﻝ إﻟﻰ اﻟﺼﻮرة اﻟﺴﺎﺑﻘﺔ أﻭ اﻟﺘﺎﻟﻴﺔ أﻭ ﻭﻣﻦ ﺧﻼﻝ ﳌﺲ اﻟﺰر • .ﻟﺘﺸﻐﻴﻞ ﻋﺮض اﻟﺸﺮاﺋﺢ ﻣﺮة أﺧﺮﻯ ﺣﺪد...
- Page 118 .ﻛﻴﻔﻴﺔ ﺗﺸﻐﻴﻞ ﻋﺮض اﻟﺸﺮاﺋﺢ .١ . )اﻟﺼﻮر( ﺑﺎﻟﺸﺎﺷﺔ اﻟﺮﺋﻴﺴﻴﺔPhotos اﳌﺲ زر .٢ .( )اﻟﺼﻮرPhotos )أﻟﺒﻮﻣﻲ( ﻓﻲ ﻗﺎﺋﻤﺔMy Album اﳌﺲ .٣ .( )اﻟﺘﺤﺪﻳﺪ اﳌﺘﻌﺪدMulti Select اﳌﺲ زر .٤ اﳌﺲ اﻟﺼﻮر اﻟﺘﻲ ﺗﺮﻏﺐ ﻓﻲ إﺿﺎﻓﺘﻬﺎ ﻟﻌﺮض اﻟﺸﺮاﺋﺢ، ﺛﻢ اﳌﺲ زر .( )ﻋﺮض اﶈﺪدView Selected (.)ﺣﺪد...
- Page 119 )ﲢﺪﻳﺪ اﻟﻜﻞ(، ﺳﻴﺘﻢ ﲢﺪﻳﺪSelect All ﻋﻨﺪ اﻟﻀﻐﻂ ﻋﻠﻰ زر • .ﻋﻨﺪ ﲢﺪﻳﺪ ﺻﻮرة، ﺳﺘﻈﻬﺮ ﻣﻌﻠﻮﻣﺎت ﺗﻔﺎﺻﻴﻠﻬﺎ • ﺟﻤﻴﻊ اﻟﺼﻮر اﳌﻮﺟﻮدة ﺑﺎﻟﺼﻔﺤﺔ اﳊﺎﻟﻴﺔ؛ ﻭﺳﻴﺘﺤﻮﻝ زر .( )إﻟﻐﺎء ﲢﺪﻳﺪ اﻟﻜﻞUnselect All )ﲢﺪﻳﺪ اﻟﻜﻞ( إﻟﻰ زرSelect All )ﻋﺮض اﶈﺪد(، ﺳﺘﺸﺎﻫﺪView Selected ﻋﻨﺪ اﻟﻀﻐﻂ ﻋﻠﻰ زر •...
- Page 120 .٥ .٥ )ﲢﺪﻳﺪMulti Select ﻟﺘﺨﺰﻳﻦ ﺻﻮر ﻣﺘﻌﺪدة، اﺿﻐﻂ ﻋﻠﻰ زر .( )أﻟﺒﻮﻣﻲMy Album اﳌﺲ اﻟﺼﻮرة اﻟﺘﻲ ﺗﺮﻏﺐ ﻓﻲ ﺣﻔﻈﻬﺎ إﻟﻰ .(ﻣﺘﻌﺪد )ﲢﺪﻳﺪ اﻟﻜﻞ(، ﺗﻈﻬﺮ ﺷﺎﺷﺔSelect All ﻋﻨﺪ اﻟﻀﻐﻂ ﻋﻠﻰ زر • .( )اﻟﺘﺤﺪﻳﺪ اﳌﺘﻌﺪدMulti Selection ﻋﻨﺪﻣﺎ ﺗﻜﻮﻥ ﻫﻨﺎﻙ ﺻﻔﺤﺎت ﻣﺘﻌﺪدة ﺑﺎﻟﻌﺪﻳﺪ ﻣﻦ اﻟﺼﻮر، ﺳﻴﺘﻢ •...
- Page 121 . ﻓﻘﻂSD/SDHC/MMC/HS MMC ﺗﻘﺒﻞ ﻓﺘﺤﺔ اﻟﺒﻄﺎﻗﺔ ﺑﻄﺎﻗﺎت ذارﻛﺔ ﻣﻦ اﻟﻨﻮع • . ﻓﻘﻂJPEG (JPG) ﳝﻜﻦ أﻥ ﺗﻘﺮأ ﺗﻠﻚ اﻟﻔﺘﺤﺔ ﺻﻮر • .ﻟﻠﻮﺣﺔ اﻟﻘﺪرة ﻋﻠﻰ ﺗﺨﺰﻳﻦ ٠٠٣ ﺻﻮرة ﺗﻘﺮﻳ ﺒ ﹰ ﺎ • ٠٨٤ ﺑﻜﺴﻞ، ﺑﻐﺾ اﻟﻨﻈﺮ ﻋﻦ اﳊﺠﻢx ٨٠٠ ﻋﻨﺪ ﺣﻔﻆ ﺻﻮر ﻣﻦ ﺑﻄﺎﻗﺔ ذارﻛﺔ إﻟﻰ اﻟﻠﻮﺣﺔ، ﺗﻐﻴ ﱢ ﺮ اﻟﺜﻼﺟﺔ ﺗﻠﻘﺎﺋﻴ ﹰ ﺎ ﺣﺠﻢ اﻟﺼﻮرة إﻟﻰ •...
- Page 122 .٤ .٤ .( )ﺣﺬﻑDelete اﳌﺲ زر .( )ﻧﻌﻢYes اﳌﺲ زر .٥ .( )ﻧﻌﻢYes اﳌﺲ زر اﻟﺼﻮر . )أﻟﺒﻮﻣﻲ( ﺑﺎﻟﺜﻼﺟﺔMy Album ﳝﻜﻨﻚ ﲢﻮﻳﻞ ﺻﻮر ﻣﻦ ﺑﻄﺎﻗﺔ ذارﻛﺔ إﻟﻰ ( )أﻟﺒﻮﻣﻲMy Album ﻛﻴﻔﻴﺔ ﻧﺴﺦ اﻟﺼﻮر ﻣﻦ ﺑﻄﺎﻗﺔ اﻟﺬاﻛﺮة إﻟﻰ .ﻳﺘﻢ اﻟﺘﻌﺮﻑ ﻋﻠﻰ اﻟﺼﻮر ذات اﻟﺪﻗﺔ ٦٩٠٤*٦٩٠٤ أﻭ أﻗﻞ •...
- Page 123 .ﻛﻴﻔﻴﺔ ﺣﺬﻑ اﳌﺬﻛﺮات .١ . )ﻣﺬﻛﺮة( ﺑﺎﻟﺸﺎﺷﺔ اﻟﺮﺋﻴﺴﻴﺔMemo اﳌﺲ زر .ﳊﺬﻑ ﻣﺬﻛﺮات ﻣﺘﻌﺪدة، ﺗﺎﺑﻊ ﻫﻨﺎ .٢ .٢ ﳊﺬﻑ ﻣﺬﻛﺮات ﻣﺘﻌﺪدة، اﺿﻐﻂ ﻋﻠﻰ زر .اﳌﺲ اﳌﺬﻛﺮة اﻟﺘﻲ ﺗﺮﻏﺐ ﻓﻲ ﺣﺬﻓﻬﺎ .( )ﲢﺪﻳﺪ ﻣﺘﻌﺪدMulti Select .٣ .٣ .اﳌﺲ اﳌﺬﻛﺮات اﻟﺘﻲ ﺗﺮﻏﺐ ﻓﻲ ﺣﺬﻓﻬﺎ .(...
- Page 124 .٤ .( )ﻋﺮض اﶈﺪدView Selected اﳌﺲ زر .٥ ﻭ ﺣﺪد اﳌﺬﻛﺮة اﶈﻔﻮﻇﺔ ﺑﺎﺳﺘﺨﺪاﻡ اﻷزرار ، ﺳﺘﻈﻬﺮ أﻭ ﻓﻲ ﻛﻞ ﻣﺮة ﺗﻘﻮﻡ ﻓﻴﻬﺎ ﺑﺎﻟﻀﻐﻂ ﻋﻠﻰ اﻟﺰر .اﻟﻘﺎﺋﻤﺔ اﻟﺘﺎﻟﻴﺔ ﻓﻲ اﻟﺘﺴﻠﺴﻞ )اﻟﻌﺮض اﻟﺘﻔﺼﻴﻠﻲ(، ﳝﻜﻨﻚ ﺣﺬﻑDetail View ﻓﻲ ﺷﺎﺷﺔ • .ﻣﺬﻛﺮة أﻭ إﳊﺎﻗﻬﺎ أﻭ ﻋﺪﻡ إﳊﺎﻗﻬﺎ ﺑﺎﻟﺸﺎﺷﺔ اﻟﺮﺋﻴﺴﻴﺔ ١٧_ اﻟﺘﺸﻐﻴﻞ...
- Page 125 .٢ .٢ )ﲢﺪﻳﺪMulti Select ﻟﻌﺮض ﻣﺬﻛﺮات ﻣﺘﻌﺪدة، اﺿﻐﻂ ﻋﻠﻰ زر .اﳌﺲ اﳌﺬﻛﺮة اﻟﺘﻲ ﺗﺮﻏﺐ ﻓﻲ ﻋﺮﺿﻬﺎ .(ﻣﺘﻌﺪد )اﻟﺘﺤﺪﻳﺪ اﳌﺘﻌﺪد( ﲢﺪﻳﺪMulti-Select ﻳﺘﻴﺢ ﻟﻚ ﻭﺿﻊ )ﲢﺪﻳﺪ اﻟﻜﻞ(، ﺗﻈﻬﺮ ﺷﺎﺷﺔSelect All ﻋﻨﺪ اﻟﻀﻐﻂ ﻋﻠﻰ زر • ﻋﺪد ﻣﻦ اﳌﺬﻛﺮات، ﺛﻢ ﻋﺮﺿﻬﺎ ﻭاﺣﺪة ﺑﻌﺪ اﻷﺧﺮﻯ ﻣﻦ ﺧﻼﻝ .(...
- Page 126 . )ﺣﻔﻆ( ﺑﻌﺪ إﻛﻤﺎﻟﻚ اﳌﺬﻛﺮةSave اﳌﺲ زر ٤ . إذا ﻛﻨﺖ ﺗﺮﻏﺐ ﻓﻲ ﻋﺮض اﳌﺬﻛﺮة ﻋﻠﻰ اﻟﺸﺎﺷﺔ اﻟﺮﺋﻴﺴﻴﺔ، اﺿﻐﻂ • )إﳊﺎﻕ ﺑﺎﻟﺸﺎﺷﺔ اﻟﺮﺋﻴﺴﻴﺔ(، ﺛﻢAttach to Home Screen ﻋﻠﻰ زر .( )ﺣﻔﻆSave اﳌﺲ زر .اﻧﻈﺮ أدﻧﺎﻩ Hide Memo )ﻋﺪﻡ اﻹﳊﺎﻕ(، أﻭ إﺧﻔﺎﺋﻬﺎ ﻣﺆﻗ ﺘ ﹰ ﺎ ﻣﻦ ﺧﻼﻝ ﳌﺲ زرDetach ﳝﻜﻨﻚ ﻋﺮض اﳌﺬﻛﺮة ﺑﻌﻴ ﺪ ﹰ ا ﻋﻦ اﻟﺸﺎﺷﺔ اﻟﺮﺋﻴﺴﻴﺔ ﻣﻦ ﺧﻼﻝ ﳌﺲ زر •...
- Page 127 ﻣﺬﻛﺮة . )ﻣﺬﻛﺮة( ﻟﺘﺤﺮﻳﺮ ﻣﺬﻛﺮة ﻟﻨﻔﺴﻚ أﻭ ﻟﺸﺨﺺ ﻣﺎ آﺧﺮMemo ﳝﻜﻨﻚ اﺳﺘﺨﺪاﻡ ﻭﻇﻴﻔﺔ .ﻛﻴﻔﻴﺔ ﲢﺮﻳﺮ ﻣﺬﻛﺮة ﺟﺪﻳﺪة . )ﻣﺬﻛﺮة( ﺑﺎﻟﺸﺎﺷﺔ اﻟﺮﺋﻴﺴﻴﺔMemo اﳌﺲ زر ١ . .( )ﺟﺪﻳﺪNew اﳌﺲ زر ٢ . ﺣﺪد أدﻭات اﳌﺬﻛﺮة اﳌﺮﻏﻮﺑﺔ ﻣﻦ ﺧﻼﻝ ﳌﺲ أزرار اﻷدﻭات اﳌﻮﺟﻮدة أﻋﻠﻰ ﻣﻨﻄﻘﺔ ﺔ...
- Page 128 ﺿﺒﻂ اﳌﻮ ز ﹼ ع :ﻟﺘﻐﻴﻴﺮ ﻧﻮع اﻟﺜﻠﺞ، اﺗﺒﻊ ﻫﺬﻩ اﳋﻄﻮات . )ﺣﺎﻟﺔ اﳌﻮ ز ﹼ ع( ﺑﺎﻟﺸﺎﺷﺔ اﻟﺮﺋﻴﺴﻴﺔ. ﺳﺘﻨﺒﺜﻖ ﺷﺎﺷﺔ اﳌﻮ ز ﹼ عDispenser Status اﳌﺲ ١ . .( )إﻏﻼﻕCLOSE اﳌﺲ ﻧﻮع اﳌﻮ ز ﹼ ع اﳌﺮﻏﻮب، ﺛﻢ اﳌﺲ اﻟﺰر ٢...
- Page 129 ﻗﺪ ﺗﺘﻐﻴﺮ درﺟﺔ ﺣﺮارة اﺠﻤﻟﻤ ﹼ ﺪ أﻭ اﻟﺜﻼﺟﺔ اﺳﺘﻨﺎ د ﹰ ا إﻟﻰ ﻋﺪد ﻣﺮات ﻓﺘﺢ اﻟﺒﺎب • .ﻭﻏﻠﻘﻪ، ﻭﻛﻤﻴﺔ اﻟﻄﻌﺎﻡ، ﻭدرﺟﺔ اﳊﺮارة اﶈﻴﻄﺔ...إﻟﺦ ﺗﺨﺘﻠﻒ درﺟﺎت اﳊﺮارة ﻓﻲ ﻛﻞ ﻗﻄﺎع ﺗﺨﺰﻳﻦ أﻃﻌﻤﺔ ﻓﻲ ﺣﺠﺮات اﺠﻤﻟﻤ ﹼ ﺪ • .ﻭاﻟﺜﻼﺟﺔ إذا...
- Page 130 ﻓﻲ اﳉﺎﻧﺐ اﻟﺴﻔﻠﻲ ﻣﻦ اﻟﺸﺎﺷﺔ: رﻣﻮز اﻟﻘﺎﺋﻤﺔ .ﻣﺬﻛﺮة: ﻹﻧﺸﺎء ﻣﺬﻛﺮات ﺧﺎﺻﺔ ﺑﻚ، أﻭ ﺣﻔﻈﻬﺎ، أﻭ ﻣﺮاﺟﻌﺘﻬﺎ ١ . .ﺻﻮر: ﻹدارة اﻟﺼﻮر اﺨﻤﻟ ﺰ ﹼ ﻧﺔ، أﻭ اﺳﺘﻴﺮاد ﺻﻮر ﻣﻦ ﺑﻄﺎﻗﺎت اﻟﺬاﻛﺮة ٢ . .درﺟﺔ اﳊﺮارة: ﳝﻜﻨﻚ ﻣﻦ ﺧﻼﻟﻪ ﺗﻐﻴﻴﺮ إﻋﺪاد درﺟﺔ ﺣﺮارة اﻟﺜﻼﺟﺔ ﻭﺗﺸﻐﻴﻞ ﻭﻇﺎﺋﻒ "اﻟﺘﺒﺮﻳﺪ اﻟﻔﺎﺋﻖ" ﻭ"اﻟﺘﺠﻤﻴﺪ اﻟﻔﺎﺋﻖ" أﻭ إﻳﻘﺎﻑ ﺗﺸﻐﻴﻠﻬﺎ ٣...
- Page 131 ذات اﻟﺒﺎﺑﲔSAMSUNG ﺗﺸﻐﻴﻞ ﺛﻼﺟﺔ اﳌﺘﻘﺎﺑﻠﲔ اﻟﺸﺎﺷﺔ اﻟﺮﺋﻴﺴﻴﺔ اﻟﺸﺎﺷﺔ اﻟﺮﺋﻴﺴﻴﺔ ﻫﻲ ﻧﻘﻄﺔ اﻟﺒﺪء ﳉﻤﻴﻊ اﻟﻮﻇﺎﺋﻒ. ﻓﻲ ﻣﻨﺘﺼﻒ اﻟﺸﺎﺷﺔ اﻟﺮﺋﻴﺴﻴﺔ، ﺗﻈﻬﺮ • .ﻣﻌﻠﻮﻣﺎت اﻟﺜﻼﺟﺔ اﻷﺳﺎﺳﻴﺔ ﻣﺜﻞ اﻟﻮﻗﺖ، ﻭاﻟﺘﺎرﻳﺦ، ﻭدرﺟﺔ اﳊﺮارة، ﻭﲢﺪﻳﺪ اﳌﻮ ز ﹼ ع .ﺗﻌﺮض رﻣﻮز اﳌﺆﺷﺮ اﳌﻮﺟﻮدة ﺑﺎﳉﺎﻧﺐ اﻟﻌﻠﻮﻱ اﻷﻳﺴﺮ ﻣﻦ اﻟﺸﺎﺷﺔ ﻣﻌﻠﻮﻣﺎت ﺣﻮﻝ ﺣﺎﻟﺔ اﻟﺜﻼﺟﺔ...
- Page 132 اﻟﻨﻘﺎط اﳌﻄﻠﻮب اﻟﺘﺤﻘﻖ ﻣﻨﻬﺎ ﻗﺒﻞ اﻻﺳﺘﺨﺪاﻡ ﻣﺤﺎذاة ارﺗﻔﺎﻋﺎت أﺑﻮاب اﻟﺜﻼﺟﺔ .ﻗﺒﻞ اﺳﺘﺨﺪاﻡ اﻟﺜﻼﺟﺔ، ﻳﺠﺐ اﻟﺘﺤﻘﻖ ﻣﻦ اﻟﻌﻨﺎﺻﺮ اﻟﺘﺎﻟﻴﺔ إذا ﻛﺎﻥ ﺑﺎب اﻟﺜﻼﺟﺔ أﻗﻞ ﻣﻦ ﺑﺎب اﺠﻤﻟﻤ ﹼ ﺪ، ﻗﻢ ﺑﻀﺒﻂ ارﺗﻔﺎع اﻟﺒﺎب ﻣﻦ ﺧﻼﻝ .ﺳﺘﺘﻌﺮﻑ ﻣﻦ ﺧﻼﻟﻬﺎ ﻋﻠﻰ ﻃﺮﻕ ﻻﺳﺘﺨﺪاﻡ اﳌﻨﺘﺞ ﺑﺄﻣﺎﻥ ﻭﻓﻌﺎﻟﻴﺔ .ﺗﺪﻭﻳﺮ...
- Page 133 ﺗﺬﻛﺮ اﺳﻢ ﻛﻞ ﺟﺰء ﺗﺄرﻳﺾ اﳌﻨﺘﺞ ﺗﺄﻛﺪ ﻣﻦ ﺗﺄرﻳﺾ اﳌﻨﺘﺞ ﳌﻨﻊ ﺗﺴﺮب اﻟﺘﻴﺎر اﻟﻜﻬﺮﺑﻲ أﻭ ﺣﺪﻭث ﺻﺪﻣﺔ ﺷﺒﻜﺔ اﻟﻮﺣﺪة .ﻛﻬﺮﺑﻴﺔ .ﺟﺰء اﻟﻌﺮض )ﺷﺎﺷﺔ اﻟﻠﻤﺲ(: اﳉﺰء اﻟﺬﻱ ﻳﻌﺮض اﻟﻮﻇﻴﻔﺔ اﳌﻜﻮ ﹼ ﻧﺔ .ﻇﻴﻔﺔ اﳌﻜﻮ ﻧ ﻧﺔ ﻧﺔ . . ﻧﺔ ﻇﻴ ﻇﻴﻔ ﻴﻔﺔ ﻔﺔ ا ﳌ ﳌﻜ ﳌﻜﻮ ﻜ ﻮ ﻮ ﹼ...
- Page 134 اﻟﺮﺟﺎء اﻟﺘﺤﻘﻖ ﻣﻦ اﻟﻌﻨﺎﺻﺮ اﻟﺘﺎﻟﻴﺔ ﻗﺒﻞ ﺗﺮﻛﻴﺐ اﳌﻨﺘﺞ. ﺗﺄﻛﺪ ﻣﻦ • .إﻣﻜﺎﻧﻴﺔ ﲢﺮﻳﺮ أﺑﻮاب اﳌﻨﺘﺞ ﺑﻨﻔﺲ ﻃﺮﻳﻘﺔ ﻭﺿﻊ اﻟﺘﺮﻛﻴﺐ (٢٠x٢٠) ﻓﺘﺤﺔ ﺗﺰﻭﻳﺪ اﳌﻴﺎﻩ .إذا ﻟﻢ ﳝﻜﻦ ﲢﺮﻳﺮ اﻷﺑﻮب، ﻓﻠﻦ ﳝﻜﻦ ﺗﺮﻛﻴﺒﻬﺎ ﺏ ()ﱈ ﺟـ ب أ اﻟﻄﺮاز RS627LHQESR “٤٢ ١٠٦٨ ٢١٢٠Min ٧٠٠ ﺩ ﻫـ ﺟـ ٢١٤٠Max RS757LHQESR “٤٨...
- Page 135 ﻗﺪ ﻳﺆدﻱ أﻱ ارﺗﻔﺎع ﻓﻲ درﺟﺔ ﺣﺮارة اﻷﻃﻌﻤﺔ اﺠﻤﻟﻤ ﱠ ﺪة أﺛﻨﺎء إزاﻟﺔ اﻟﺜﻠﺞ • .إﻟﻰ ﻗ ﹺ ﺼﺮ ﻓﺘﺮة اﻟﺘﺨﺰﻳﻦ اﶈﺘﻮﻳﺎت ٠٧ ……………………………………………………………………………………………………………………………………………………………………………………………………… إﻋﺪاد اﻟﺜﻼﺟﺔ ذات اﻟﺒﺎﺑﲔ اﳌﺘﻘﺎﺑﻠﲔ ١٠ ………………………………………………………………………………………………………………………………………………………………………… ذات اﻟﺒﺎﺑﲔ اﳌﺘﻘﺎﺑﻠﲔSAMSUNG ﺗﺸﻐﻴﻞ ﺛﻼﺟﺔ ٤٢ …………………………………………………………………………………………………………………………………………………………………………………………………………………اﺳﺘﻜﺸﺎﻑ اﻷﺧﻄﺎء ﻭإﺻﻼﺣﻬﺎ ٦٠_ ﻣﻌﻠﻮﻣﺎت اﻟﺴﻼﻣﺔ DA68-01312H(0.0).indb 43 DA68-01312H(0.0).indb 43 2012.2.16 5:4:28 PM...
- Page 136 ﻋﻼﻣﺎت اﻟﺘﺤﺬﻳﺮ اﳋﺎﺻﺔ ﺑﺎﻟﺘﺨﻠﺺ ﻣﻦ اﳌﻨﺘﺞ ﻋﻼﻣﺎت اﻟﺘﻨﺒﻴﻪ اﳋﺎﺻﺔ ﺑﺎﻟﺘﻨﻈﻴﻒ ﻭاﻟﺼﻴﺎﻧﺔ ﲢﺬﻳﺮ ﺗﻨﺒﻴﻪ ﺗﺄﻛﺪ ﻣﻦ ﻋﺪﻡ ﺗﻠﻒ أﻱ ﻣﻦ اﻷﻧﺎﺑﻴﺐ اﳌﻮﺟﻮدة ﺑﺎﳉﺰء اﳋﻠﻔﻲ • ،ﻻ ﺗﻘﻢ ﺑﺮش اﳌﻴﺎﻩ ﻣﺒﺎﺷﺮ ة ﹰ داﺧﻞ اﻟﺜﻼﺟﺔ أﻭ ﺧﺎرﺟﻬﺎ • .ﻟﻠﺠﻬﺎز ﻗﺒﻞ اﻟﺘﺨﻠﺺ ﻣﻨﻪ .ﻷﻥ...
- Page 137 .ﻻ ﺗﺴﺘﺨﺪﻡ ﻣﺮﻭﺣﺔ اﻟﺘﻬﻮﻳﺔ .ﻭ/أﻭ ﺗﻠﻒ ﺑﺎﳌﻤﺘﻠﻜﺎت .ﻓﻘﺪ ﲢﺪث ﺷﺮارة ﺗﺆدﻱ إﻟﻰ اﻧﻔﺠﺎر أﻭ ﻧﺸﻮب ﺣﺮﻳﻖ أﻱ ﺗﻐﻴﻴﺮات أﻭ ﺗﻌﺪﻳﻼت ﻳﺘﻢSamsung ﻻ ﺗﺸﻤﻞ ﺧﺪﻣﺔ ﺿﻤﺎﻥ اﻟﺘﻲ ﺗﻮﻓﺮﻫﺎ اﻟﺸﺮﻛﺔ اﳌﺼ ﻨ ﱢ ﻌﺔ أﻭ ﻭﻛﻴﻞLED اﺳﺘﺨﺪﻡ ﻣﺼﺎﺑﻴﺢ • إﺟﺮاؤﻫﺎ ﻋﻦ ﻃﺮﻳﻖ ﺟﻬﺎت أﺧﺮﻯ ﻋﻠﻰ ﻫﺬا اﳉﻬﺎز ﺑﺎﻟﻜﺎﻣﻞ، ﻛﻤﺎ ﻻ...
- Page 138 ﻋﻼﻣﺎت اﻟﺘﺤﺬﻳﺮ اﻟﺼﺎرﻣﺔ اﳋﺎﺻﺔ ﺑﺎﻟﺘﺮﻛﻴﺐ ﲢﺬﻳﺮ ﻓﻲ ﺣﺎﻟﺔ ﺣﺪﻭث ﺗﻠﻒ ﻟﺴﻠﻚ اﻟﺘﻴﺎر اﻟﻜﻬﺮﺑﻲ، ﻳﺠﺐ • ﻻ ﺗﻘﻢ ﺑﺘﺮﻛﻴﺐ ﻫﺬا اﳉﻬﺎز ﺑﺎﻟﻘﺮب ﻣﻦ ﻣﺪﻓﺄة أﻭ ﻣﻮﻗﺪ، أﻭ • اﺳﺘﺒﺪاﻟﻪ ﻓﻲ اﳊﺎﻝ ﻋﻦ ﻃﺮﻳﻖ اﻟﺸﺮﻛﺔ اﳌﺼ ﻨ ﱢ ﻌﺔ أﻭ ﻭﻛﻴﻞ .ﻣﻮاد ﻗﺎﺑﻠﺔ ﻟﻼﺷﺘﻌﺎﻝ .اﻟﺼﻴﺎﻧﺔ...
- Page 139 .ﻛﻤﻴﺔ اﳌﻮاد اﳌﺒﺮ ﱠ دة اﳌﺴﺘﺨﺪﻣﺔ ﺻﻴﺎﻧﺔ أﻭ اﺑﺤﺚ ﻋﻦ اﻟﺘﻌﻠﻴﻤﺎت ﻭاﳌﻌﻠﻮﻣﺎت ﻋﺒﺮ اﻹﻧﺘﺮﻧﺖ ﻋﻠﻰ اﳌﻮﻗﻊ .ﻻ ﺗﻘﻢ ﺑﺘﺸﻐﻴﻞ اﳉﻬﺎز ﻋﻨﺪ ﻇﻬﻮر أﻱ ﻋﻼﻣﺎت ﺗﺪﻝ ﻋﻠﻰ ﻭﺟﻮد ﺗﻠﻒ .www.samsung.com .إذا ﺳﺎﻭرﺗﻚ اﻟﺸﻜﻮﻙ، ﺑﺮﺟﺎء اﻻﺗﺼﺎﻝ ﺑﺎﳌﻮ ز ﱢ ع ﻟﻜﻞ ٨ ﺟﺮاﻡ ﻣﻦ اﻟﻐﺎز...
- Page 140 اﻟﻌﺮﺑﻴﺔ .٪١٠٠ ﲤﺖ ﻃﺒﺎﻋﺔ ﻫﺬا اﻟﺪﻟﻴﻞ ﻋﻠﻰ ﻭرﻕ ﻣ ﹸ ﻌﺎد ﺗﺪﻭﻳﺮﻩ ﺑﻨﺴﺒﺔ اﻹﻣﻜﺎﻧﺎت اﻟﻬﺎﺋﻠﺔ ﺗﺨﻴﻞ .Samsung ﺷﻜﺮ ﹰ ا ﻟﺸﺮاﺋﻚ أﺣﺪ ﻣﻨﺘﺠﺎت ،ﻟﻠﺤﺼﻮﻝ ﻋﻠﻰ ﻣﺴﺘﻮﻯ ﻛﺎﻣﻞ ﻣﻦ اﳋﺪﻣﺔ أﻭ ﻗﻄﻊ إﺿﺎﻓﻴﺔ ﻳﺮﺟﻰ ﺗﺴﺠﻴﻞ ﻣﻨﺘﺠﻚ أﻭ زﻳﺎرة ﻣﻮﻗﻊ اﻟﻮﻳﺐ www.samsung.com/register 1-800-SAMSUNG (726-7864) ﻣﻀﻤﻦ...