Table of Contents
Advertisement
Available languages
Available languages
Quick Links
Advertisement
Chapters
Table of Contents

Related Manuals for Philips SDV3427W/27


Summary of Contents for Philips SDV3427W/27
- Page 1 Audio/Video SDV3427W/27 User manual...
- Page 3 WARNING: INSTALLATION OF THIS PRODUCT NEAR POWER LINES IS DANGEROUS, FOR YOUR SAFETY, FOLLOW THE INSTALLATION DIRECTIONS. WATCH FOR WIRES! YOU CAN BE KILLED IF THIS ANTENNA COMES NEAR ELECTRIC POWER LINES. READ INSTRUCTIONS!
-
Page 4: Table Of Contents
TABLE OF CONTENTS Important safety instructions .........5 Select and measure your installation site ..... 6 Choose a mount type ..........7 Parts List ..............8 Assembling the antenna ........10 Antenna grounding and connection ..... 13 Easy installation guides ........17 Antenna removal ........... 17 Helpful tips ............ -
Page 5: Important Safety Instructions
IMPORTANT SAFETY INSTRUCTIONS: • NEVER touch ANYTHING or ANYONE in contact with a power line. You can be electrocuted. In case of an accident or emergency, call 911 immediately for help. • INSPECT your installation site carefully for power lines. Make sure there is no possibility the antenna, its mounting structure or your ladder can come into contact with power lines. -
Page 6: Select And Measure Your Installation Site
SELECT AND MEASURE YOUR INSTALLATION SITE Key things to consider in choosing the antenna installation site are: 1) Choose a SAFE location that is far away from power lines. Keep the distance between power lines and the antenna and its mounting structure at least 2 times the combined height of the antenna and its mounting structure added together. -
Page 7: Choose A Mount Type
CHOOSE A MOUNT TYPE: Some examples of common mounting options are shown below. Follow the installation instructions for the mount you will use: J-Mount (Provided) 2) Ridge Mount (Not provided) 3) Chimney Mount (Not provided) 4) Wall Mount (Not provided) IF YOU ARE UNSURE OR DO NOT FEEL CAPABLE OF INSTALLING THIS ANTENNA,... -
Page 8: Parts List
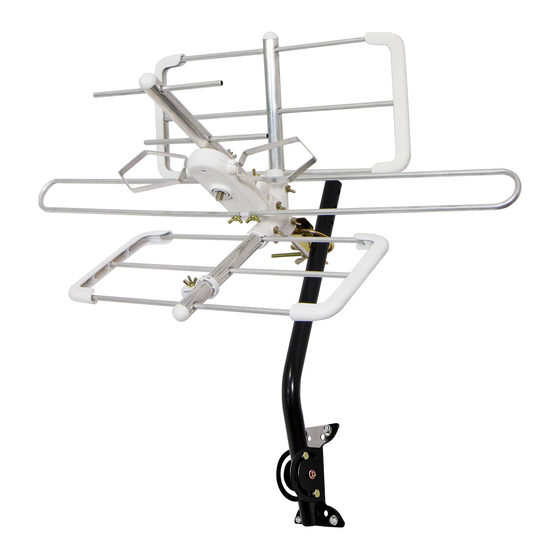
ASSEMBLY INSTRUCTIONS: Thank you for purchasing the Philips SDV3427W/27 Passive Digital Outdoor TV Antenna. It is a sturdy, high-performance antenna designed to receive UHF and VHF broadcasted signals. The small, compact design allows you to install the antenna almost any- where on the outside or in the attic of your house. - Page 9 11) Wing Nut (M5) – 4 ea. 12) “U” Bolt and Clamp Assembly – 1 ea (attached to main boom) 13) Rubber Boot – 1 ea. 14) Mounting bracket – 1 ea. 15) “J” Mount (15/16” or 2.5cm) – 1 ea. 16) 1/4”X 2”...
-
Page 10: Assembling The Antenna
ASSEMBLING THE ANTENNA: 1) Assemble the Main Housing Unit to the Main Boom. Secure the Main Boom to the Main Housing Unit with the M3 Wing Nut. Note: The main boom has two slotted holes on one side and four holes on the other side. - Page 11 3) Assemble the Reflector Bracket. Attach the Reflector Bracket to the Main Boom using two M5 x 40mm Carriage Bolts and two M5 Wing Nuts. Fig.3a 4) Assemble the Reflectors Attach each Reflector to the Main Boom using a M5 x 40mm Carriage Bolt and M5 Wing Nut.
- Page 12 5) Installing the assembled antenna. a) Locate a position on the house that is far away from power lines. Refer to the Important Safety Instructions. b) Secure the Mounting Bracket to the location selected for the antenna. The 1/4 X 2” Lag Screws have been provided for some installations.
-
Page 13: Antenna Grounding And Connection
6) Antenna Grounding & Connection The National Electric Code (NEC) requires your out- door antenna installation to be properly grounded. This involves grounding both the antenna and the antenna mounting structure. This helps protect you and your property in the event of static build up on the antenna or lightning near your home. - Page 14 Tighten this connection securely. Ensure there is a good electrical connection between your mounting structure and grounding wire. Run the grounding wire as straight as possible and use stand-off insulators spaced four (4) to six (6) feet apart. Attach the grounding wire to an acceptable building ground location.
- Page 15 If you are using a pre-built cable that has connec- tors, follow these steps. i. Cut 4 slits spaced evenly apart at the narrow tip of the provided Rubber Boot approximately 1/4” in length. (Fig. 6c) Fig. 6c ii. Run the cable through the narrow end of the Rubber Boot and attach the cable to the Cable Fixing Accessory on the Reflector.
- Page 16 c) Ground the 75 OHM Grounding Block: Connect a #8 aluminum or #10 grounding wire to a screw terminal provided on the 75 ohm grounding block. Connect the other end of the wire to an acceptable building ground location. Refer to step a) in this section for acceptable building grounding locations.
-
Page 17: Easy Installation Guides
EASY INSTALLATION GUIDES: EASY INSTALLATION FOR TODAY’S HDTVS 1) Connect the coax cable from the antenna to the antenna input on your HDTV. 2) Follow your HDTV’s instruction manual to scan for channels on your television. EASY INSTALLATION FOR ANALOG TVS WITH SET-TOP BOX 1) Connect the coax cable from the antenna to your set-top box antenna input. - Page 18 FOR FURTHER ASSISTANCE, CALL 1-800-654- 8483 FOR TECHNICAL SUPPORT. MADE IN CHINA The Philips trademark and the Philips Shield Emblem are registered trademarks of Koninklijke Philips N.V. used under license. This product has been manufactured by Gibson Innovations Limited. It is distributed and warranted by Jasco Products Company LLC, 10 E.
- Page 19 Audio/Video SDV3427W/27 Manual del usuario...
- Page 21 ADVERTENCIA: INSTALAR ESTE PRODUCTO CERCA DE CABLES DE TENSIÓN ES PELIGROSO POR SU SEGURIDAD, SIGA LAS INDICACIONES DE INSTALACIÓN. PELIGRO ¡PRESTE ATENCIÓN A LOS CABLES ELÉCTRICOS! EL CONTACTO DE ESTA ANTENA CON ALGÚN CABLE ELÉCTRICO PUEDE CAUSARLE LA MUERTE. ¡LEA LAS INSTRUCCIONES!
- Page 22 ÍNDICE Instrucciones importantes de seguridad ....23 Seleccione y mida el lugar de la instalación ..24 Elija un tipo de montaje ........25 Lista de piezas ............26 Instrucciones para el ensamblaje ......28 Puesta a tierra y conexión de la antena ....31 Guías para una instalación sencilla ......35 Desinstalación de la antena .........35 Consejos útiles ............36...
-
Page 23: Instrucciones Importantes De Seguridad
INSTRUCCIONES DE SEGURIDAD IMPORTANTES: • NUNCA toque NADA ni a NADIE que esté en contacto con un cable eléctrico. Podría electrocutarse. En caso de accidente o emergencia, llame al 911 de inmediato para obtener ayuda. • INSPECCIONE el sitio de la instalación cuidadosa- mente para ver si hay cables eléctricos. -
Page 24: Seleccione Y Mida El Lugar De La Instalación
• INFORME a otras personas acerca de los peligros de tocar los cables eléctricos u otros objetos que puedan estar en contacto con una línea eléctrica. • LLAME a un instalador profesional de su zona para que instale la antena si no está seguro de cómo instalar y conectar a tierra esta antena de manera segura. -
Page 25: Elija Un Tipo De Montaje
ELIJA UN TIPO DE MONTAJE: A continuación, se muestran algunos ejemplos de las opciones de montaje más co- munes. Siga las instrucciones de instalación para el montaje que desea utilizar: Montaje en “J” (suministrado) 2) Montaje para caballete (no suministrado) 3) Montaje para chimenea (no suministrado) 4) Montaje para pared... -
Page 26: Lista De Piezas
INSTRUCCIONES DE MONTAJE: Gracias por adquirir la antena pasiva digital Philips SDV3427W/27 para exteriores. Es una antena ro- busta y de alto rendimiento, diseñada para recibir las señales transmitidas de UHF y VHF. Su diseño pequeño y compacto permite instalar la antena en prácticamente cualquier parte del exterior o del... - Page 27 10) Perno de cabeza redonda M5 de 40 mm (4 unidades) 11) Tuerca mariposa M5 (4 unidades) 12) Conjunto de abrazadera tipo “U” y perno (1 unidad) (adjuntado al brazo principal) 13) Manga de goma (1 unidad) 14) Soporte de montaje (1 unidad) 15) Montaje en “J”...
-
Page 28: Instrucciones Para El Ensamblaje
CÓMO ENSAMBLAR LA ANTENA: 1) Ensamble la unidad principal de montaje al brazo principal. Sujete el brazo principal a la unidad principal con la tuerca mariposa M3. Nota: El brazo principal tiene dos orificios ranurados a un lado y cuatro orificios al otro lado. - Page 29 3) Ensamble la cubierta del reflector. Conecte la cubierta del reflector al brazo principal utilizando dos pernos de cabeza redonda M5 de 40 mm y dos tuercas mariposa M5. Fig.3a 4) Ensamble los reflectores. Conecte cada cubierta del reflector al brazo prin- cipal utilizando un perno de cabeza redonda M5 de 40 mm y una tuerca mariposa M5.
- Page 30 5) Instalación de la antena ensamblada a) Elija un lugar de la casa alejado de los cables eléctricos. Consulte las Instrucciones de seguridad importantes. b) Sujete el soporte de montaje en el lugar selec- cionado para la antena. Se suministran tornillos tirafondos de 1/4 X 2”...
-
Page 31: Puesta A Tierra Y Conexión De La Antena
6) Puesta a tierra y conexión de la antena El Código Estadounidense de Normas de Elec- tricidad (NEC) exige que la antena exterior esté debidamente conectada a tierra, lo cual implica conectar a tierra tanto la antena como su estructura de montaje. - Page 32 posible y use aislantes separadores a una distancia de entre cuatro (4) y seis (6) pies (1,2 y 1,8 m). Una el cable de conexión a tierra a un punto de conexión a tierra aceptable de la construcción. Los siguientes son ejemplos de puntos de conexión a tierra aceptables de una construcción: •...
- Page 33 Fig. 6b Si construye su propio cable coaxial, asegúrese de deslizar la manga de goma sobre el cable antes de colocar los conectores sobre el cable. Una vez que haya conectado el cable a la antena, deslice la manga de goma sobre el canal redondo en la unidad principal. Si emplea un cable preconstruido con conectores, haga lo siguiente.
- Page 34 c) Conecte a tierra el bloque de conexión a tierra de 75 ohm: conecte un cable de conexión a tierra N.º 10 o de aluminio N.º 8 a un terminal roscado en el bloque de conexión a tierra de 75 ohm. Conecte el otro extremo del cable a un lugar de conexión a tierra aceptable de la construcción.
-
Page 35: Guías Para Una Instalación Sencilla
GUÍAS PARA UNA INSTALACIÓN SENCILLA: INSTALACIÓN SENCILLA PARA LOS TELEVISORES HDTV MODERNOS 1) Conecte el cable coaxial de la antena a la entrada del televisor HDTV correspondiente a la antena. 2) Siga las indicaciones del manual del HDTV para buscar canales en su televisor. INSTALACIÓN SENCILLA PARA TELEVISORES ANÁLOGOS CON APARATOS DECODIFICADORES 1) Conecte el cable coaxial de la antena a la entrada... -
Page 36: Consejos Útiles
SUGERENCIAS ÚTILES RELACIONADAS CON LA ANTENA Maximice la cantidad de canales que recibe colocando la antena en distintas direcciones para ver qué posición le brinda la mejor recepción y la mayor cantidad de canales. Asegúrese de realizar una nueva búsqueda de canales en cada posición. Consulte el manual de instrucciones que viene con su televisor si no está... - Page 37 HECHO EN CHINA La marca Philips como el emblema de escudo Philips son marcas registradas de Koninklijke Philips N.V. y son utilizadas bajo licencia. Este producto ha sido fabricado por Gibson Innovations Limited. Este producto es distribuido y tiene garantía de Jasco Products Company LLC, 10 E.
- Page 38 SDV3427W/27 v2 5/2018...