Table of Contents
Advertisement
Quick Links
Advertisement
Table of Contents

Related Manuals for Bosch RTS RVON+


Summary of Contents for Bosch RTS RVON+
- Page 1 RVON+ RTS Voice Over Network Rev. 01 June/2019 F.01U.359.008...
- Page 2 OTICE The product information and design disclosed herein were origi- nated by and are the property of Bosch Security Systems, Inc. Bosch reserves all patent, proprietary design, manufacturing, repro- duction, use and sales rights thereto, and to any article disclosed therein, except to the extent rights are expressly granted to others.
- Page 3 RVON+ Important Safety Instructions Read these instructions. Keep these instructions. Heed all warnings. Follow all instructions. Do not use this apparatus near water. Clean only with dry cloth. Do not block any ventilation openings. Install in accordance with the manufacturer’s instructions. Do not install near any heat sources such as radiators, heat registers, stoves, or other apparatus (including amplifiers) that produce heat.
- Page 4 RVON+...
-
Page 5: Table Of Contents
Table Contents Important Safety Instructions .............................3 INTRODUCTION ..........................3 Description of the RVON+ Voice Over Network Card ................3 Requirements ..............................4 Features ................................. 4 Specifications ..............................5 Codecs ..................................5 Connections ................................5 Agency Approvals ..............................5 Emissions (Class A): ...............................5 Immunity: ................................5 Safety: ..................................5 RVON Configuration ............................ - Page 6 RVON-16 Technical Manual F.01U.193.261 Bosch Security Systems, Inc. Rev. 06...
-
Page 7: Important Safety Instructions
CHAPTER 1 Introduction Description of the RVON+ Voice Over Network Card The RVON+ provides VoIP (Voice Over Internet Protocol) communications for the RTS ADAM Intercom product family. The RVON+ is an integrated solution for connecting keypanels to the Intercom matrix over standard IP networks by supporting up to 32 channels of bi-directional audio, as well as keypanel data. -
Page 8: Requirements
4 Introduction RVON+ Requirements IMPORTANT: All legacy RVON devices (RVON-16, RVON-8, RVON-1, RVON-IO, RVON-C) running v 2.1.0 or higher are capable of connecting to an RVON-16. Configuring these devices to connect to an RVON-16 allows them to connect to an RVON+. All legacy RVON devices running v 2.7.0 (or higher) recognize the RVON+. ... -
Page 9: Specifications
RVON+ Introduction 5 Specifications Codecs CODING PLAYOUT SAMPLE COMPRESSION BIT RATE BANDWIDTH DELAY DELAY RATE 125 s G.711 64 k 20-60 ms 160-224 kbps G.729AB 10 ms 20-120 ms 32-112 kbps G.722 64 k 4 ms 20-60 ms 160-224 kbps 16 k *Data Rate depends on Codec Selection NOTE:... -
Page 10: Rvon Configuration
6 Introduction RVON+ Well-known TCP Port Numbers TABLE 2. RVON Configuration Port Number Description RVON cards use ports for communication of audio and control packets. Because routers can be configured to block certain SQL Services incoming and outgoing requests, you need to open the following Newsgroup (NNTP) ports in your network to allow WAN connections to and from a NetBIOS Name Service... -
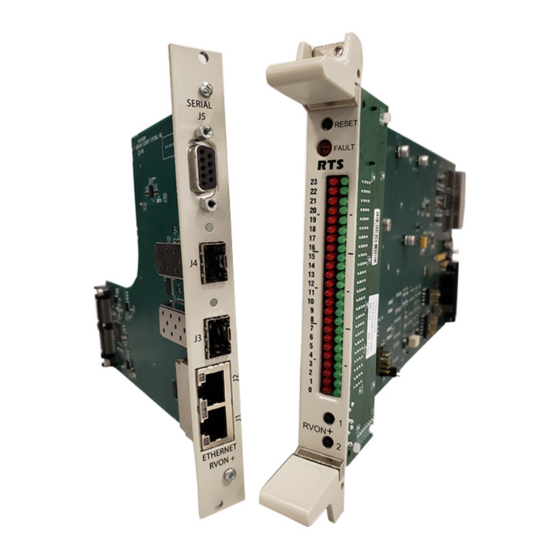
Page 11: Rvon+ Front Card Leds
RVON+ Introduction 7 RVON+ Front Card LEDs PAGE 1 Red LED Green LED VOIP not connected - Channel 1 VOIP connected - Channel 1 VOIP not connected - Channel 2 VOIP connected - Channel 2 VOIP not connected - Channel 3 VOIP connected - Channel 3 VOIP not connected - Channel 4 VOIP connected - Channel 4... - Page 12 8 Introduction RVON+ PAGE 2 Red LED Green LED VOIP not connected - Channel 17 VOIP connected - Channel 17 VOIP not connected - Channel 18 VOIP connected - Channel 18 VOIP not connected - Channel 19 VOIP connected - Channel 19 VOIP not connected - Channel 20 VOIP connected - Channel 20 VOIP not connected - Channel 21...
- Page 13 RVON+ Introduction 9 PAGE 3 Red LED Green LED J4 Ethernet half duplex J4 Ethernet full duplex J4 Ethernet speed 1 Gbps J4 Ethernet link up J3 Ethernet half duplex J3 Ethernet full duplex J3 Ethernet speed 1 Gbps J3 Ethernet link up J2 Ethernet half duplex J2 Ethernet full duplex J2 Ethernet speed 1 Gbps...
-
Page 14: Rvon+ Backcard Pinouts
10 Introduction RVON+ RVON+ Backcard Pinouts RJ-45 PIN Function Ethernet TPO+ Ethernet TPO- Ethernet TPI+ TPO+ TPO- Ethernet TPO- TPI+ TPI- DB-9 PIN Function RXD (RS-232) Data - (RS-485 TXD (RS-232) Data + (RS-485 RVON+ Backcard FIGURE 1. -
Page 15: Default Ethernet Ip Addresses
RVON+ Introduction 11 Default Ethernet IP Addresses Default Address for the RVON Product Line TABLE 3. Product Default IP Address Default Subnet Mask RVON-I/O 192.168.0.1 255.255.0.0 RVON-8 192.168.0.2 255.255.0.0 RVON-Keypanel 192.168.0.3 255.255.0.0 RVON-C 192.168.0.4 255.255.0.0 RVON-16 192.168.0.5 255.255.0.0 GPIO-16 192.168.0.6 255.255.0.0 MCII-e 192.168.0.7... - Page 16 12 Introduction RVON+...
-
Page 17: Rvon+ Port Allocation
CHAPTER 2 RVON+ Port Allocation Port Allocation The PAT (Port Allocation Table) is used to support I/O cards with more than 16 ports. Use the table to select which card types occupy which intercom slots and which ports are allocated to each card. Ports can be allocated in groups of 8 or 16. A single frame system holds up to 880 ports. -
Page 18: Slot Column
14 RVON+ Port Allocation RVON+ Port Allocation Table FIGURE 2. NOTE: When Port is unlicensed is seen in the port allocation table, the port is not licensed for use and cannot be configured. Slot Column The Slot column displays the number of the slot where the card resides. This field is not editable. -
Page 19: Type Column
RVON+ RVON+ Port Allocation 15 Type Column The Type column is used to select the type of card in the slot. Use the drop down menu to select the type of card in the slot. Available options are: AIO-8, AIO-16, RVON-8, RVON-16, RVON+16, RVON+32, MADI-16, MADI-32, MADI-48, MADI- 64, AES-3, OMI-16, OMI-32, OMI-48, and OMI-64. -
Page 20: Ports Column
16 RVON+ Port Allocation RVON+ Ports Column The Ports column is used to select the block of ports to assign to the RVON card. These are in blocks of 8 or 16. PAT – Ports Column FIGURE 5. -
Page 21: Installation
CHAPTER 3 Installation Installation of the RVON+ Card into the ADAM and ADAM-M When inserting the RVON+ in the ADAM system, the following considerations need to be made: Gently insert the RVON+ card into the correct slot. If the card is forced or twisted while inserting, a pin on •... -
Page 22: Jumpers And Configuration
18 Installation RVON+ Jumpers and Configuration J1 Configuration File Save Location The RVON+ has only one jumper that can be configured. The J1 jumper controls where the RVON+ configuration file is stored; either on the master controller card or on the RVON+ card. In both AZedit and IPedit, this option is seen as a status only (grayed out) check box. -
Page 23: Disable Changes From Azedit Check Box (Ipedit Only)
RVON+ Installation 19 Configuration Options Disable Changes from AZedit Check Box (IPedit Only) The Disable Changes from AZedit check box determines whether or not to accept changes to the RVON+ card from AZedit. This means only modifications made in IPedit are accepted. If this option is selected, AZedit still allows the card’s configuration to be viewed, but all controls will be grayed out and disabled. -
Page 24: Reboot If Lost Contact With Mc Check Box
20 Installation RVON+ AZedit - RVON Configuration Options FIGURE 8. Reboot if lost contact with MC check box The Reboot if lost contact with MC check box determines if the RVON+ card reboots after 30 seconds of no communication with the Master Controller. When this option is not selected, pass-through serial data continues when the intercom is otherwise down (for example, when upgrades are being made). -
Page 25: Reset Authentication Table Button (Azedit Only)
RVON+ Installation 21 Reset Authentication Table Button (AZedit Only) The Reset Authentication Table button (see Figure 8 on page 20) is used to reset the authentication to the RVON+ card. By clicking this button, the authentication table for IPedit is reset to the two default user profiles and passwords. Use this function when the password for IPedit cannot be remembered. -
Page 26: Configuring The Rvon+ Card With Azedit
22 Installation RVON+ Configuring the RVON+ Card with AZedit NOTE: IPedit version 3.6.0 has more extensive configuration options for the RVON+ card. Once the RVON+ card is inserted into the intercom, AZedit automatically recognizes the card. NOTE: Requires intercom firmware and AZedit software that supports RVON cards. To configure the RVON+ card settings, do the following: From the Status menu, select I/O Cards.... - Page 27 RVON+ Installation 23 In the IP Address field, enter the IP Address you have assigned to the RVON+. In the Network Mask field, enter the Network Mask of the network to which the RVON+ is connected. In the Default Gateway field, enter the Default Gateway Address, if applicable, of the network to which the RVON+ card is connected.
-
Page 28: Rvon Connection Status Screen
24 Installation RVON+ RVON Connection Status Screen The RVON+ connection status screen displays information pertaining to RVON channel connections. You can only show statistics for one channel on a card at a time. NOTE:To view the RVON Connection Status screens, make sure both AZedit and the RVON+ card are on the same Ethernet network. - Page 29 RVON+ Installation 25 Screen Item Description Select Local Card and Channel RVON Card The card for which you want to view the status From the RVON drop down list, select the card you want to view. IP Address Displays the IP (Internet Protocol) Address of the card you select Local Channel The channel to view the status.
- Page 30 26 Installation RVON+ Screen Item Description Connection State The state of the connection. Available connection states are IN USE, SEIZED, SETUP, PROGRESS, CONNECTED, TEAR DOWN or IDLE. CONNECTED and IDLE are stable states, while the other states are transitory. Connection Duration Displays the duration of the connection.
- Page 31 RVON+ Installation 27 Screen Item Description VOIP Playout Statistics Playout Buffer Size Displays how much audio can be received from the network before packets are lost. This is four times bigger than configured packet size. This is a static system setting.
- Page 32 28 Installation RVON+ Screen Item Description Network Statistics Voice Playout Packets (Tx/Rx) Displays the number of voice packets transmitted and received from the other side of the connection. Silence Detection Packets (Tx/ Displays the number of times a silence detection packet has been sent or received. VAD (voice activity detection) must be enabled.
- Page 33 RVON+ Installation 29 Screen Item Description Error Counts Invalid Headers Displays how many IP packets could not be parsed. Lost Packets Displays how many packets were lost. DSP to Micro Overrun Displays the number of packets that were lost because the Micro was too busy to receive.
- Page 34 30 Installation RVON+ Screen Item Description SERIAL TO ETHERNET The Serial to Ethernet information shows the serial data that is received on the serial pass-through serial port and sent via Ethernet to the partner card. Bytes Transferred Displays the number of bytes transferred from the serial connection to Ethernet. Bytes Lost Displays the number of bytes that could not be transferred.
- Page 35 RVON+ Installation 31 Screen Item Description J1/RJ45, J2/RJ45, J3/Fiber, J4/ Fiber Link Status Displays the status of links on the port. Available status: – No IP Address is defined Link Speed Displays the transmission speed. Available speeds: 10 Mbps 100 Mbps 1 Gbps NOTE: 100 Mbps or better is strongly recommended, and is required for proper operation of 32 channels.
-
Page 36: Download Rvon+ Firmware Through Azedit
32 Installation RVON+ Download RVON+ Firmware through AZedit To download firmware to the RVON+ card from AZedit, do the following: Open AZedit. From the Status menu, select Software Versions, then I/O Cards. The I/O Card Version Information screen appears showing the occupied slots in the system. Highlight the card to be updated.... - Page 37 RVON+ Installation 33 Click Begin Download. The download begins. Once the download shows 100% a message (shown below) appears. Click OK. The RVON+ firmware download is complete. This takes a minute or two to occur. Verify the version upgrade in the I/O Card Version Information Window. CAUTION: Do not power down the frame or pull the RVON+ card (s) from the frame until you have verified the new version information from AZedit.
-
Page 38: Download Rvon+ Firmware Through Ipedit
34 Installation RVON+ Download RVON+ Firmware through IPedit NOTE: If you are using RVON+ with IPedit, you must use IPedit version 3.6.0 or later. To download firmware to the RVON+ card from IPedit, do the following: Open IPedit. From the Device catalog, right-click the RVON+ card for which the new firmware is to be downloaded. The Download Firmware dialog appears with the RVON+ highlighted. - Page 39 RVON+ Installation 35 Click Begin. The download begins. Once the download is complete, a message (shown below) appears Click Done. The RVON+ firmware download is complete. This takes a minute or two to occur. Verify the version upgrade in the I/O Card Version Information Window.
- Page 40 36 Installation RVON+...
-
Page 41: Rvon Trunking Connections
APPENDIX A RVON Trunking Connections In this chapter, find the following drawings: ADAM/ADAM M Trunking Via RVON+ • Cronus Trunking Via RVON-I/O To RVON+ • RVON-16 Trunking to RVON+ •... - Page 42 ADAM/ADAM M Trunking Via RVON+ FIGURE 9.
- Page 43 Cronus Trunking Via RVON-I/O To RVON+ FIGURE 10.
- Page 44 RVON-16 Trunking to RVON+ FIGURE 11.
- Page 46 Bosch Security Systems, Inc. 12000 Portland Avenue South Burnsville, MN 55337 U.S.A. www.boschcommunications.com...