Table of Contents
Advertisement
Quick Links
Advertisement
Table of Contents

Related Manuals for D-Link Share Center Pro 1100


Summary of Contents for D-Link Share Center Pro 1100
-
Page 2: Table Of Contents
Chapter 2 - Software Installation ......... 19 Hardware - Installing more Drives ........48 Software Setup - Default IP Address Location ....20 Hardware - Installing more Drives ........49 Software Setup - EZ Search Utility ........21 D-Link ShareCenter Pro 1100-04 User Manual... - Page 3 Software - Adding Users to a Group ......103 Software - Importing Users .............76 Software - Adding Users to a Group ......104 Software - Importing Users - Creating a User List ...77 My Favorites................105 D-Link ShareCenter Pro 1100-04 User Manual...
- Page 4 Software - Disk Management - Extend/Spare a Volume 131 Accounts Management - Shared Folders ....229 Software - Disk Management - Migrate a Volume ..132 ISO Mounts ................. 230 Software - Disk Management - Expand a Volume ..133 D-Link ShareCenter Pro 1100-04 User Manual...
- Page 5 System Management - Logs ..........274 Software - Applications - Download Manager ..311 System Management - Syslog Server ....... 275 Software - Applications - Download Manager ..312 System Management - Syslog Server Rule ..... 277 D-Link ShareCenter Pro 1100-04 User Manual...
- Page 6 Software - Backup - External Backup ......335 Software - Backup - External Backup ......336 Amazon S3 ................. 337 Amazon S3 ................. 338 Chapter 18 - Software - Extension Pack ......344 Extension Pack ................345 Extension Pack ..............346 D-Link ShareCenter Pro 1100-04 User Manual...
-
Page 7: Introduction
The DNS-1100-04 CD contains the D-Link’s EZ Search Utility. This utility allows you to locate the ShareCenter Pro 1100 automatically and map drives to your computer on the fly. The D-Link EZ Storage Utility allows you to configure the device and set IP addresses. -
Page 8: Product Overview
� Internet Explorer version 7.0, Mozilla Firefox 3.0, Apple Safari, Google Chrome 3, Opera 10 � Windows XP (with Service Pack 2), Windows® Vista Windows � ® ™ ® 3.5” SATA Hard Drive(s) � D-Link ShareCenter Pro 1100-04 User Manual... -
Page 9: Features
Section 1 - Product Overview Features The D-Link ShareCenter Pro 1100 is packed with a wide variety of features geared toward the small and medium business environment. Some of these features are listed below: Link Aggregation � Four 3.5-inch SATA Hard Drives with support for 3TB �... - Page 10 Section 1 - Product Overview � Supports Windows Server 2008 Hyper-V � Network access by service � AFP support � Syslog server � Network UPS � ISO mount � WebDAV � Amazon S3 D-Link ShareCenter Pro 1100-04 User Manual...
-
Page 11: Hardware Overview
To switch on the device press the button once. To switch off the device hold the button down for 5 seconds. OLED Screen This screen displays detailed information about the following: System Information, HD Volume Information and Error Messages D-Link ShareCenter Pro 1100-04 User Manual... -
Page 12: Hardware Overview
4 Disk LED’s Green No internal disk Static Disk error. Cannot Read/ Write Component Color Status Description Static A network connection is available 2 LAN LED’s Blue Blinking The network is active The network is inactive D-Link ShareCenter Pro 1100-04 User Manual... -
Page 13: Rear Panel (Connections)
USB UPS monitoring. Reset Button Press this button for more than 5 seconds to reset the unit to factory defaults. Cooling Fan The cooling fan is used to cool the hard drives and feature speed control. D-Link ShareCenter Pro 1100-04 User Manual... -
Page 14: Using The Oled
Hard Drive Volume information- This screen shows the following information: The percentage of used space on the hard drives. Error Messages- This screen shows error messages during system failures Press the following button once to alternate between the different Status screens. D-Link ShareCenter Pro 1100-04 User Manual... -
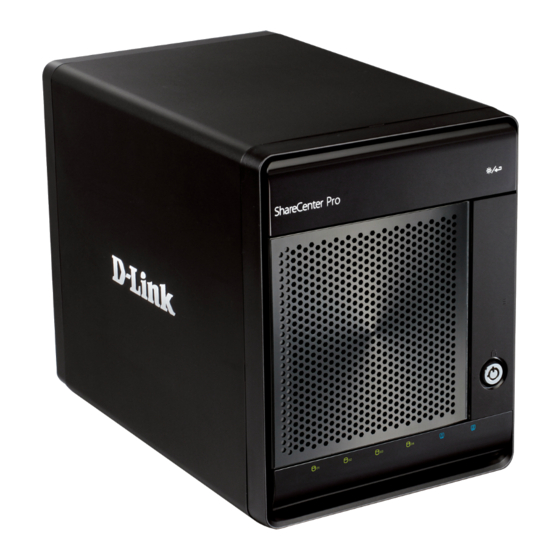
Page 15: Chapter 1 - Hardware
Section 3 - Configuration Chapter 1 - Hardware The D-Link ShareCenter Pro 1100-04 is a solid NAS. It can hold four hot-swappable drives, provides auto encryption and has dual Ethernet ports. Let’s take a closer look. D-Link ShareCenter Pro 1100-04 User Manual... -
Page 16: Hardware Setup - Installing Hard Drives
Hardware Setup - Installing Hard Drives The D-Link ShareCenter Pro 1100 takes four 3.5” hard disk drives. The hard drives do not have to be the same size. However, to create a RAID, it would be preferable to have all hard drives the same size. In this guide we show how to take the hard drive cases apart, install the drives and turn on the device. -
Page 17: Hardware Setup - Removing Brackets
Section 2 - Installation Hardware Setup - Removing Brackets Step 2: Remove the plastic bracket inside the hard drive cage. D-Link ShareCenter Pro 1100-04 User Manual... -
Page 18: Hardware Setup - Attaching The Hard Drive To The Hard Drive Tray
Place a 3.5” SATA hard drive into the drive tray, and screw it into place. There are four holes on either side of the drive tray. Step 4: Slide the drive trays into the enclosure. D-Link ShareCenter Pro 1100-04 User Manual... -
Page 19: Hardware Setup - Installing Hard Drives
Section 2 - Installation Hardware Setup - Installing Hard Drives Step 5: Depress the blue clip in place to shut the drive tray in the enclosure. D-Link ShareCenter Pro 1100-04 User Manual... -
Page 20: Network Setup - Plugging In The Network Cables
Network Setup - Plugging in the Network Cables Step 1: Plug in one end of the CAT5E cable (provided in the box) into one of the Gigabyte ports at the back of the ShareCenter Pro. D-Link ShareCenter Pro 1100-04 User Manual... -
Page 21: Network Setup - Plugging In The Cables
Section 2 - Installation Network Setup - Plugging in the Cables Step 2: Plug the other end of the CAT5E cable into a router or switch. D-Link ShareCenter Pro 1100-04 User Manual... -
Page 22: Power Cable Setup - Plugging In The Cables
Power Cable Setup - Plugging in the Cables Step 1: Plug the power cord into the back of the ShareCenter Pro 1100-04. Step 2: Plug the other end into the wall socket and power up the device. D-Link ShareCenter Pro 1100-04 User Manual... -
Page 23: Powering On The Device
ShareCenter Pro and wait for the OLED screen to display “Welcome to ShareCenter Pro “1100”. There will also be a blinking blue network LED that indicates the device is connected to the network. OLED Screen Network LED D-Link ShareCenter Pro 1100-04 User Manual... -
Page 24: Powering On The Device - Software
Section 2 - Installation Powering on the Device - Software Step 3: Place the accompanied CD-ROM into your CD-ROM drive and browse to D-Link’s DNS- 1100-04 EZSearch. Double-click the icon to activate the program. Step 4: This starts the EZSearch utility. The EZSearch utility locates the ShareCenter Pro 1100-04 and it’s IP address. -
Page 25: Chapter 2 - Software Installation
Section 3 - Configuration Chapter 2 - Software Installation The D-Link ShareCenter Pro 1100-04 is a solid NAS. Installing, configuring, and creating shares on the fly is the ShareCenter Pro’s strengths. Let’s take a closer look. D-Link ShareCenter Pro 1100-04 User Manual... -
Page 26: Software Setup - Default Ip Address Location
Password It is recommended to use the D-Link EZ Search Utility when accessing and configuring the ShareCenter Pro for the first time. If you want to change the IP address before logging in or are unable to connect to the ShareCenter Pro’s IP address, you can use the EZ Search Utility provided on the product CD to locate the device on your network and make any changes. -
Page 27: Software Setup - Ez Search Utility
Section 2 - Installation Software Setup - EZ Search Utility Here is a closer look at the EZ Search Utility Network The EZ Search Utility displays any D-Link NAS or ShareCenter Pro Storage device on the network here. Device Refresh Click Refresh to refresh the device list. -
Page 28: Getting Started
Section 3 - Configuration Getting Started To run the EZ Search Utility, insert the ShareCenter Pro CD into your CD-ROM drive: Step 1: Click the EZ Search Utility link. Click EZ Search Utility. D-Link ShareCenter Pro 1100-04 User Manual... - Page 29 ShareCenter Pro. If your network is using a DHCP server and the computer receives IP settings from the DHCP server, the ShareCenter Pro will automatically be in the same subnet. D-Link ShareCenter Pro 1100-04 User Manual...
-
Page 30: Getting Started - Browser Setup
Section 2 - Installation Getting Started - Browser Setup Alternatively, open your default browser and type in the IP address of your ShareCenter Pro 1100-04. D-Link ShareCenter Pro 1100-04 User Manual... - Page 31 IP settings from the DHCP server, the ShareCenter Pro will automatically be in the same subnet. Step 3: Click the button next to System Administrator, leave the Password field blank and click Login. D-Link ShareCenter Pro 1100-04 User Manual...
-
Page 32: Using The Web Ui
Section 3 - Configuration Using the Web UI The screen loads to the default page. If there are no drives, the browser loads to the Disk Management, Volumes page. D-Link ShareCenter Pro 1100-04 User Manual... -
Page 33: Using The Web Ui Part Ii
RAID level. See Creating Your First Volume in the next section. You can also close this window and use the Setup Wizard to configure the ShareCenter Pro 1100-04. Note: If there is only one drive installed into the system, the device will act as a standalone drive as no RAID can be created. D-Link ShareCenter Pro 1100-04 User Manual... -
Page 34: Understanding The Web Ui
Pro 1100-04 are located in the folders at the left of the page. Click the icon to see the categories of each folder. The categories available for configuration include: Homepage, Status, Disk Management, Account Management, System Management, Network Services, Applications, Backup and Extension Pack. D-Link ShareCenter Pro 1100-04 User Manual... -
Page 35: Understanding The Web Ui Part Ii
These pages and their configuration options will be discussed in detail in the following pages of this manual. Note: After logging in to the ShareCenter Pro for the first time it is recommended to add a password to the admin account. D-Link ShareCenter Pro 1100-04 User Manual... -
Page 36: Chapter 3 - Setup Wizard
Section 3 - Configuration Chapter 3 - Setup Wizard The ShareCenter Pro 1100-04 provides a Setup Wizard to easily configure the DNS-1100-04. This chapter shows you how to create volumes and format drives. D-Link ShareCenter Pro 1100-04 User Manual... -
Page 37: Using The Setup Wizard For The First Time
The Setup Wizard is the easiest and fastest way to setup your ShareCenter Pro 1100-04. Once you have entered your IP address into the browser, follow these few steps to get started: Create Volume (close) Step 1: Close the Create Volume window. D-Link ShareCenter Pro 1100-04 User Manual... -
Page 38: Using The Setup Wizard For The First Time
Section 3 - Configuration Using the Setup Wizard for the First Time Step 2: Click the Home icon at the top right of the browser. Home Icon D-Link ShareCenter Pro 1100-04 User Manual... -
Page 39: Using The Setup Wizard For The First Time
Section 3 - Configuration Using the Setup Wizard for the First Time Step 3: Click the Setup Wizard icon on the main Homepage System Wizard Icon D-Link ShareCenter Pro 1100-04 User Manual... -
Page 40: Using The Setup Wizard For The First Time
Section 3 - Configuration Using the Setup Wizard for the First Time Step 4: The ShareCenter Pro 1100-04 System Wizard starts. Read the instructions carefully and click Next. Next D-Link ShareCenter Pro 1100-04 User Manual... -
Page 41: Using The Setup Wizard For Static Ip Addresses
Click Next to continue. Note: If your network environment is setup with DHCP, select DHCP. If, however, you are setting up your network environment using your own set of IP addresses, select Static IP. D-Link ShareCenter Pro 1100-04 User Manual... -
Page 42: Using The Setup Wizard For Static Ip Addresses
Setup the VLAN settings according to your virtual LAN. Click Next to continue. Note: If you are not configuring the ShareCenter Pro to use the second LAN port, click DHCP Client. D-Link ShareCenter Pro 1100-04 User Manual... -
Page 43: Using The Setup Wizard For Host Names
Step 7: The ShareCenter Pro 1100-04 System Wizard allows you to change the hostname. Enter the Host Name, Primary DNS and Secondary DNS, and the Default Gateway for either LAN card. Click Next to continue. D-Link ShareCenter Pro 1100-04 User Manual... -
Page 44: Using The Setup Wizard For File Sharing
Mac OS X and previous Mac OS’s. WebDAV: Web-based Distributed Authoring and Versioning,is a set of methods based on the Hypertext Transfer Protocol (HTTP). Click Next to continue. D-Link ShareCenter Pro 1100-04 User Manual... -
Page 45: Using The Setup Wizard For Raid Levels
In our example, we inserted one drive. The RAID level is automatically selected (standalone). Select the Disk Array and click Next. D-Link ShareCenter Pro 1100-04 User Manual... -
Page 46: Encrypting Your Drive
NAS or select USB Key to save the password on an external USB drive. Click Apply. Note: Select either Auto Unlock or USB Key. You cannot select both. Auto Unlock Checkbox USB Key Checkbox D-Link ShareCenter Pro 1100-04 User Manual... -
Page 47: Setup Wizard Summary
Section 3 - Configuration Setup Wizard Summary Step 11: The ShareCenter Pro 1100-04 now provides a summary of all the stages you completed. LAN 1 LAN 2 D-Link ShareCenter Pro 1100-04 User Manual... -
Page 48: Setup Wizard Summary Part Ii
Section 3 - Configuration Setup Wizard Summary Part II Step 12: The ShareCenter Pro 1100-04 now provides a summary of all the stages you completed. Global Settings File Sharing Create Volume Click Apply to continue. D-Link ShareCenter Pro 1100-04 User Manual... -
Page 49: Creating A Clean Volume
Step 13: Click Yes to create a new Volume on the drive. All data on the selected disk will be erased. Step 14: The ShareCenter Pro 1100-04 now creates a volume for the hard drive. D-Link ShareCenter Pro 1100-04 User Manual... -
Page 50: Formatting A Volume
Section 3 - Configuration Formatting a Volume Step15: Once the Volume is created, the ShareCenter Pro 1100-04 will format the drive. (As shown below) D-Link ShareCenter Pro 1100-04 User Manual... -
Page 51: Accessing The Drive For The First Time
Section 3 - Configuration Accessing the Drive for the First Time When the Setup Wizard is complete, use your Windows Explorer to access the drives on the ShareCenter Pro 1100-04. D-Link ShareCenter Pro 1100-04 User Manual... -
Page 52: Chapter 4 - Hardware - Installing More Drives
Chapter 4 - Hardware - Installing more Drives The D-Link ShareCenter Pro 1100-04 can take up to four hard drives. All these hard drives can be individually configured and grouped in an array for RAID. Let’s take a look further. -
Page 53: Hardware - Installing More Drives
Installing new hard drives in the ShareCenter Pro 1100 is convenient and funtional. Let’s take a look at this in more detail. Step1: When you first purchase the ShareCenter Pro 1100, there are no drives in it. The Setup Wizard will prompt you to install drives (as seen below). Click OK and install the drives. D-Link ShareCenter Pro 1100-04 User Manual... -
Page 54: Hardware - Installing More Drives
Install the first drive Step 3: The top OLED indicates the position of the drive on the ShareCenter Pro, while the bottom OLED displays the active drive number in green. Top OLED Bottom OLED D-Link ShareCenter Pro 1100-04 User Manual... -
Page 55: Hardware - Installing More Drives
Hard Drive Installation Step 5: As you install the second drive, the ShareCenter Pro automatically recognizes the drives and displays the information on Top OLED showing the OLED screens. two drives Bottom OLED showing drive numbers D-Link ShareCenter Pro 1100-04 User Manual... -
Page 56: Chapter 5 - Software - Creating Volumes & Formatting
Chapter 5 - Software - Creating Volumes & Formatting The D-Link ShareCenter Pro 1100-04 handles each drive differently. Once a new drive is installed the WEB UI creates a volume and formats the drive according to the user’s requirements. Let’s take a closer look. -
Page 57: Software - Installing More Drives
Open your default browser and type in the IP Address displayed on the OLED screen. Browser window LED IP Address If you cannot see the top OLED screen click the icon on the right side of the ShareCenter Pro. Touch Display D-Link ShareCenter Pro 1100-04 User Manual... -
Page 58: Software - Configuring More Than One Drive
IP settings from the DHCP server, the ShareCenter Pro will automatically be in the same subnet. Step 3: Click the button next to System Administrator, leave the Password field blank and click Login. D-Link ShareCenter Pro 1100-04 User Manual... -
Page 59: Software - Configuring More Than One Drive
Section 3 - Configuration Software - Configuring more than one drive Step 4: Click Disk Management, Disk Diagnostics Disk Diagnostics shows all the drives placed in the NAS (formatted or unformatted) D-Link ShareCenter Pro 1100-04 User Manual... -
Page 60: Software - Creating Raid
Step 6: Under Create Volume, select the RAID Level best suited for your purpose. (See More About RAID in other chapters) Step 7: Select the Array you wish to use and click Next. D-Link ShareCenter Pro 1100-04 User Manual... -
Page 61: Software - Encryption Settings
Confirm Password fields. Tick the Auto Unlock check box to automatically unlock the volume when the system starts. Tick the USB Key check box to save the password to a USB drive. Click Apply to continue. D-Link ShareCenter Pro 1100-04 User Manual... -
Page 62: Software - Creating The Volume
Click Yes to create the Volume. A warning message appears before starting to create the volume. Click Yes to continue. The volume is being created. The status bar displays the percentage of completion in real time. D-Link ShareCenter Pro 1100-04 User Manual... -
Page 63: Software - Creating The Raid & Formatting
Note: The ShareCenter Pro 1100-04 will automatically create the Volume, a Standalone Volume, if the size of the hard drives are different. Once the volume is created, the Volume page opens to show the information. D-Link ShareCenter Pro 1100-04 User Manual... -
Page 64: Software - Volume & Raid Created
Software - Volume & RAID Created The ShareCenter Pro 1100-04 creates a Volume and configures the RAID. Windows Explorer can see the share but users on the network cannot access it unless a shared folder is created. D-Link ShareCenter Pro 1100-04 User Manual... -
Page 65: Chapter 6 - Software - Creating Users
Section 3 - Configuration Chapter 6 - Software - Creating Users The D-Link ShareCenter Pro 1100-04 allows you to create individual accounts or group accounts accordingly. Let’s take a look. D-Link ShareCenter Pro 1100-04 User Manual... -
Page 66: Software - Creating Users
Section 3 - Configuration Software - Creating Users Step 1: Once you have logged into the Web UI, click the Home icon on the left side of the browser. Click the Create User icon. Click Create User D-Link ShareCenter Pro 1100-04 User Manual... -
Page 67: Software - Creating Users
Software - Creating Users Step 2: The “Create User” wizard appears. Click Next to proceed. Click the Create User icon in the Homepage window and the Create User window appears. Click Next to continue. D-Link ShareCenter Pro 1100-04 User Manual... -
Page 68: Software - User Information
If setting a specific storage quota for the user, tick the Set Quota check box and enter the storage quota in megabytes (MB). If you use 0 in the Quota it represents unlimited disk space. Click Next to continue. D-Link ShareCenter Pro 1100-04 User Manual... -
Page 69: Software - Creating Groups
Select a group from the list. If there is no entry in the list, you can go to Account Management >> User to update the information after a group has been created. Click Next to continue. D-Link ShareCenter Pro 1100-04 User Manual... -
Page 70: Software - Creating Share Folder Lists
Select a share folder from the list. If there is no entry in the list, you can go to Account Management > User to update the information after a share folder is created. Click Next to continue. D-Link ShareCenter Pro 1100-04 User Manual... -
Page 71: Software - User Summary
Step 7: Under Summary, view details about the user you have just created. Click Apply to save the settings. This window displays the information that has been configured. Click Apply to save the settings. D-Link ShareCenter Pro 1100-04 User Manual... -
Page 72: Software - User Information
Section 3 - Configuration Software - User Information Step 8: Click Account Management, Users. There you will find the New User that you have created. Account Manager Users New User D-Link ShareCenter Pro 1100-04 User Manual... -
Page 73: Software - Creating More Than One User
Section 3 - Configuration Software - Creating more than One User Step 1: Once you have the Account Management window open, simply click Create at the top of the right window pane. Create D-Link ShareCenter Pro 1100-04 User Manual... -
Page 74: Software - Creating More Than One User
Section 3 - Configuration Software - Creating more than One User Step 2: Enter the details of the new user and click Next. New User details D-Link ShareCenter Pro 1100-04 User Manual... -
Page 75: Software - Creating More Than One User
Select a group from the list. If there is no entry in the list, you can go to Account Management >> User to update the information after a group has been created. Click Next to continue. D-Link ShareCenter Pro 1100-04 User Manual... -
Page 76: Software - Creating More Than One User
Select a share folder from the list. If there is no entry in the list, you can go to Account Management > User to update the information after a share folder is created. Click Next to continue. D-Link ShareCenter Pro 1100-04 User Manual... -
Page 77: Software - User Summary
Step 5: Under Summary, view details about the user you have just created. Click Apply to save the settings. This window displays the information that has been configured. Click Apply to save the settings. D-Link ShareCenter Pro 1100-04 User Manual... -
Page 78: Software - User Information
Section 3 - Configuration Software - User Information Step 6: Click Account Management, Users. There you will find the New User that you have created. Account Manager Users Second User created D-Link ShareCenter Pro 1100-04 User Manual... -
Page 79: Software - Deleting A User
Section 3 - Configuration Software - Deleting a User Step 1: Click the check-box next to the User’s name and click Delete. Check-box next to User details. D-Link ShareCenter Pro 1100-04 User Manual... -
Page 80: Software - Deleting A User
Section 3 - Configuration Software - Deleting a User Step 2: Confirm that you want to delete the User from the User List and click Yes. Step 3: The User no longer exists in the User List. D-Link ShareCenter Pro 1100-04 User Manual... -
Page 81: Software - Importing Users
Section 3 - Configuration Software - Importing Users Step 1: Click the Import Users button at the top of the Account Management, Users window. Click Import Users D-Link ShareCenter Pro 1100-04 User Manual... -
Page 82: Software - Importing Users
Section 3 - Configuration Software - Importing Users Step 2: The welcome window is displayed. Click Next to continue. Click Next to continue. D-Link ShareCenter Pro 1100-04 User Manual... -
Page 83: Software - Importing Users - Creating A User List
Step 4: accounts to write over user accounts you already have in the ShareCenter Pro. Click the Browse button to locate the file you Step 5: created and click Next. Click Next to continue. D-Link ShareCenter Pro 1100-04 User Manual... -
Page 84: Software - Importing Users - Checking The User List
Click Next to continue. Step 7: The window displays the final results of importing users to the ShareCenter Pro. Click Apply to save the settings. D-Link ShareCenter Pro 1100-04 User Manual... -
Page 85: Software - Creating A Batch User List
Section 3 - Configuration Software - Creating a Batch User List Step 1: Click the Create Batch button at the top of the Account Management, Users window. Click Create Batch D-Link ShareCenter Pro 1100-04 User Manual... -
Page 86: Software - Creating A Batch User List
Section 3 - Configuration Software - Creating a Batch User List Step 2: The welcome window appears. Click Next to continue. Click Next to continue. D-Link ShareCenter Pro 1100-04 User Manual... -
Page 87: Software - Creating A Batch User List
Set Quota Tick the Set Quota check box to limit the storage capacity (in megabyte) for the user. The value of 0 means an unlimited quota size. Click Next to continue Click Next to continue. D-Link ShareCenter Pro 1100-04 User Manual... -
Page 88: Software - Creating A Batch User List
First Page ( ), Previous Page ( ), Next Page ( ) or Last page ( ) to search for the group. Refresh Click to update the group list. Click Next to continue. Click Next to continue. D-Link ShareCenter Pro 1100-04 User Manual... -
Page 89: Software - Creating A Batch User List
First Page ( ), Previous Page ( ), Next Page ( ) or Last page ( ) to search for the group. Refresh Click to update the folder list. Click Next to continue. Click Next to continue. D-Link ShareCenter Pro 1100-04 User Manual... -
Page 90: Software - Creating A Batch User List
This window displays a summary of the configured information. Click Previous to modify the settings. Click Apply to save the settings. Depending on the amount of users, the procedure may take a few hours. Click Apply to save the settings. D-Link ShareCenter Pro 1100-04 User Manual... -
Page 91: Chapter 7 - Software - Creating A Shared Folder
Section 3 - Configuration Chapter 7 - Software - Creating a Shared Folder The D-Link ShareCenter Pro 1100-04 allows you to create shared folders for users to access. Let’s take a look. D-Link ShareCenter Pro 1100-04 User Manual... -
Page 92: Software - Creating A Shared Folder
Software - Creating a Shared Folder Step 1: Once you have logged into the Web UI, click the Home icon on the left side of the browser. Click the Create Share Folder icon. Click Create Share Folder D-Link ShareCenter Pro 1100-04 User Manual... -
Page 93: Create Share Folder
Step 2: The Create Share Folder introduction window appears. Click Next to continue. Click the Create Share Folder icon in the Homepage window and the Create Share Folder window appears. Click Next to continue. D-Link ShareCenter Pro 1100-04 User Manual... -
Page 94: Create Share Folder - Volumes & Quotas
Select Path field to choose a folder. Step 4: Choose the Volume you wish to use by double-clicking or click Create. Click the Select Path field to choose the path of a folder. Click Create D-Link ShareCenter Pro 1100-04 User Manual... -
Page 95: Create Share Folder - Volumes & Quotas
Section 3 - Configuration Create Share Folder - Volumes & Quotas Step 5: Enter a Share Folder name in the field provided and click OK. D-Link ShareCenter Pro 1100-04 User Manual... -
Page 96: Create Share Folder - Volumes & Quotas
Select Enable or Disable according to your choice. D-Link ShareCenter Pro 1100-04 User Manual... -
Page 97: Create Share Folder - Volumes & Quotas
It compares file modification dates and maps data to that archive. Click the Set Quota box and enter a number in Megabytes D-Link ShareCenter Pro 1100-04 User Manual... -
Page 98: Create Share Folder - Volumes & Quotas
Share Folders can be deleted and placed in the Recycle Bin. If this is disabled then a user cannot delete an item into the Recycled Bin. Click the Set Quota box and enter a number in Megabytes D-Link ShareCenter Pro 1100-04 User Manual... -
Page 99: Create Share Folder - Volumes & Quotas
Click Next to continue. If setting a specific storage quota for the share folder, tick the Set Quota check box and enter the storage quota in megabyte (MB). Click Next to continue. D-Link ShareCenter Pro 1100-04 User Manual... -
Page 100: Create Share Folder - Select Service
Section 3 - Configuration Create Share Folder - Select Service Step 8: Select the Service you wish to enable. There are six services: CIFS, AFP, FTP, NFS, Web File Manager, and WebDAV. Click Next to continue. D-Link ShareCenter Pro 1100-04 User Manual... -
Page 101: Create Share Folder - Access Rights
Section 3 - Configuration Create Share Folder - Access Rights Step 8: Select All Users or Specific User. Click Next to continue. Use the radio button to select All Users or Specific User Click Next to continue. D-Link ShareCenter Pro 1100-04 User Manual... -
Page 102: Create Share Folder - Access Rights
Read/Write: Give the users read and write access to the folder Deny: Deny the user from accessing the shared folder. Click Next to continue. Select either Read Only, Read/Write, or Deny. Click Next to continue. D-Link ShareCenter Pro 1100-04 User Manual... -
Page 103: Shared Folders
Section 3 - Configuration Shared Folders The Summary window appears detail the Step 10: events you just configured. Click Apply when done. Summary Report Click Apply to continue. D-Link ShareCenter Pro 1100-04 User Manual... -
Page 104: Create Share Folder - Summary
Section 3 - Configuration Create Share Folder - Summary Step 11: Click Account Management, Shared Folders. The newly created Shared Folder appears in the right-hand pane. Shared Folder Usage/Size Status Options Management D-Link ShareCenter Pro 1100-04 User Manual... -
Page 105: Chapter 8 - Software - Creating A Group
Section 3 - Configuration Chapter 8 - Software - Creating a Group The D-Link ShareCenter Pro 1100-04 allows you to create groups for users/shared folders to access. Let’s take a look. D-Link ShareCenter Pro 1100-04 User Manual... -
Page 106: Software - Creating A Group
Section 3 - Configuration Software - Creating a Group Step 1: Once logged in click Account Management, then Groups. D-Link ShareCenter Pro 1100-04 User Manual... -
Page 107: Software - Creating A Group
Section 3 - Configuration Software - Creating a Group Step 2: Click Create. Click Create D-Link ShareCenter Pro 1100-04 User Manual... -
Page 108: Software - Creating A Group
Section 3 - Configuration Software - Creating a Group Step 3: Under Group Name type in the name of the group and click Next Enter a Group Name Click Next to continue D-Link ShareCenter Pro 1100-04 User Manual... -
Page 109: Software - Adding Users To A Group
Software - Adding Users to a Group Step 4: Add Users to the Group. Click the check- box next to the name of the user. Add a User to the Group Click Apply to save the changes. D-Link ShareCenter Pro 1100-04 User Manual... -
Page 110: Software - Adding Users To A Group
Step 5: After the changes are applied, the ShareCenter Pro reverts back to the Accounts Management, Groups window. The new Group is created with information on the users Group Name Users added to the Group D-Link ShareCenter Pro 1100-04 User Manual... -
Page 111: My Favorites
My Favorites field. To delete a category in My Favorites, drag the category in My Favorites field to the left window. Once the category is added to My Favorites, click the icon to see the category in the list. Click to directly link to the window of the category. D-Link ShareCenter Pro 1100-04 User Manual... -
Page 112: Chapter 9 - Software - Admin Password
Section 3 - Configuration Chapter 9 - Software - Admin Password The D-Link ShareCenter Pro 1100-04 allows you to create and change the Administrator Password. Let’s take a look. D-Link ShareCenter Pro 1100-04 User Manual... -
Page 113: Software - Admin Password
Section 3 - Configuration Software - Admin Password Step 1: Log into the ShareCenter Pro. Click Account Management, then click Admin Password. Click Admin Password D-Link ShareCenter Pro 1100-04 User Manual... -
Page 114: Software - Admin Password
Enter a Username, the original password. Then the New Password and retype that password again in the fields provided. User Name Displays administrator’s user name. Password Enter the original password. Enter a new password. Password Confirm Retype the new password. Password Click Apply to continue. Click Apply to save the changes D-Link ShareCenter Pro 1100-04 User Manual... -
Page 115: Software - Admin Password
Section 3 - Configuration Software - Admin Password Step 3: A confirmation window appears to inform you that the changes have been saved. Click OK D-Link ShareCenter Pro 1100-04 User Manual... -
Page 116: Chapter 10 - Software - System & Hard Drive Status
Section 3 - Configuration Chapter 10 - Software - System & Hard Drive Status The D-Link ShareCenter Pro 1100-04 allows you to check the status of your machine through the web UI. Let’s take a look. D-Link ShareCenter Pro 1100-04 User Manual... -
Page 117: Software - Status Management
Section 3 - Configuration Software - Status Management Step 1: Click the Status Folder icon in the left pane of the ShareCenter Pro 1100-04. It reveals System Status, Hard Drive Status, and Resource Monitor. D-Link ShareCenter Pro 1100-04 User Manual... -
Page 118: Software - System Status
Section 3 - Configuration Software - System Status Step 2: Click the System Status icon. Click the System Status icon D-Link ShareCenter Pro 1100-04 User Manual... -
Page 119: Software - System Status
Section 3 - Configuration Software - System Status Step 3: The Status, System Status information window pane provides Basic Information, LAN 1 & 2 information, Network Settings, and Date and Time Settings. D-Link ShareCenter Pro 1100-04 User Manual... -
Page 120: System Status
Displays the current date and time settings of the ShareCenter Pro. Time USB Disk Displays information for a connected USB printer, memory disk or UPS. Click the Unmount button to remove the device Information from the ShareCenter Pro. D-Link ShareCenter Pro 1100-04 User Manual... -
Page 121: Software - Hard Drive Status
Section 3 - Configuration Software - Hard Drive Status Step 1: Click the Status Folder icon in the left pane of the ShareCenter Pro 1100-04 D-Link ShareCenter Pro 1100-04 User Manual... -
Page 122: Software - Hard Drive Status
Section 3 - Configuration Software - Hard Drive Status Step 2: Click the Hard Drive Status icon in the right pane Click the Hard Drive Status icon D-Link ShareCenter Pro 1100-04 User Manual... -
Page 123: Software - Hard Drive Status
Software - Hard Drive Status Step 3: This window displays the Vendor, Model name, Temperature, and Size of the hard disks installed in the ShareCenter Pro, along with the slot they are installed in. D-Link ShareCenter Pro 1100-04 User Manual... -
Page 124: Software - Hard Drive Status
S.M.A.R.T. information The S.M.A.R.T. information for the selected hard drive is displayed. Click the Close button to go back to the Hard Drive Status window. Click the to close the window. D-Link ShareCenter Pro 1100-04 User Manual... -
Page 125: Software - Resource Monitor
Section 3 - Configuration Software - Resource Monitor Step 1: Click the Status Folder icon in the left pane of the ShareCenter Pro 1100-04 D-Link ShareCenter Pro 1100-04 User Manual... -
Page 126: Software - Resource Monitor
Section 3 - Configuration Software - Resource Monitor Step 2: Click the Resource Monitor icon in the right pane. Click the Resource Monitor icon D-Link ShareCenter Pro 1100-04 User Manual... -
Page 127: Software - Resource Monitor
Shows what percentage of data is being used for the CPU. Disk Usage Shows the used space, the available space, and the total space. The iSCSI Target Used Size will be displayed when iSCSI LUNs are created D-Link ShareCenter Pro 1100-04 User Manual... -
Page 128: Software - Resource Monitor
Section 3 - Configuration Software - Resource Monitor Step 4: Memory Shows how much memory is being consumed. Usage Bandwidth Shows data transfer on 2 LAN ports. Usage D-Link ShareCenter Pro 1100-04 User Manual... - Page 129 Section 3 - Configuration Step 5: Process This table shows PID, User, Memory, CPU Usage, and Command data information. D-Link ShareCenter Pro 1100-04 User Manual...
-
Page 130: Chapter 11 - Software - Disk Management
Section 3 - Configuration Chapter 11 - Software - Disk Management The D-Link ShareCenter Pro 1100-04 allows you to manage various aspects of the machine - primarily the disks. Let’s take a look. D-Link ShareCenter Pro 1100-04 User Manual... -
Page 131: Software - Disk Management
Section 3 - Configuration Software - Disk Management Step 1: Click the Disk Management Folder icon in the left pane of the ShareCenter Pro 1100-04 D-Link ShareCenter Pro 1100-04 User Manual... -
Page 132: Software - Disk Management
Section 3 - Configuration Software - Disk Management Step 2: Click the Volume icon. Click the Volume icon D-Link ShareCenter Pro 1100-04 User Manual... -
Page 133: Software - Disk Management - Volume
Unlock Click to unlock an encrypted volume Encryption Click to configure the encryption settings of the volume. Auto Rebuild Click to enable or disable the auto-rebuild function. D-Link ShareCenter Pro 1100-04 User Manual... -
Page 134: Software - Disk Management - Creat A Volume
Tick the check box to select the corresponding hard drive to be part of the volume. Spare Tick the check box to select the corresponding hard drive as a spare for the volume. Click Next to continue D-Link ShareCenter Pro 1100-04 User Manual... -
Page 135: Software - Disk Management - Create A Volume
Auto Unlock Tick the check box to automatically unlock the volume when the system starts. USB Key Tick the check box to save the password to a USB drive. Click Apply to save the changes D-Link ShareCenter Pro 1100-04 User Manual... -
Page 136: Software - Disk Management - Create A Volume
A warning message appears before starting to create the volume. Click Yes to continue. The volume is being created. The status bar displays the percentage of completion in real time. Once the volume is created successfully, the Volume window appears. D-Link ShareCenter Pro 1100-04 User Manual... -
Page 137: Software - Disk Management - Extend/Spare A Volume
Tick the check box to select the disk to be a spare disk. Disk Displays the configured disk number. Size Displays the size of the hard disk. Note: Only JBOD, RAID 0/1/5/6 supports volume extensions and only RAID 1/5 and 6 supports spare disk settings. D-Link ShareCenter Pro 1100-04 User Manual... -
Page 138: Software - Disk Management - Migrate A Volume
Migration can only take place in the following instances: Standalone to JBOD Standalone to RAID 0/1/5/6 RAID 1 to JBOD RAID 1 to RAID 0/5, and 6 Click OK to save the Click OK to save the settings. changes D-Link ShareCenter Pro 1100-04 User Manual... -
Page 139: Software - Disk Management - Expand A Volume
ONLY RAID 1, 5 and RAID 6 supports volume expansion. Click the Expand button to see the following window. Click Yes, to continue. Follow the instruction in the State column to expand the Volume. D-Link ShareCenter Pro 1100-04 User Manual... -
Page 140: Disk Management - Change The Encryption Settings
Auto Unlock Tick the check box to automatically unlock the volume when the system starts. USB Key Tick the check box to save the password to a USB drive. Click OK to save the changes D-Link ShareCenter Pro 1100-04 User Manual... - Page 141 Click the Browse button to locate the path of the password password that is saved to the local computer. from local Click the Load button to get the password from local to unlock this volume. D-Link ShareCenter Pro 1100-04 User Manual...
-
Page 142: Disk Management - Change The Encryption Settings
Section 3 - Configuration Disk Management - Change the Encryption Settings Step 10:This window displays the setting in the Mail tab. Click Mail to send the password to the administrator. Click Mail D-Link ShareCenter Pro 1100-04 User Manual... -
Page 143: Iscsi Target
However, it is possible that you can mount a iSCSI device as read-only on multiple initiators. D-Link ShareCenter Pro 1100-04 User Manual... - Page 144 Do not connect 2 different clients to the same iSCSI target at the same time. This will lead to data loss and system crash. Create an iSCSI Target using the iSCSI Manager Login to your ShareCenter Pro 1100-04 as an administrator. Follow the instructions on the next page. D-Link ShareCenter Pro 1100-04 User Manual...
-
Page 145: Iscsi Target - Iscsi Manager
The iSCSI Target should not be confused with iSCSI which is a protocol, iSCSI Target is a storage server instance. iSCSI is a dedicated network connected hard disk storage device, like the DNS-1100-04. The 1100-04 provides distinct iSCSI targets for numerous clients. Step 1: Click Disk Management on the left pane. D-Link ShareCenter Pro 1100-04 User Manual... - Page 146 Click iSCSI Target. The right pane displays the iSCSI Manager. Step 3: Click the Enable iSCSI Target checkbox to enable this function. Click Enable iSNS and enter the iSNS server IP address. Click Apply to continue. D-Link ShareCenter Pro 1100-04 User Manual...
- Page 147 Section 3 - Configuration Step 4: The program saves all configurations. D-Link ShareCenter Pro 1100-04 User Manual...
-
Page 148: Iscsi Target - Iscsi Targets
Step 1: Click Disk Management under the main category window. Click iSCSI Target, then the iSCSI Targets button Click Create. NB: In order to run this, you must enable iSCSI Target under iSCSI Manager. D-Link ShareCenter Pro 1100-04 User Manual... - Page 149 ShareCenter Pro , it will be constructed to “iqn.2010-01.com.d- link:” + the device’s hostname + “:” + enter the name here. Check the No or Yes radio button to disable or activate CHAP services Enter a name and password for CHAP services. D-Link ShareCenter Pro 1100-04 User Manual...
- Page 150 ‘-’ , colon ‘:’ and dot ‘ . ’ . Both of them can accepts English letters, numbers, and underscore ‘_’ . Note: Both CHAP name and password can accepts English letters, numbers, and underscore ‘_’ D-Link ShareCenter Pro 1100-04 User Manual...
- Page 151 Section 3 - Configuration Step 3: Enter the appropriate fields. Click Next to continue. D-Link ShareCenter Pro 1100-04 User Manual...
- Page 152 1. None: no map LUN to this target. You can map it later. 2. Create a New LUN: create a new LUN and map it to this iSCSI target. 3. Map Existing LUNs: map existing LUNs to this target. D-Link ShareCenter Pro 1100-04 User Manual...
- Page 153 Section 3 - Configuration Step 5: The newly created iSCSI Target appears in the iSCSI Target table. The connection status will show in the “Status” column. D-Link ShareCenter Pro 1100-04 User Manual...
-
Page 154: Iscsi Target - Editing Iscsi Targets
Section 3 - Configuration iSCSI Target - Editing iSCSI Targets Follow these instructions to edit an iSCSI Target. Step 1: Under iSCSI Targets, click the iSCSI Target entry you wish to edit. Click Edit. D-Link ShareCenter Pro 1100-04 User Manual... - Page 155 The next window asks you to edit the iSCSI LUN Mapping. You can re-map any existing LUN to this iSCSI target. If this window doesn’t show any data, go to iSCSI LUNs to create a new one. D-Link ShareCenter Pro 1100-04 User Manual...
- Page 156 Section 3 - Configuration Step 4: The iSCSI Targets window returns to the table. D-Link ShareCenter Pro 1100-04 User Manual...
-
Page 157: Iscsi Target - Deleting Iscsi Targets
Section 3 - Configuration iSCSI Target - Deleting iSCSI Targets Follow these instructions to delete an iSCSI Target. Step 1: Select the iSCSI Target D-Link ShareCenter Pro 1100-04 User Manual... - Page 158 Section 3 - Configuration Step 2: The Warning message indicates that the iSCSI Target will be deleted. Step 3: The items in the iSCSI Targets table no longer exists. D-Link ShareCenter Pro 1100-04 User Manual...
-
Page 159: Iscsi Target - Details Of An Iscsi Targets
Target - Details of an iSCSI Targets Follow these instructions to view details of an iSCSI Target. Step 1: Select the iSCSI Target. Step 2: Click the Details button to show all details on the iSCSI Target. D-Link ShareCenter Pro 1100-04 User Manual... -
Page 160: Iscsi Target - Iscsi Lun
The space will be allocated now. If you create a 50 GB LUN, then 50 GB will be immediately reserved for that LUN. (Note that the creation will also take more time because of that process). D-Link ShareCenter Pro 1100-04 User Manual... - Page 161 Otherwise, you can enter a size from 1 to the volume size. The upper bound of the possible maximum LUN size is 2043 GB. Click Next to continue. D-Link ShareCenter Pro 1100-04 User Manual...
- Page 162 Under Enable CHAP, select Yes, if you wish to have authentication to login to the Target. Click No, if you do not want authentication. In the Name field, enter the CHAP name. In the Password field, enter the CHAP password. D-Link ShareCenter Pro 1100-04 User Manual...
- Page 163 Section 3 - Configuration Step 5: The new iSCSI LUN shows up in the iSCSI LUN table. D-Link ShareCenter Pro 1100-04 User Manual...
-
Page 164: Edit An Iscsi Lun
Step 1: Select an iSCSI LUN. Click the edit button Change the LUN size if the LUN is in thin-provisioning settings Step 2: Change the LUN Mapping settings here. Click Apply to save settings. D-Link ShareCenter Pro 1100-04 User Manual... -
Page 165: View Details Of An Iscsi Lun
View details of an iSCSI LUN Step 1: Select an iSCSI LUN. Click the Details button The Details window shows the basic settings of an iSCSI LUN and its ACL settings in the ACL table. D-Link ShareCenter Pro 1100-04 User Manual... -
Page 166: Iscsi Target - Lun Acl
Step 1: The Default Policy will always be first ACL on the LUN ACL table when the iSCSI Target service is enabled. Click the Create button to create a new LUN ACL for the initiator. D-Link ShareCenter Pro 1100-04 User Manual... - Page 167 Read Only: The initiator will grant Read access rights to the LUN. Read/Write: The initiator will grant Read and Write access rights to the LUN. Deny: The initiator will not see the LUN. Click Apply to continue. D-Link ShareCenter Pro 1100-04 User Manual...
- Page 168 Section 3 - Configuration Step 3: A warning message appears asking you to reconnect to the initiator. Click OK to continue. Step 4: The created LUN ACL will appear here. D-Link ShareCenter Pro 1100-04 User Manual...
-
Page 169: Editing The Lun Acl
Caution: Disconnect the iSCSI initiator from the ShareCenter Pro before editing the LUN ACL. Failure to do so can cause system problems. Follow these instructions to edit the LUN ACL. Step 1: Select the LUN ACL you want to modify. D-Link ShareCenter Pro 1100-04 User Manual... - Page 170 Section 3 - Configuration Step 2: Select the LUN ACL entry and click the Edit button. Step 3: Change the LUN access permissions on the initiator. Select either Read Only, Read/Write or Deny. D-Link ShareCenter Pro 1100-04 User Manual...
- Page 171 Section 3 - Configuration Step 4: Press the Apply button, and the modified rule will be applied. Step 5: A LUN warning message appears asking that you reconnect the initiator to apply the modified ACL. D-Link ShareCenter Pro 1100-04 User Manual...
-
Page 172: Virtual Volume
When using the virtual volume for the first time, the volume must be formatted before mounting to the ShareCenter Pro. Connect/ Click Connect to link to a virtual volume. Click Disconnect Disconnect to terminate the connection. D-Link ShareCenter Pro 1100-04 User Manual... - Page 173 Enter a name for the share folder to access. Authentication Click the Yes radio button to enable the authentication function. User Name Enter the user name for authentication. Password Enter the password for authentication Click Apply to save the settings. D-Link ShareCenter Pro 1100-04 User Manual...
-
Page 174: Disk Diagnostic
Click to stop a test Scan Click to scan if there are any errors or there is any corruption for the file system. Format Click to format a volume. All data on the volume will be deleted. D-Link ShareCenter Pro 1100-04 User Manual... - Page 175 Use the drop-down menu to select hour and minute of the day. Weekday Use the drop-down menu to select which day of the week. Date Use the drop-down menu to select a date. Click OK to save the settings. D-Link ShareCenter Pro 1100-04 User Manual...
- Page 176 Section 3 - Configuration Scan a Volume Click the Scan button to see this window. Select a volume and click Scan to start to check the file system. D-Link ShareCenter Pro 1100-04 User Manual...
- Page 177 Click the Format button to see this window. Select a volume and click Format to format the volume. A warning message appears to double confirm if the formatting will proceed. Click Yes to proceed. D-Link ShareCenter Pro 1100-04 User Manual...
-
Page 178: Disk Management - Scheduling A Disk Diagnostics
Use the drop-down menu to select hour and minute of the day. Weekday Use the drop-down menu to select which day of the week. Date Use the drop-down menu to select a date. Click OK to save the settings D-Link ShareCenter Pro 1100-04 User Manual... -
Page 179: Disk Management - Scan A Volume
Section 3 - Configuration Disk Management - Scan a Volume Click the Scan button to see this window. Select a volume and click Scan to start to check the file system. D-Link ShareCenter Pro 1100-04 User Manual... -
Page 180: Disk Management - Format A Volume
Click the Format button to see this window. Select a volume and click Format to format the volume. A warning message appears to double confirm if the formatting will proceed. Click Yes to proceed. D-Link ShareCenter Pro 1100-04 User Manual... -
Page 181: Account Management
Section 3 - Configuration Account Management This folder contains the Admin Password, Users, Groups, Share Folders, and ISO Mount. Click the folder to see the subcategories. D-Link ShareCenter Pro 1100-04 User Manual... -
Page 182: Admin Password
Admin Password. This window is used to change the administrator’s password. User Name Displays administrator’s user name. Password Enter the original password. Enter a new password. Password Confirm Retype the new password. Password Click Apply to save the settings. D-Link ShareCenter Pro 1100-04 User Manual... -
Page 183: Users
Create Batch Click the button to create multiple users at one time. Search Enter the search keyword and click to search for the user. Click to clear the search field and all users’ information appears. D-Link ShareCenter Pro 1100-04 User Manual... - Page 184 Section 3 - Configuration Create a User Click the Create button to see the welcome window. Click Next to continue. D-Link ShareCenter Pro 1100-04 User Manual...
- Page 185 Retype the password. Password Set Quota Tick the Set Quota check box to limit the storage capacity in megabyte for the user. The value of 0 means an unlimited quota size. Click Next to continue. D-Link ShareCenter Pro 1100-04 User Manual...
- Page 186 Click First Page ( ), Previous Page ( ), Next Page ( ) or Last page ( ) to search for the group. Refresh Click to update the group list. Click Next to continue. D-Link ShareCenter Pro 1100-04 User Manual...
- Page 187 Click First Page ( ), Previous Page ( ), Next Page ( ) or Last page ( ) to search for the group. Refresh Click to update the folder list. Click Next to continue. D-Link ShareCenter Pro 1100-04 User Manual...
- Page 188 Section 3 - Configuration This window displays a summary of the configured information. Click Previous to modify the settings. Click Apply to save the settings. D-Link ShareCenter Pro 1100-04 User Manual...
-
Page 189: Import Users
Section 3 - Configuration Import Users Click the Import Users button to see the welcome window. Click Next to continue. D-Link ShareCenter Pro 1100-04 User Manual... - Page 190 Click this button to see the example for listing the users in the file. Overwrite Tick the check box to replace duplicate accounts. duplicate accounts User List File Click the Browse button to locate the file. Click Next to continue. D-Link ShareCenter Pro 1100-04 User Manual...
- Page 191 State filed, the user will not be able to go to the next window. Click Next to continue. The window displays the final results of importing users to the ShareCenter 1100-04. Click Apply to save the settings. D-Link ShareCenter Pro 1100-04 User Manual...
- Page 192 Section 3 - Configuration Create Batch Users Click the Create Batch button to see the welcome window. Click Next to continue. D-Link ShareCenter Pro 1100-04 User Manual...
- Page 193 Tick the check box to replace duplicate accounts. duplicate Accounts Set Quota Tick the Set Quota check box to limit the storage capacity (in megabyte) for the user. The value of 0 means an unlimited quota size. Click Next to continue. D-Link ShareCenter Pro 1100-04 User Manual...
- Page 194 Click First Page ( ), Previous Page ( ), Next Page ( ) or Last page ( ) to search for the group. Refresh Click to update the group list. Click Next to continue. D-Link ShareCenter Pro 1100-04 User Manual...
- Page 195 Click First Page ( ), Previous Page ( ), Next Page ( ) or Last page ( ) to search for the group. Refresh Click to update the folder list. Click Next to continue. D-Link ShareCenter Pro 1100-04 User Manual...
- Page 196 This window displays a summary of the configured information. Click Previous to modify the settings. Click Apply to save the settings. Depending on the amount of users, the procedure may take a few hours. D-Link ShareCenter Pro 1100-04 User Manual...
-
Page 197: Groups
Select a group and click the button to remove the group from the list. Search Enter the search keyword and click to search for the group. Click to clear the search field and all groups’ information appears. D-Link ShareCenter Pro 1100-04 User Manual... -
Page 198: Create A Group
Section 3 - Configuration Create a Group Click the Create button to see the welcome window. Group Name Enter a name of the group Click Next to continue. D-Link ShareCenter Pro 1100-04 User Manual... - Page 199 First Page ( ), Previous Page ( ), Next Page ( ) or Last page ( ) to search for the group. Refresh Click to update the group list. Click Apply to save the settings. D-Link ShareCenter Pro 1100-04 User Manual...
-
Page 200: Shared Folders
Section 3 - Configuration Shared Folders Shared Folders creates folders users can share over the network. These folders can be created, edited or deleted. Step 1: Log into the system. Click Create Shared Folder. D-Link ShareCenter Pro 1100-04 User Manual... - Page 201 • Select a volume path where that folder will go • Set share folder options and size • Set other services like: CIFS,AFP, FTP, NFS, Web, File Manager, and WebDAV • Set shared folder access rights Click Next to continue. D-Link ShareCenter Pro 1100-04 User Manual...
- Page 202 Section 3 - Configuration Step 3: Under Volume Path, select the path by clicking once on the open field. A drop down menu appears of the drives on your NAS. Click Create to make a new folder. D-Link ShareCenter Pro 1100-04 User Manual...
- Page 203 Section 3 - Configuration Step 4: Enter a name for your new folder and click OK. D-Link ShareCenter Pro 1100-04 User Manual...
- Page 204 Section 3 - Configuration Step 5: Once you have entered the volume path, select the Share Folder Option Select to enable or disable the Map Archive, or Recycle Bin D-Link ShareCenter Pro 1100-04 User Manual...
- Page 205 Select to Enable the CIFS Services, Map Archive and Recycle Bin Select the Set Quota checkbox. Enter a Quota. The Quota is the number of MB you wish to designate the Shared Folder. Click Next to continue. D-Link ShareCenter Pro 1100-04 User Manual...
- Page 206 Select the Service you wish to incorporate onto this share folder. Choose from CFS, AFP, FTP, NFS, Web File Manager, or WebDAV. Click Enable to authenticate it or Disable to stop the service. Click Next to continue. D-Link ShareCenter Pro 1100-04 User Manual...
- Page 207 Select who you would like to access this Shared Folder. Select All Users to give all users access to the Shared Folder Select Specific User to choose a user from your list or enter details of a user. Click Next to continue. D-Link ShareCenter Pro 1100-04 User Manual...
- Page 208 Section 3 - Configuration Step 9: Select the Access Rights of the Shared Folder. Select either Read Only, Read/Write, or Deny access. Click Next to continue. D-Link ShareCenter Pro 1100-04 User Manual...
- Page 209 Section 3 - Configuration Step 10: The final screen shows a summary of the configuration options just carried out. Read through the settings you have just made. Click Apply to finish the Shared Folder configuration settings. D-Link ShareCenter Pro 1100-04 User Manual...
- Page 210 Section 3 - Configuration Step 11: ShareCenter 1100-04 starts to save your settings. D-Link ShareCenter Pro 1100-04 User Manual...
- Page 211 Section 3 - Configuration Step 12: ShareCenter 1100-04 returns you to Accounts Management, Share Folders. The table displays the Shared Folder created with size, status, and management functions. D-Link ShareCenter Pro 1100-04 User Manual...
-
Page 212: Shared Folders - Editing A Shared Folder
Section 3 - Configuration Shared Folders - Editing a Shared Folder Edit a Shared Folder within ShareCenter 1100-04. Step 1: Select the Shared Folder you wish edit. Click Edit. D-Link ShareCenter Pro 1100-04 User Manual... - Page 213 Section 3 - Configuration Step 2: The Volume is selected. Edit the Share Folder Options (services) and Quota accordingly. Click Next to continue. D-Link ShareCenter Pro 1100-04 User Manual...
- Page 214 Section 3 - Configuration Step 3: Edit the Services manually according to your needs. Click Next to continue. D-Link ShareCenter Pro 1100-04 User Manual...
- Page 215 Section 3 - Configuration Step 4: Edit the Access Rights in the Shared Folder for all users or specific users. Click Next to continue. D-Link ShareCenter Pro 1100-04 User Manual...
- Page 216 Section 3 - Configuration Step 5: Now select the Permissions. The permissions can be for a local user or a local group. Select the user and select the Permission for the user Click Apply to continue. D-Link ShareCenter Pro 1100-04 User Manual...
- Page 217 Section 3 - Configuration Step 6: ShareCenter 1100-04 saves your configuration and returns you to the Share Folder Table. D-Link ShareCenter Pro 1100-04 User Manual...
-
Page 218: Shared Folders - Management
Shared Folders - Management Manage the Shared Folder from a few icons on the table Step 1: Click the S button under Management to provide details on the Share Path. Click OK to exit. D-Link ShareCenter Pro 1100-04 User Manual... - Page 219 Section 3 - Configuration Step 2: Click the P button to change the Access Rights. Select between All Users or Specific Users. Click Next to continue. D-Link ShareCenter Pro 1100-04 User Manual...
- Page 220 Section 3 - Configuration Step 3: Select the Access Rights for the volume. Read Only, Read/Write, or Deny. Click Apply to complete the changes. D-Link ShareCenter Pro 1100-04 User Manual...
- Page 221 Click the C button to change CIFS services. Select between Enable (activate) or Disable (deactivate). Click Apply to continue. Clicking Disable changes the color of the letter to indicate that the service has been deactivated. D-Link ShareCenter Pro 1100-04 User Manual...
- Page 222 Click the A button to change AFP services. Select between Enable (activate) or Disable (deactivate). Click Apply to continue. Clicking Disable changes the color of the letter to indicate that the service has been deactivated. D-Link ShareCenter Pro 1100-04 User Manual...
- Page 223 Click the F button to change FTP services. Select between Enable (activate) or Disable (deactivate). Click Apply to continue. Clicking Disable changes the color of the letter to indicate that the service has been deactivated. D-Link ShareCenter Pro 1100-04 User Manual...
- Page 224 Section 3 - Configuration Step 7: For NFS settings, the configuration window allows you to Disable NFS or Create a new rule. To Create a new rule click Create. D-Link ShareCenter Pro 1100-04 User Manual...
- Page 225 Section 3 - Configuration Step 8: Under Create NFS Share, select the Permission level. There are two choices: Read Only & Read/Write. D-Link ShareCenter Pro 1100-04 User Manual...
- Page 226 Section 3 - Configuration Step 9: Under Root Squash, select to activate Root Squash or not. D-Link ShareCenter Pro 1100-04 User Manual...
- Page 227 Section 3 - Configuration Step 10: Enter the Host address. Click Apply. D-Link ShareCenter Pro 1100-04 User Manual...
- Page 228 Section 3 - Configuration Step 11: The NFS table now shows the changes made. D-Link ShareCenter Pro 1100-04 User Manual...
- Page 229 Section 3 - Configuration Step 12: To Edit Select the volume you wish to edit, click Edit. D-Link ShareCenter Pro 1100-04 User Manual...
- Page 230 Section 3 - Configuration Step 13: Users can edit the Permissions of a volume in this section. Once complete. Click Apply. D-Link ShareCenter Pro 1100-04 User Manual...
- Page 231 Section 3 - Configuration Step 14: Delete an NFS volume by clicking the volume. Then, click Delete. D-Link ShareCenter Pro 1100-04 User Manual...
- Page 232 Section 3 - Configuration Step 15: A warning message prompts you to verify your selection. Click Yes to delete the NFS volume. Click No to return to your original settings. D-Link ShareCenter Pro 1100-04 User Manual...
- Page 233 Click the M button to modify the Web File Manager. Select between Enable (activate) or Disable (deactivate). Click Apply to continue. Clicking Disable changes the color of the letter to indicate that the service has been deactivated. D-Link ShareCenter Pro 1100-04 User Manual...
- Page 234 Click the W button to modify the WebDAV Services Select between Enable (activate) or Disable (deactivate). Click Apply to continue. Clicking Disable changes the color of the letter to indicate that the service has been deactivated. D-Link ShareCenter Pro 1100-04 User Manual...
-
Page 235: Accounts Management - Shared Folders
Section 3 - Configuration Accounts Management - Shared Folders Inactive Service Active Service D-Link ShareCenter Pro 1100-04 User Manual... -
Page 236: Iso Mounts
Section 3 - Configuration ISO Mounts Follow these steps to mount and save an ISO file. Step 1: Log into the system. D-Link ShareCenter Pro 1100-04 User Manual... - Page 237 Section 3 - Configuration Step 2: Click Accounts Management Click ISO Mount. D-Link ShareCenter Pro 1100-04 User Manual...
- Page 238 Section 3 - Configuration Step 3: Click Create, the Create ISO Mount window appears. Read the instructions and click Next. D-Link ShareCenter Pro 1100-04 User Manual...
- Page 239 Click the empty field to browse to the ISO File Path. The ISO File must be located on the NAS to authenticate this procedure. The ISO file cannot be on a volume. Click the volume to extend your search. D-Link ShareCenter Pro 1100-04 User Manual...
- Page 240 Section 3 - Configuration Step 5: Click Next to continue D-Link ShareCenter Pro 1100-04 User Manual...
- Page 241 Section 3 - Configuration Step 6: Select the Service by using one of the radio buttons The choices include: CIFS, AFP, FTP, NFS, Web File Manager, and WebDAV. Click Next to continue. D-Link ShareCenter Pro 1100-04 User Manual...
- Page 242 Under Access Rights specify the user - All Users or Specific Users. Click Next to continue Step 8: Select which Access Rights you want to assign a user. Choose either Read Only or Deny. Click Next to continue. D-Link ShareCenter Pro 1100-04 User Manual...
- Page 243 Section 3 - Configuration Step 9: The final step is a summary. The summary displays the Path, Allowed Services, and Access Rights. Click Apply to accept the configuration changes or click Cancel. D-Link ShareCenter Pro 1100-04 User Manual...
-
Page 244: Iso Mounts - Editing An Iso Mount
Section 3 - Configuration ISO Mounts - Editing an ISO Mount Follow these steps to edit an ISO file. Step 1: Once the configuration is saved and you need to edit your settings once again, click Edit. D-Link ShareCenter Pro 1100-04 User Manual... - Page 245 Section 3 - Configuration Step 2: Select the Services you want. Click Enable to activate the services. Click Disable to deactivate the services. Click Next to continue. D-Link ShareCenter Pro 1100-04 User Manual...
- Page 246 Select the User you wish to assign or edit. Click Next. Step 4: Selecting a Specific User. Under Permissions, select the specific user, check the permission you want to set for this user. Click Apply to continue. D-Link ShareCenter Pro 1100-04 User Manual...
- Page 247 Section 3 - Configuration Step 5: Once you have clicked Apply, the screen reverts back to the ISO Mount table. D-Link ShareCenter Pro 1100-04 User Manual...
-
Page 248: Iso Mounts - Deleting An Iso Mount
ISO Mounts - Deleting an ISO Mount Follow these steps to delete an ISO mount setting. Please note: The ISO file will not be deleted. Step 1: Select the ISO Mount you wish to delete Click the Delete button. D-Link ShareCenter Pro 1100-04 User Manual... - Page 249 Section 3 - Configuration Step 2: A warning message appears verifying if you want to delete the shared folder. Click Yes to confirm the delete instruction Click No to exit this instruction D-Link ShareCenter Pro 1100-04 User Manual...
- Page 250 Section 3 - Configuration Step 3: The folder is deleted and the ISO Mount directory is empty. D-Link ShareCenter Pro 1100-04 User Manual...
-
Page 251: Chapter 12 - Software - System Management
Section 3 - Configuration Chapter 12 - Software - System Management The D-Link ShareCenter Pro 1100-04 allows you to manage key system functions of your NAS. Let’s take a look. D-Link ShareCenter Pro 1100-04 User Manual... -
Page 252: Software - System Management - Network Settings
Section 3 - Configuration Software - System Management - Network Settings Step 1: Open your browser and click System Management. D-Link ShareCenter Pro 1100-04 User Manual... -
Page 253: Software - System Management - Network Settings
Section 3 - Configuration Software - System Management - Network Settings Step 2: Click the Network icon Click the Network icon D-Link ShareCenter Pro 1100-04 User Manual... -
Page 254: System Management - Network Settings - Lan 1
Option Use the drop-down menu to select the port bonding method. Available methods are Round Robin, Active Backup, XOR, Broadcast, 802.3ad, Adaptvie Transmit Load Balancing, and Adaptive Load Balancing. D-Link ShareCenter Pro 1100-04 User Manual... -
Page 255: System Management - Network Settings - Lan 2
Ethernet frame size. Gateway Enter the gateway IP address for the ShareCenter Pro. VLAN Enable or disable the VLAN. VLAN ID Enter a VLAN ID when VLAN is enabled. Click Apply to save the changes D-Link ShareCenter Pro 1100-04 User Manual... -
Page 256: System Management - Network Settings - Global Settings
Enter the main DNS address for the ShareCenter Pro. Secondary Enter the secondary DNS address for the ShareCenter Pro. Gateway Use the drop-down menu to select the LAN interface. Click Apply to save the changes D-Link ShareCenter Pro 1100-04 User Manual... -
Page 257: System Management - Network Settings - Route
Click First Page ( ), Previous Page ( ), Next Page ( ) or Last page ( ) to search for the group. Refresh Click to update the group list. D-Link ShareCenter Pro 1100-04 User Manual... -
Page 258: System Management - Network Settings - Route
Enter the subnet mask for the IP address. Metric Enter an integer cost metric for the route. Interface Use the drop-down menu to select the interface. Gateway Enter the forwarding or next hop IP address. Click Apply to save the changes D-Link ShareCenter Pro 1100-04 User Manual... -
Page 259: System Management - Time And Date Settings
Section 3 - Configuration System Management - Time and Date Settings Step 8: Click the Time and Date icon to configure these settings. Click the Time and Date icon D-Link ShareCenter Pro 1100-04 User Manual... -
Page 260: System Management - Time And Date Settings
Click the radio button to set the time and date manually. Set from Click the radio button and select a NTP server to NTP Server synchronize the ShareCenter Pro’s time with the NTP server. Click Apply to save the changes D-Link ShareCenter Pro 1100-04 User Manual... -
Page 261: System Management - System Settings
Section 3 - Configuration System Management - System Settings Step 10: Click the System Settings icon Click the System Settings icon D-Link ShareCenter Pro 1100-04 User Manual... -
Page 262: System Management - System Settings
System Overheat Toggle between Celsius and Fahrenheit and enter Temperature a temperature. Once the system temperature is over the entered temperature;, the ShareCenter Pro will automatically shut down. Click Apply to save the changes D-Link ShareCenter Pro 1100-04 User Manual... -
Page 263: System Management - Power Management
Section 3 - Configuration System Management - Power Management Step 12: Click the Power Management icon Click the Power Management icon D-Link ShareCenter Pro 1100-04 User Manual... -
Page 264: System Management - Power Management
Type Use the drop-down menu to select a fan speed mode. Available choices are Auto (Off/Low/High), Auto (Low/High) and Manual (Always on High). Click Apply to save the changes D-Link ShareCenter Pro 1100-04 User Manual... -
Page 265: System Management - Schedule Settings
Click Enable to set a schedule for automatic system Power On/Off power on and off. Schedule On Use the drop-down menus to select the time of & Schedule system power on and off. Click Apply to save the changes D-Link ShareCenter Pro 1100-04 User Manual... -
Page 266: System Management - Power Management - Ups
This device plays the role of the master and standalone if its connected with a USB cable. If it is not connected in this way, the device will play the role as the slave. In the slave role it will monitor the UPS status through the network. Step 1: Log-in to the NAS. D-Link ShareCenter Pro 1100-04 User Manual... - Page 267 Section 3 - Configuration Step 2: Click System Management D-Link ShareCenter Pro 1100-04 User Manual...
- Page 268 Section 3 - Configuration Step 3: Click Power Management D-Link ShareCenter Pro 1100-04 User Manual...
- Page 269 Section 3 - Configuration Step 4: Click UPS UPS has two modes, Master and Standalone From the drop-down list select Standalone D-Link ShareCenter Pro 1100-04 User Manual...
- Page 270 The UPS Status provides D e v i c e I n f o r m a t i o n , Manufac turer, Produc t, Battery Charge, and Status. Click Apply to continue D-Link ShareCenter Pro 1100-04 User Manual...
- Page 271 Section 3 - Configuration Step 6: The alternative is to select Master UPS mode. The Master UPS mode has three slave device IP address inputs. D-Link ShareCenter Pro 1100-04 User Manual...
- Page 272 Section 3 - Configuration Step 7: Enter an IP address into the field provided. Click Apply to submit the changes. D-Link ShareCenter Pro 1100-04 User Manual...
- Page 273 Note: Configuring network UPS is not the default configuration. Ask a systems administrator to assist you with all configuration operations. This feature is ideal for SOHO and medium size businesses that use more than one UPS and NAS. Make sure your network supports network UPS alerts. D-Link ShareCenter Pro 1100-04 User Manual...
-
Page 274: System Management - Email Alerts
Section 3 - Configuration System Management - Email Alerts Step 15: Click the Email Alerts icon. Click the Email Alerts icon D-Link ShareCenter Pro 1100-04 User Manual... -
Page 275: System Management - Email Alerts
Test E-mail Click the Test E-Mail button to send a test e-mail. Event Alert Tick the check boxes to select the situation that Settings will cause the e-mail alert to be sent out. D-Link ShareCenter Pro 1100-04 User Manual... -
Page 276: System Management - Firmware Upgrade
Section 3 - Configuration System Management - Firmware Upgrade Step 17: Click the Firmware Upgrade icon. Click the Firmware Upgrade icon D-Link ShareCenter Pro 1100-04 User Manual... -
Page 277: System Management - Firmware Upgrade
Displays the date of the firmware. File Path Click the Browse button to locate the firmware. You must save the firmware to the local hard drive of your computer before upgrading the firmware. Click Apply to save the changes D-Link ShareCenter Pro 1100-04 User Manual... -
Page 278: System Management - Logs
Section 3 - Configuration System Management - Logs Step 19: Click the Logs icon Click the Logs icon D-Link ShareCenter Pro 1100-04 User Manual... -
Page 279: System Management - Logs
NFS: Enable Network File Systems to access files over the network. CIFS: Provides shared access to files. FTP: File transfer Protocol to setup file transfer. Event: To monitor your events on your NAS. Log Settings D-Link ShareCenter Pro 1100-04 User Manual... -
Page 280: System Management - Logs
Section 3 - Configuration System Management - Logs Step 21: Click the Log Message List to monitor the activity on your system. You can refresh logs, clear a log, or save a log. D-Link ShareCenter Pro 1100-04 User Manual... -
Page 281: System Management - Syslog Server
Section 3 - Configuration System Management - Syslog Server Step 22 Log in to your NAS. Step 23 Click System Management. D-Link ShareCenter Pro 1100-04 User Manual... - Page 282 Section 3 - Configuration Step 24 Under System Management, Syslog Server, click Enable Syslog Server. Click Apply to continue. D-Link ShareCenter Pro 1100-04 User Manual...
-
Page 283: System Management - Syslog Server Rule
Section 3 - Configuration System Management - Syslog Server Rule Follow these steps to create a Syslog Server Role. Step 1 Under System Management, Syslog Server, click Syslog Server Rule. Click Create. D-Link ShareCenter Pro 1100-04 User Manual... -
Page 284: Link Sharecenter Pro 1100-04 User Manual
Section 3 - Configuration Step 2 Under Create Syslog Server Rule, create a Rule Name Click Next to continue. D-Link ShareCenter Pro 1100-04 User Manual... - Page 285 Step 3 Under Protocols and Severity, select from the options available. Facility:- Auth, Crons, Daemon, FTP, Kern, LPR, Mail, News, Syslog Severity:- Debug, Information, Notice, Warning, Error, Alert, Critical, Emergency Click Next to continue. D-Link ShareCenter Pro 1100-04 User Manual...
- Page 286 Section 3 - Configuration Step 4 Under Log File, browse to the path where you want to save the file. Type a File Name D-Link ShareCenter Pro 1100-04 User Manual...
- Page 287 Section 3 - Configuration Step 5: Click Next to continue. Step 6: Under Log File Rotation. Click Enable. D-Link ShareCenter Pro 1100-04 User Manual...
- Page 288 Section 3 - Configuration Step 7: Enter the Number of Log Files Click Rotate by Size. Enter the Maximum Log File Size in “MB” Click Rotate by Frequency. Rotation Frequency is Daily, Weekly, or Monthly Click Apply. D-Link ShareCenter Pro 1100-04 User Manual...
- Page 289 Section 3 - Configuration Step 8: The Total Number of Log Files cannot exceed “10”. The warning message prompts you change your configuration. D-Link ShareCenter Pro 1100-04 User Manual...
-
Page 290: Link Sharecenter Pro 1100-04 User Manual
Section 3 - Configuration Step 9: Enter the Log File amount. Click Apply. Step 10: The Rule now appears in Syslog Server Rule table. D-Link ShareCenter Pro 1100-04 User Manual... -
Page 291: System Management - Edit A Syslog Server Rule
Section 3 - Configuration System Management - Edit a Syslog Server Rule Follow these steps to edit a Syslog Server Rule: Step 1: Select the Server Rule you wish to edit Click Edit. D-Link ShareCenter Pro 1100-04 User Manual... - Page 292 Section 3 - Configuration Step 2: The Rule Name window is first. However, the Rule Name cannot be edited. Click Next to continue. D-Link ShareCenter Pro 1100-04 User Manual...
- Page 293 Section 3 - Configuration Step 3: Under Protocols and Severity, select from the options available. Select or deselect the options you want to edit Click Next to continue. D-Link ShareCenter Pro 1100-04 User Manual...
- Page 294 Section 3 - Configuration Step 4: Edit the Log File, the path and/or File Name. D-Link ShareCenter Pro 1100-04 User Manual...
- Page 295 Section 3 - Configuration Step 5: Edit the Log File Rotation according to your requirements. Click Apply. The changes take effect immediately. D-Link ShareCenter Pro 1100-04 User Manual...
-
Page 296: System Management - Delete A Syslog Server Rule
Section 3 - Configuration System Management - Delete a Syslog Server Rule Follow these steps to edit a Syslog Server Rule. Step 1: Select the Server Rule you wish to delete Click Delete. D-Link ShareCenter Pro 1100-04 User Manual... - Page 297 Section 3 - Configuration Step 2: A warning message asks you to confirm your selection. Click Yes to delete the Rule. Click No to cancel your configuration. D-Link ShareCenter Pro 1100-04 User Manual...
-
Page 298: System Management - Enable/Disable A Syslog Server Rule
Step 1: Select the Server Rule you wish to enable or disable Click the Enable/Disable Rule button to toggle between the two. The Status column will indicate whether the device is enabled or disabled. D-Link ShareCenter Pro 1100-04 User Manual... -
Page 299: System Management - Clearing A Syslog Server Log
Section 3 - Configuration System Management - Clearing a Syslog Server Log Follow these steps to clear a Syslog Server Log File: Step 1: Select the Server Log you wish to clear. Click Clean Log. D-Link ShareCenter Pro 1100-04 User Manual... - Page 300 A warning message appears to notify you that the log will be deleted. Click Yes to clear the Log file. Click No to make no changes. Click the Download Log button to download the log. D-Link ShareCenter Pro 1100-04 User Manual...
-
Page 301: Chapter 13 - Software - Network Services
Section 3 - Configuration Chapter 13 - Software - Network Services The D-Link ShareCenter Pro 1100-04 allows you to monitor and configure Network Services. Let’s take a look. D-Link ShareCenter Pro 1100-04 User Manual... -
Page 302: Software - Network Services
Section 3 - Configuration Software - Network Services Step 1: Click the Network Services folder to the right. Click File Sharing. Click the File Sharing icon D-Link ShareCenter Pro 1100-04 User Manual... -
Page 303: Software - Network Services - File Sharing
CIFS: FTP: NFS: DFS: Quota: AFP: WebDAV: Each of these protocols can be configured. Select the choices you want to enable and click Apply. Click Apply to save the changes D-Link ShareCenter Pro 1100-04 User Manual... -
Page 304: Software - Network Services - File Sharing - Ftp
Anonymous Click Enable to allow anonymous FTP to log in. Support SSL/TLS Click Enable to only allow SSL or TLS connection Connection Only requests from the FTP clients. D-Link ShareCenter Pro 1100-04 User Manual... -
Page 305: Software - Network Services - File Sharing - Cifs
Enter the name of the workgroup which should be the same as the computers on the network. Realm Name Enter the AD server domain name. AD Server Enter the AD server hostname. Name Click Apply to save the changes D-Link ShareCenter Pro 1100-04 User Manual... -
Page 306: Software - Network Services - File Sharing - Dfs
Click First Page ( ), Previous Page ( ), Next Page ( ) or Last page ( ) to search for the group. Refresh Click to update the group list. D-Link ShareCenter Pro 1100-04 User Manual... -
Page 307: Software - Network Services - File Sharing - Dfs
Enter a remote share folder location manually, or click share folder the Get Host Share Folder button to search for one. Local share Enter the local share name in the field. name Click Apply to save the changes. D-Link ShareCenter Pro 1100-04 User Manual... -
Page 308: Software - Network Services - Dynamic Dns
Section 3 - Configuration Software - Network Services - Dynamic DNS Step 1: Click the Dynamic DNS folder Click the Dynamic DNS icon D-Link ShareCenter Pro 1100-04 User Manual... -
Page 309: Software - Network Services - Dynamic Dns
Re-type the password or key. or Key Timeout Enter a time in hours for periodic updates from the dynamic DNS provider. Status Displays the current status to the server. Click Apply to save the changes D-Link ShareCenter Pro 1100-04 User Manual... -
Page 310: Software - Network Services - Snmp
Section 3 - Configuration Software - Network Services - SNMP Step 1: Click the SNMP folder. Click the SNMP icon D-Link ShareCenter Pro 1100-04 User Manual... -
Page 311: Software - Network Services - Snmp
Enable or Disable SNMP. SNMP Enter the name of the SNMP community. Community Notification Enable or Disable trap support. Notification IP Enter the IP address that will receive the notification. Click Apply to save the changes. D-Link ShareCenter Pro 1100-04 User Manual... -
Page 312: Software - Network Services - Network Discovery Services
Section 3 - Configuration Software - Network Services - Network Discovery Services Step 1: Click the Network Discovery Services folder Click the Network Discovery Services icon D-Link ShareCenter Pro 1100-04 User Manual... -
Page 313: Software - Network Services - Network Discovery Services
UPnP discovery protocol. LLTD Click Enable to allow the ShareCenter Pro to be discovered by the network map under Windows Vista or Windows 7. Click Apply to save the changes. D-Link ShareCenter Pro 1100-04 User Manual... -
Page 314: Chapter 14 - Software - Applications
Section 3 - Configuration Chapter 14 - Software - Applications The D-Link ShareCenter Pro 1100-04 allows you to configure a Web File Manager and Download Manager. Let’s take a look. D-Link ShareCenter Pro 1100-04 User Manual... -
Page 315: Software - Applications - Web File Manager
Section 3 - Configuration Software - Applications - Web File Manager Step 1: Click the Web File Manager folder Click the Web File Manager icon D-Link ShareCenter Pro 1100-04 User Manual... -
Page 316: Software - Applications - Web File Manager
SSL Connection Click the radio buttons to enable or disable the HTTPS connection. SSL Port Enter the port number for the HTTPS connection. Click Apply to save the changes. D-Link ShareCenter Pro 1100-04 User Manual... -
Page 317: Software - Applications - Download Manager
Section 3 - Configuration Software - Applications - Download Manager Step 3: Click the Download Manager folder Click the Download Manager icon D-Link ShareCenter Pro 1100-04 User Manual... -
Page 318: Software - Applications - Download Manager
Click First Page ( ), Previous Page ( ), Next Page ( ) or Last page ( ) to search for the group. Refresh Click to update the group list. D-Link ShareCenter Pro 1100-04 User Manual... -
Page 319: Software - Applications - Download Manager
Click the Test button to see if the URL can be connected. Save To Click the field to show the available folders. Click the Create button to add a new folder. Double-click a folder to select it. Click Next D-Link ShareCenter Pro 1100-04 User Manual... -
Page 320: Software - Applications - Download Manager
Time Use the drop-down menu to select downloading time. Weekly Select a day of the week for recurring download. Monthly Select the month for recurring download. Click Apply to save the changes. D-Link ShareCenter Pro 1100-04 User Manual... -
Page 321: Chapter 15 - Software - Backup
Section 3 - Configuration Chapter 15 - Software - Backup The D-Link ShareCenter Pro 1100-04 allows you to configure a Backup service for your NAS. Let’s take a look. D-Link ShareCenter Pro 1100-04 User Manual... -
Page 322: Software - Backup
Section 3 - Configuration Software - Backup Step 1: Click the Backup folder on the left pane Click the Backup Folder D-Link ShareCenter Pro 1100-04 User Manual... -
Page 323: Software - Backup - Volume Snapshot
Section 3 - Configuration Software - Backup - Volume Snapshot Click the Volume Snapshot. C l i c k t h e Vo l u m e Snapshot icon. D-Link ShareCenter Pro 1100-04 User Manual... -
Page 324: Software - Backup - Volume Snapshot
Take Click the button to take a snapshot of a volume. snapshot Show Click the button to show the calendar indicating on snapshot which dates a snapshot had been taken. D-Link ShareCenter Pro 1100-04 User Manual... -
Page 325: Software - Backup - Volume Snapshot
Weekday Use the drop-down menu to select the day of the week. Date Use the drop-down menu to select the day of the month. Click Apply to save the changes. D-Link ShareCenter Pro 1100-04 User Manual... -
Page 326: Software - Backup - Volume Snapshot
The date cell is highlighted when there are snapshots on that day. Click the cell to view details of the volume’s snapshot(s). Click Close to go back to the Volume Snapshot window. Click Close. D-Link ShareCenter Pro 1100-04 User Manual... -
Page 327: Software - Backup - Volume Snapshot
First Page ( ), Previous Page ( ), Next Page ( ) or Last page ( ) to search for the group. Refresh Click to update the group list. Click Close to go back to the previous window. Click Close. D-Link ShareCenter Pro 1100-04 User Manual... -
Page 328: Software - Backup - Local Backup
Section 3 - Configuration Software - Backup - Local Backup Step 1: Click the Local Backup icon Click the Local Backup icon D-Link ShareCenter Pro 1100-04 User Manual... -
Page 329: Software - Backup - Local Backup
Click First Page ( ), Previous Page ( ), Next Page ( ) or Last page ( ) to search for the group. Refresh Click to update the group list. D-Link ShareCenter Pro 1100-04 User Manual... -
Page 330: Software - Backup - Local Backup
Tick the check box to enable the incremental Backup backup method. All backups after the first full backup will be on an incremental basis. Only the changes since the last backup will be backed up. Click Next. D-Link ShareCenter Pro 1100-04 User Manual... -
Page 331: Software - Backup - Local Backup
Time Use the drop-down menu to select the time for backup. Weekly Select a day of the week for recurring backup. Monthly Select the month for recurring backup. Click Apply to save the changes. D-Link ShareCenter Pro 1100-04 User Manual... -
Page 332: Software - Backup - Local Backup
Section 3 - Configuration Software - Backup - Local Backup Step 1: Click the Remote Backup icon. Click the Remote Backup icon. D-Link ShareCenter Pro 1100-04 User Manual... -
Page 333: Software - Backup - Remote Backup Server
ShareCenter Pro. This is the remote backup password. The password for the remote NAS should be the same as the password of the ShareCenter Pro. Click Apply to save the settings. Click Apply to save the changes. D-Link ShareCenter Pro 1100-04 User Manual... -
Page 334: Software - Backup - Remote Backup Job
Click First Page ( ), Previous Page ( ), Next Page ( ) or Last page ( ) to search for the group. Refresh Click to update the group list. D-Link ShareCenter Pro 1100-04 User Manual... -
Page 335: Software - Backup - Remote Backup Job
Software - Backup - Remote Backup Job Step 4: Click Create. Server Type Use the drop-down menu to select between D-Link NAS Server or Rsync Server. Click Next to continue. Click Next to continue. D-Link ShareCenter Pro 1100-04 User Manual... -
Page 336: Software - Backup - Remote Backup Job
Enter the Job Name and Folder Path. Job Name Enter the name of the remote backup job. Folder Path Click the field to select the source file/folder to be backed up remotely. Click Next to continue. Click Next to continue. D-Link ShareCenter Pro 1100-04 User Manual... -
Page 337: Software - Backup - Remote Backup Job
Tick the check box to enable SSH encryption. Support Keep Existing Tick the check box to keep the existing file with File the same name at the remote server and create another copy for backup. D-Link ShareCenter Pro 1100-04 User Manual... -
Page 338: Software - Backup - Remote Backup Job
Section 3 - Configuration Software - Backup - Remote Backup Job Step 7: Enter the Destination Path and click Next. Destination Click the field to select the destination path. Path D-Link ShareCenter Pro 1100-04 User Manual... -
Page 339: Software - Backup - Remote Backup Job
Time Use the drop-down menu to select the time for backup. Weekly Select a day of the week for recurring backup. Monthly Select the month for recurring backup. Click Apply to save the changes. D-Link ShareCenter Pro 1100-04 User Manual... -
Page 340: Software - Backup - External Backup
Section 3 - Configuration Software - Backup - External Backup Step 1: Click the External Backup icon Click the Ex ternal Backup icon D-Link ShareCenter Pro 1100-04 User Manual... -
Page 341: Software - Backup - External Backup
Tick the Incremental Backup check box to enable the incremental backup method. All backups after first full backup will be on an incremental basis. Only the changes since the last backup will be backed up. D-Link ShareCenter Pro 1100-04 User Manual... -
Page 342: Software - Backup - External Backup
Section 3 - Configuration Software - Backup - External Backup Step 1: Click the Amazon S3 icon. Click the Amazon S3 icon. D-Link ShareCenter Pro 1100-04 User Manual... -
Page 343: Amazon S3
Create a bucket on the Amazon S3 Server where you can upload or download your ShareCenter Pro data to/from. Create an Amazon S3 Scheduled Backup on your ShareCenter Pro to automatically upload any ShareCenter Pro Network Share to the Amazon S3 service. D-Link ShareCenter Pro 1100-04 User Manual... -
Page 344: Amazon S3
Section 3 - Configuration Amazon S3 Follow these steps to setup Amazon S3: Step 1: Log in. Click Backup, Amazon S3. Click Create. D-Link ShareCenter Pro 1100-04 User Manual... - Page 345 Section 3 - Configuration Step 2: The Create Amazon S3 Job wizard appears providing the following details: Job Name Settings Remote Settings Server Type Local Settings Schedule Settings Finish Click Next to continue. D-Link ShareCenter Pro 1100-04 User Manual...
- Page 346 Section 3 - Configuration Step 3: Enter a Job Name Click Next to continue. Step 4: Remote Settings Enter the Access Key, Private Key, Remote Path and Region supplied my Amazon Click Next to continue. D-Link ShareCenter Pro 1100-04 User Manual...
- Page 347 Click Next to continue. Step 6: Select the Local Path settings for your backup Click in the Local Path area. Your NAS drive should appear. Locate the path of your drive. Click Next to continue. D-Link ShareCenter Pro 1100-04 User Manual...
- Page 348 A summary of the configuration just completed is displayed. This is the final step in the wizard. Click Apply to end the wizard or Previous to back and make changes. Click cancel to exit and make no changes. D-Link ShareCenter Pro 1100-04 User Manual...
- Page 349 Highlighting the task you wish to delete. A warning message will appear asking you if you wish to delete the task. Click Yes to delete. Click No to return back to the previous page. D-Link ShareCenter Pro 1100-04 User Manual...
-
Page 350: Chapter 18 - Software - Extension Pack
Section 3 - Configuration Chapter 18 - Software - Extension Pack The D-Link ShareCenter Pro 1100-04 allows you to configure extension features for your NAS. Let’s take a look. Note: The Extension Pack only supports the Multi-Language package. D-Link ShareCenter Pro 1100-04 User Manual... -
Page 351: Extension Pack
Section 3 - Configuration Extension Pack This folder contains the Extension Pack. Click the folder to see the subcategories. D-Link ShareCenter Pro 1100-04 User Manual... -
Page 352: Extension Pack
Click First Page ( ), Previous Page ( ), Next Page ( ) or Last page ( ) to search for the group. Page Click to update the group list. D-Link ShareCenter Pro 1100-04 User Manual... -
Page 353: Chapter 19 - Appendix
Section 3 - Configuration Chapter 19 - Appendix The D-Link ShareCenter Pro 1100-04 knowledge base is a helpful link to technological terms within this manual. D-Link ShareCenter Pro 1100-04 User Manual... -
Page 354: Knowledge Base
Because the data is stored on multiple disks, fault tolerance means that if one drive fails, all data RAID 1 provides fault tolerance and protection, in in the array will be lost. addition to performance advantages. D-Link ShareCenter Pro 1100-04 User Manual... - Page 355 240GB (3x80GB). Implementing RAID 5 on the ShareCenter Pro allows it to continue operating even if one of the disks fails. The diagram below indicates the operation of RAID 5: D-Link ShareCenter Pro 1100-04 User Manual...
-
Page 356: Mapping A Drive
Section 4 - Knowledge Base Mapping a Drive You can use the D-Link EZ Search Utility to map drives to your computer. Insert the ShareCenter Pro CD into your CD-ROM drive. Click EZ Search Utility. The EZ Search Utility will load and detect any ShareCenter Pro devices that are on the local network. - Page 357 Available volumes will be displayed under Drive Mapping. Highlight the volume you want to map. Select an available drive letter from the drop-down menu and click Connect. Once connected, your mapped drive(s) will appear in My Computer. D-Link ShareCenter Pro 1100-04 User Manual...
- Page 358 Section 4 - Knowledge Base Double-click the My Computer icon on your desktop. Double-click the mapped drive to access the files and folders. D-Link ShareCenter Pro 1100-04 User Manual...
-
Page 359: Usb Print Server
USB printer to the USB port on the back of the ShareCenter Pro. It is important to ensure that any of the printer manufacturer’s drivers are already installed on any computer you want to print from. To add a printer: Click Start and select Printers and Faxes. D-Link ShareCenter Pro 1100-04 User Manual... - Page 360 Section 4 - Knowledge Base Select Add a printer. The Windows Add Printer Wizard will launch: ® Click Next to continue. D-Link ShareCenter Pro 1100-04 User Manual...
- Page 361 When prompted to choose a local, or network printer, select “A network printer, or a printer attached to another computer.” Click Next to continue. Select “Browse for a printer” and click Next to continue. D-Link ShareCenter Pro 1100-04 User Manual...
- Page 362 Section 4 - Knowledge Base Select Double-click DNS-1100-04 from the Shared Printers list to expand the tree. Select the available USB printer, and click Next to continue. D-Link ShareCenter Pro 1100-04 User Manual...
- Page 363 Click OK to continue and select a printer driver. Select the appropriate printer driver from the list and click OK to complete the wizard. If the driver is not in the list, select Have Disk. D-Link ShareCenter Pro 1100-04 User Manual...
- Page 364 Section 4 - Knowledge Base Insert the print driver CD or browse to the appropriate directory. Select the appropriate driver file, and click Open to continue. Click OK to continue. D-Link ShareCenter Pro 1100-04 User Manual...
- Page 365 Section 4 - Knowledge Base Verify the driver is correct, and click OK to continue. The wizard will install the printer drivers, and return a completion screen. Click Finish. D-Link ShareCenter Pro 1100-04 User Manual...
- Page 366 Section 4 - Knowledge Base The printer should now appear as an available printer. D-Link ShareCenter Pro 1100-04 User Manual...
-
Page 367: Iscsi Drive Mapping
If you cannot see the latest list, click the Refresh button to update the status. Note: You will need to create iSCSI volume in the Disk Management -> iSCSI Target. Click the iSCSI Targets tab to see the iSCSI target name in this section. D-Link ShareCenter Pro 1100-04 User Manual... - Page 368 Target. If CHAP authentication has been enabled, then a username and password will be required. Management Click the button to see the Management window. The window allows you to add, delete, mount and unmount the partition. D-Link ShareCenter Pro 1100-04 User Manual...
- Page 369 1. When attempting to connect a target for the first time, choose the target from the list 2. Click the Connect button. 3. If the CHAP is enabled, you will see this window appears requesting CHAP User and Password. D-Link ShareCenter Pro 1100-04 User Manual...
- Page 370 Choose the drive letter that you want to allocate to the iSCSI partition from the drop-down menu. When you have finished configuring the Target Settings, click the Format button to see the window below D-Link ShareCenter Pro 1100-04 User Manual...
- Page 371 File System Displays the File System that the partition was formatted with. Capacity Displays the total capacity of the partition. Target Displays the iSCSI target name of the partition. D-Link ShareCenter Pro 1100-04 User Manual...
- Page 372 Choose the drive letter that you want to allocate to the iSCSI partition from the drop-down menu. When you have finished configuring the partition settings, click the Format button to add the new partition. D-Link ShareCenter Pro 1100-04 User Manual...
- Page 373 Section 4 - Knowledge Base Deleting an existing partition Right-click an existing partition and click Delete. D-Link ShareCenter Pro 1100-04 User Manual...
- Page 374 Carry out the following steps to mount a disk: 1. Right-click an unmounted partition and click Mount. The Drive Select window appears. 2. Select the drive letter in the Device drop-down list. 3. Click the OK button. D-Link ShareCenter Pro 1100-04 User Manual...
- Page 375 4. The mounted disk is displayed in the Disk Management list. 3. The newly mounted disk is displayed in the My Computer window and can be used as if it was a locally attached disk. D-Link ShareCenter Pro 1100-04 User Manual...
-
Page 376: Hot-Swap
Disk(s) column. Hot swap one of the hard drives, make sure the Disk number has disappeared from the Disk(s) column, and then hot swap the next hard drive. D-Link ShareCenter Pro 1100-04 User Manual... -
Page 377: Storing Non-English Character Files
Section 4 - Knowledge Base Storing non-English Character Files By default the ShareCenter Pro will support Unicode which is an industry standard allowing computers to consistently represent and manipulate text expressed in most of the world’s writing formats. D-Link ShareCenter Pro 1100-04 User Manual... -
Page 378: Warranty
Any repair or replacement will be rendered by D-Link at an Authorized D-Link Service Office. The replacement hardware need not be new or have an identical make, model or part. D-Link may, at its option, replace the defective Hardware or any part thereof with any reconditioned product that D-Link reasonably determines is substantially equivalent (or superior) in all material respects to the defective Hardware. - Page 379 Software or to refund the portion of the actual purchase price paid that is attributable to the Software. Except as otherwise agreed by D-Link in writing, the replacement Software is provided only to the original licensee, and is subject to the terms and conditions of the license granted by D-Link for the Software.
- Page 380 • USA residents send to 17595 Mt. Herrmann, Fountain Valley, CA 92708. D-Link will not be held responsible for any packages that are lost in transit to D-Link. The repaired or replaced packages will be shipped to the customer via UPS Ground or any common carrier selected by D-Link.
- Page 381 FOR WARRANTY SERVICE) RESULTING FROM THE USE OF THE PRODUCT, RELATING TO WARRANTY SERVICE, OR ARISING OUT OF ANY BREACH OF THIS LIMITED WARRANTY, EVEN IF D-LINK HAS BEEN ADVISED OF THE POSSIBILITY OF SUCH DAMAGES. THE SOLE REMEDY FOR A BREACH OF THE FOREGOING LIMITED WARRANTY IS REPAIR, REPLACEMENT OR REFUND OF THE DEFECTIVE OR NONCONFORMING PRODUCT.
- Page 382 • Connect the equipment into an outlet on a circuit different from that to which the receiver is connected. • Consult the dealer or an experienced radio/TV technician for help. For detailed warranty information applicable to products purchased outside the United States, please contact the corresponding local D-Link office.
-
Page 383: Registration
Registration Registration Register your product at registration.dlink.com Product registration is entirely voluntary and failure to complete or return this form will not diminish your warranty rights. Version 1.1 January 19, 2012 D-Link ShareCenter Pro 1100-04 User Manual...