Siemens SIMATIC S7-1200 Manual
Hide thumbs
Also See for SIMATIC S7-1200:
- Function manual (527 pages) ,
- Manual (364 pages) ,
- System manual (338 pages)
Table of Contents
Advertisement
S7-1200 Easy Book
SIMATIC
S7-1200
Easy Book
Manual
11/2009
A5E02486774-01
Preface
Introducing the powerful and
______________
flexible S7-1200
STEP 7 Basic makes the
______________
work easy
______________
Getting started
______________
PLC concepts made easy
Programming concepts
______________
made easy
Easy to communicate
______________
between devices
Easy to use the built-in pulse
______________
generators
______________
Easy to use the online tools
______________
Technical specifications
1
2
3
4
5
6
7
8
A
Advertisement
Table of Contents

Related Manuals for Siemens SIMATIC S7-1200


Summary of Contents for Siemens SIMATIC S7-1200
- Page 1 Preface Introducing the powerful and S7-1200 Easy Book ______________ flexible S7-1200 STEP 7 Basic makes the ______________ work easy SIMATIC ______________ Getting started S7-1200 ______________ Easy Book PLC concepts made easy Programming concepts ______________ made easy Manual Easy to communicate ______________ between devices Easy to use the built-in pulse...
- Page 2 Note the following: WARNING Siemens products may only be used for the applications described in the catalog and in the relevant technical documentation. If products and components from other manufacturers are used, these must be recommended or approved by Siemens. Proper transport, storage, installation, assembly, commissioning, operation and maintenance are required to ensure that the products operate safely and without any problems.
-
Page 3: Preface
Preface Welcome to the world of S7-1200, the latest in a line of the Siemens SIMATIC controllers. The SIMATIC S7-1200 compact controller is the modular, space-saving controller for small automation systems that require either simple or advanced functionality for logic, HMI and networking. - Page 4 Siemens products that you are using, they can provide the fastest and most efficient answers to any problems you might encounter.
-
Page 5: Table Of Contents
Table of contents Preface ..............................3 Introducing the powerful and flexible S7-1200 ................... 7 Expanding the capability of the CPU .....................9 HMI Basic panels .........................10 Mounting dimensions and clearance requirements ..............11 STEP 7 Basic makes the work easy ......................13 Help when you need it .........................14 2.1.1 Printing a topic from the online help ....................15... - Page 6 Table of contents Easy to communicate between devices ....................67 PROFINET instructions (T-blocks)....................68 PtP, USS, and Modbus communication protocols ..............69 6.2.1 PtP instructions ........................... 70 6.2.2 Library of USS instructions......................71 6.2.3 Library of Modbus instructions ....................73 Easy to use the built-in pulse generators ....................
-
Page 7: Introducing The Powerful And Flexible S7-1200
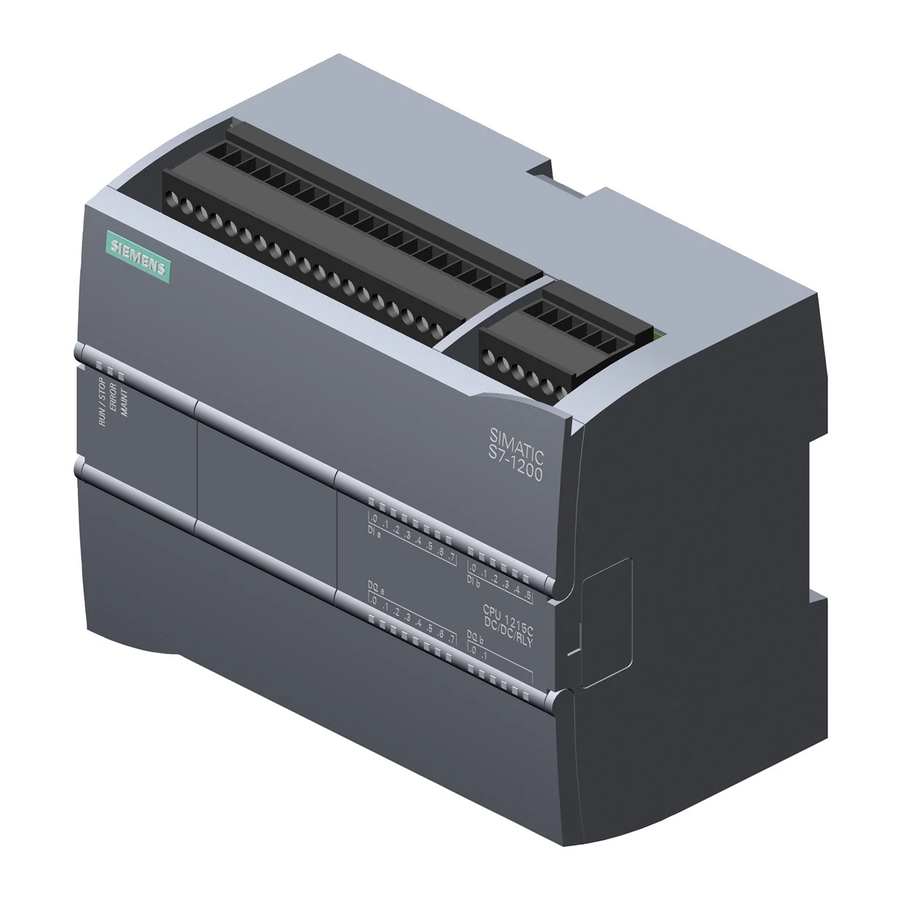
Introducing the powerful and flexible S7-1200 The S7-1200 controller provides the flexibility and power to control a wide variety of devices in support of your automation needs. The compact design, flexible configuration, and powerful instruction set combine to make S7-1200 a perfect solution for controlling a wide variety of applications. - Page 8 Introducing the powerful and flexible S7-1200 Feature CPU 1211C CPU 1212C CPU 1214C Physical size (mm) 90 x 100 x 75 90 x 100 x 75 110 x 100 x 75 User memory Work memory 25 Kbytes 25 Kbytes 50 Kbytes •...
-
Page 9: Expanding The Capability Of The Cpu
Introducing the powerful and flexible S7-1200 1.1 Expanding the capability of the CPU Expanding the capability of the CPU The S7-1200 family provides a variety of signal modules and signal boards for expanding the capabilities of the CPU. You can also install additional communication modules to support other communication protocols. -
Page 10: Hmi Basic Panels
Introducing the powerful and flexible S7-1200 1.2 HMI Basic panels HMI Basic panels As visualization becomes a standard component for most machine designs, the SIMATIC HMI Basic Panels provide touch-screen devices for basic operator control and monitoring tasks. All panels are have a protection rating for IP65 and have CE, UL, cULus, and NEMA 4x certification. -
Page 11: Mounting Dimensions And Clearance Requirements
Introducing the powerful and flexible S7-1200 1.3 Mounting dimensions and clearance requirements Mounting dimensions and clearance requirements The S7-1200 PLC is designed to be easy to install. Whether mounted on a panel or on a standard DIN rail, the compact size makes efficient use of space. The CPUs, SMs and CMs support DIN rail mounting and panel mounting. - Page 12 Introducing the powerful and flexible S7-1200 1.3 Mounting dimensions and clearance requirements ① Side view ③ Vertical installation ② Horizontal installation ④ Clearance area Always consider the following guidelines when planning your installation: • Separate the devices from heat, high voltage, and electrical noise.
-
Page 13: Step 7 Basic Makes The Work Easy
STEP 7 Basic makes the work easy STEP 7 Basic provides a user-friendly environment to develop controller logic, configure HMI visualization, and setup network communication. To help increase your productivity, STEP 7 Basic provides two different views of the project: a task-oriented set of portals that are organized on the functionality of the tools (Portal view), or a project-oriented view of the elements within the project (Project view). -
Page 14: Help When You Need It
STEP 7 Basic makes the work easy 2.1 Help when you need it Help when you need it To help you to find more information or to resolve issues quickly and efficiently, STEP 7 Basic provides intelligent point-of-need assistance. For example, some of the tool tips in the interface (such as for the instructions) "cascade"... -
Page 15: Printing A Topic From The Online Help
STEP 7 Basic makes the work easy 2.1 Help when you need it 2.1.1 Printing a topic from the online help To print from the information system, click the "Print" button on the help window. The "Print" dialog allows you to select the topics to print. -
Page 16: Providing Easy-To-Use Tools
STEP 7 Basic makes the work easy 2.2 Providing easy-to-use tools Providing easy-to-use tools 2.2.1 Easy to insert instructions into your user program STEP 7 Basic provides task cards that contain the instructions for your program. The instructions are grouped according to function. To create your program, you drag instructions from the task card onto a network. -
Page 17: Easy To Drag And Drop Between Editors
STEP 7 Basic makes the work easy 2.2 Providing easy-to-use tools 2.2.3 Easy to drag and drop between editors To help you perform tasks quickly and easily, STEP 7 Basic allows you to drag and drop elements from one editor to another. For example, you can drag an input from the CPU to the address of an instruction in your user program. -
Page 18: Easy To Virtually "Unplug" Modules Without Losing The Configuration
STEP 7 Basic makes the work easy 2.2 Providing easy-to-use tools 2.2.5 Easy to virtually "unplug" modules without losing the configuration STEP 7 Basic provides a storage area for "unplugged" modules. You can drag a module from the rack to save the configuration of that module. -
Page 19: Getting Started
Getting started Working with STEP 7 Basic is easy! In the next few pages, you can see how quickly you can get started with creating a project. In the Start portal, click the "Create new project" task. Enter a project name and click the "Create"... - Page 20 Getting started Create tags for the I/O of the CPU Note "PLC tags" are the symbolic names for I/O and addresses. After you create a PLC tag, STEP 7 Basic stores the tag in a tag table. All of the editors in your project (such as the program editor, the device editor, the visualization editor, and the watch table editor) can access the tag table.
- Page 21 Getting started Zoom the device configuration to over 200% so that the I/O points of the CPU are legible and selectable. 1. Select I0.0 and drag it to the first row of the tag table. 2. Change the tag name from "I0.0" to "Start". 3.
- Page 22 Getting started Create a simple network in your user program Your program code consists of instructions that the PLC executes in sequence. For this example, use ladder logic (LAD) to create the program code. The LAD program is a sequence of networks that resemble the rungs of a ladder.
- Page 23 Getting started Use the PLC tags in the tag table for addressing the instructions Using the tag table, you can quickly enter the PLC tags for the addresses of the contacts and coils. 1. Double-click the default address ??.?> < above the first normally open contact.
- Page 24 Getting started Add a Math instruction to the second network The program editor features a generic "box" instruction. After inserting this box instruction, you then select the type of instruction, such as an ADD instruction, from a drop-down list. Click the generic "box" instruction in the "Favorites"...
- Page 25 Getting started Adding an HMI device to the project Adding an HMI device to your project is easy! 1. Double-click the "Add new device" icon. 2. Click the "SIMATIC HMI" button in the Add new device" dialog. 3. Select the specific HMI device from the list.
- Page 26 Getting started Creating a network connection between the CPU and HMI device Creating a network is easy! Go to "Devices and Networks" and select the Network view to display the CPU and HMI device. To create a PROFINET network, drag a line from the green box (Ethernet port) on one device to the green box on the other device.
- Page 27 Getting started You can use other options for creating an HMI connection: ● Dragging a PLC tag from the PLC tag table, the program editor or the device configuration editor to the HMI screen editor automatically creates an HMI connection. ●...
- Page 28 Getting started Selecting a PLC tag for an HMI element After you create the element on your screen, use the properties of the element to select assign a PLC tag to the element. Clicking the button by the "Connections" field displays the PLC tags of the CPU.
- Page 29 Getting started Easy Book Manual, 11/2009, A5E02486774-01...
-
Page 31: Plc Concepts Made Easy
PLC concepts made easy Tasks performed every scan cycle Each scan cycle includes writing the outputs, reading the inputs, executing the user program instructions, and performing system maintenance or background processing. The cycle is referred to as a scan cycle or scan. Under default conditions, all digital and analog I/O points are updated synchronously with the scan cycle using an internal memory area called the process image. -
Page 32: Operating Modes Of The Cpu
PLC concepts made easy 4.2 Operating modes of the CPU This process provides consistent logic through the execution of the user instructions for a given cycle and prevents the flickering of physical output points that might change state multiple times in the process image output area. You can change the default behavior for a module by removing it from this automatic update of I/O. -
Page 33: Memory Areas, Addressing And Data Types
PLC concepts made easy 4.3 Memory areas, addressing and data types Memory areas, addressing and data types The CPU provides the following memory areas to store the user program, data, and configuration: ● Load memory is non-volatile storage for the user program, data and configuration. When a project is downloaded to the CPU, it is first stored in the Load memory area. - Page 34 PLC concepts made easy 4.3 Memory areas, addressing and data types Data types supported by S7-1200 Data types are used to specify both the size of a data element as well as how the data are to be interpreted. Each instruction parameter supports at least one data type, and some parameters support multiple data types.
- Page 35 PLC concepts made easy 4.3 Memory areas, addressing and data types Memory areas and addressing STEP 7 Basic facilitates symbolic programming. You create symbolic names or "tags" for the addresses of the data, whether as PLC tags relating to memory addresses and I/O points or as local variables used within a code block.
- Page 36 PLC concepts made easy 4.3 Memory areas, addressing and data types Each different memory location has a unique address. Your user program uses these addresses to access the information in the memory location. The figure shows how to access a bit (which is also called "byte.bit" addressing). In this example, the memory area and byte address (M = bit memory area, and 3 = byte 3) are followed by a period (".") to separate the bit address (bit 4).
-
Page 37: Execution Of The User Program
PLC concepts made easy 4.4 Execution of the user program Execution of the user program The CPU supports the following types of code blocks that allow you to create an efficient structure for your user program: ● An organization block (OB) is a code block that typically contains the main program logic. The OB responds to a specific event in the CPU and can interrupt the execution of the user program. - Page 38 PLC concepts made easy 4.4 Execution of the user program An OB within a priority group does not interrupt another OB within the same priority group. However, an event in priority group 2 will interrupt the execution of an OB in priority group 1, and an event in priority group 3 will interrupt the execution of any OB in either priority group 1 or 2.
-
Page 39: Protecting Access To The Cpu Or Code Block Is Easy
PLC concepts made easy 4.5 Protecting access to the CPU or code block is easy If the CPU were to detect an event in priority group 3 (such as a time error event), the time- error OB interrupts the processing of both priority group 1 (such as a program cycle OB) and priority group 2 (such as a cyclic OB). -
Page 41: Programming Concepts Made Easy
Programming concepts made easy Easy to create the device configuration You create the device configuration for your PLC by adding a CPU and additional modules to your project. ① Communications module (CM): Up to 3, inserted in slots 101, 102, and 103 ②... - Page 42 Programming concepts made easy 5.1 Easy to create the device configuration Uploading an existing hardware configuration is easy If you are connected to a CPU, you can upload the configuration of that CPU, including any modules, to your project. Simply create a new project and select the "unspecified CPU"...
- Page 43 Programming concepts made easy 5.1 Easy to create the device configuration Adding a CPU to the configuration You create your device configuration by inserting a CPU into your project. Select the CPU in the "Add a new device" dialog and click "OK"...
- Page 44 Programming concepts made easy 5.1 Easy to create the device configuration Adding a device to the configuration Use the hardware catalog to add modules to the CPU. There are three types of modules: ● Signal boards (SB) provide just a few additional I/O points for the CPU. The SB is installed on the front of the CPU.
- Page 45 Programming concepts made easy 5.1 Easy to create the device configuration Configuring a network connection Use the "Network view" of Device configuration to create the network connections between the devices in your project. After creating the network connection, use the "Properties" tab of the inspector window to configure the parameters of the network.
-
Page 46: Configuring The Operation Of The Cpu And Modules
Programming concepts made easy 5.1 Easy to create the device configuration 5.1.1 Configuring the operation of the CPU and modules To configure the operational parameters for the CPU, select the CPU in the Device view and use the "Properties" tab of the inspector window. •... - Page 47 Programming concepts made easy 5.1 Easy to create the device configuration The CPU performs a warm restart before going to RUN mode. Warm restart resets all non- retentive memory to the default start values, but the CPU retains the current values stored in the retentive memory.
-
Page 48: Configuring The Ip Address Of The Cpu
Programming concepts made easy 5.1 Easy to create the device configuration 5.1.2 Configuring the IP address of the CPU Because the CPU does not have a pre-configured IP address, you must manually assign an IP address. You configure the IP address and the other parameters for the PROFINET interface when you configure the properties for the CPU. -
Page 49: Easy To Design Your User Program
Programming concepts made easy 5.2 Easy to design your user program Easy to design your user program When you create a user program for the automation tasks, you insert the instructions for the program into code blocks (OB, FB, or FC). An OB is a code block that you use to structure or organize the user program for your application. - Page 50 Programming concepts made easy 5.2 Easy to design your user program By designing FBs and FCs to perform generic tasks, you create modular code blocks. You then structure your user program by having other code blocks call these reusable modules. The calling block passes device-specific parameters to the called block.
-
Page 51: Use Obs For Organizing Your User Program
Programming concepts made easy 5.2 Easy to design your user program 5.2.1 Use OBs for organizing your user program Organization blocks provide the structure for your program. They serve as the interface between the operating system and the user program. OBs are event-driven. An event, such as a diagnostic interrupt or a time interval, will cause the CPU to execute an OB. -
Page 52: Fbs And Fcs Make Programming The Modular Tasks Easy
Programming concepts made easy 5.2 Easy to design your user program Configuring the operation of an OB You can modify the operational parameters for an OB. For example, you can configure the time parameter for a time-delay OB or for a cyclic interrupt OB. 5.2.2 FBs and FCs make programming the modular tasks easy A function (FC) is like a subroutine. -
Page 53: Data Blocks Provide Easy Storage For Program Data
Programming concepts made easy 5.2 Easy to design your user program The following figure shows an OB that calls one FB three times, using a different data block for each call. This structure allows one generic FB to control several similar devices, such as motors, by assigning a different instance data block for each call for the different devices. - Page 54 Programming concepts made easy 5.2 Easy to design your user program Creating a new code block 1. Open "Program blocks" folder. 2. Double-click "Add new block". 3. In the "Add new block" dialog, click the "Function (FC)" icon. 4. Specify the programming language for the FC by selecting "LAD"...
-
Page 55: Easy To Use The Powerful Programming Languages
Programming concepts made easy 5.3 Easy to use the powerful programming languages Easy to use the powerful programming languages You have the option of choosing either the LAD (ladder logic) or FBD (Function Block Diagram) programming language. LAD is a graphical programming language. The representation is based on circuit diagrams. -
Page 56: Providing The Basic Instructions You Expect
Programming concepts made easy 5.3 Easy to use the powerful programming languages 5.3.1 Providing the basic instructions you expect Bit logic instructions The basis of bit logic instruction is contacts and coils. Contacts read the status of a bit, while the coils write the status of the operation to a bit. - Page 57 Programming concepts made easy 5.3 Easy to use the powerful programming languages The coil output instruction writes a value for an output bit. If the output bit you specify uses memory identifier Q, then the CPU turns the output bit in the process-image register on or off, setting the specified bit equal to power flow status.
- Page 58 Programming concepts made easy 5.3 Easy to use the powerful programming languages Compare instructions You use the compare instructions to compare two values of the same data type. When the comparison is TRUE, the contact is activated (LAD) or the box output is TRUE (FBD). After you click on the instruction in the program editor, you can select the comparison type and data type from the drop-down menus.
- Page 59 Programming concepts made easy 5.3 Easy to use the powerful programming languages Counters You use the counter instructions to count internal program events and external process events. Each counter uses a structure stored in a data block to maintain counter data. You assign the data block when the counter instruction is placed in the editor.
- Page 60 Programming concepts made easy 5.3 Easy to use the powerful programming languages The CTUD counts up or down by 1 on the 0 to 1 transition of the Count up (CU) or Count down (CD) inputs. The figure shows a CTUD timing diagram with an unsigned integer count value (where PV = 4).
- Page 61 Programming concepts made easy 5.3 Easy to use the powerful programming languages This reduces the processing time and data storage necessary for handling the timers. There is no interaction between the timer data structures in the shared multi-instance data block. TP timer Pulse timing diagram...
- Page 62 Programming concepts made easy 5.3 Easy to use the powerful programming languages TONR timer On-delay retentive timing diagram S7-1200 provides powerful instructions In addition to the basic instructions, S7-1200 also provides an impressive set of instructions that help you easily resolve complex control applications. The following instructions are just a sampling of the power packed into the S7-1200.
- Page 63 Programming concepts made easy 5.3 Easy to use the powerful programming languages Modes Description Inactive After the user program has been downloaded the first time, the PID controller remains in the "Inactive" operating mode. In this case carry out a "Self tuning during initial start"...
-
Page 64: Other Features To Make Programming Easy
Programming concepts made easy 5.4 Other features to make programming easy MC_MoveAbsolute starts MC_MoveRelative starts a MC_MoveVelocity causes motion to an absolute position. positioning motion relative the axis to travel with the The job ends when the target to the start position. specified speed. - Page 65 Programming concepts made easy 5.4 Other features to make programming easy Because both the clock memory and system memory are unreserved M memory, instructions or communications can write to these locations and corrupt the data. Overwriting the system memory or clock memory bytes can corrupt the data in these functions and cause your user program to operate incorrectly.
-
Page 66: Watch Tables Make Monitoring The User Program Easy
Programming concepts made easy 5.4 Other features to make programming easy 5.4.2 Watch tables make monitoring the user program easy You use "watch tables" for monitoring and modifying the values of a user program being executed by the online CPU. You can create and save different watch tables in your project to support a variety of test environments. -
Page 67: Cross Reference To Show Usage
Programming concepts made easy 5.4 Other features to make programming easy Note Saving the project does not save or update the global library. To save a global library that you added or modified, use the "Save the changes to the library" button in the tool bar of the global library. -
Page 68: Call Structure To Examine The Calling Hierarchy
Programming concepts made easy 5.4 Other features to make programming easy 5.4.5 Call structure to examine the calling hierarchy The call structure describes the call hierarchy of the block within your user program. It provides an overview of the blocks used, calls to other blocks, the relationships between blocks, the data requirements for each block, and the status of the blocks. - Page 69 Programming concepts made easy 5.4 Other features to make programming easy Easy Book Manual, 11/2009, A5E02486774-01...
-
Page 71: Easy To Communicate Between Devices
● Programming device with STEP 7 Basic ● HMI devices ● Other CPUs or non-Siemens devices using standard TCP communications protocols transmission block (T-block) instructions For a direct connection between the programming device and a CPU : •... -
Page 72: Profinet Instructions (T-Blocks)
HMI and a CPU. An Ethernet switch is required for a network with more than two CPUs or HMI devices. Note The PROFINET port on the CPU does not contain an Ethernet switching device. You can use a rack-mounted Siemens CSM1277 4-port Ethernet switch to connect your CPUs and ① HMI devices. -
Page 73: Ptp, Uss, And Modbus Communication Protocols
Easy to communicate between devices 6.2 PtP, USS, and Modbus communication protocols TRCV_C establishes a TCP or ISO-on-TCP communication connection to a partner CPU, receives data, and can terminate the connection. After the connection is set up and established, it is automatically maintained and monitored by the CPU. -
Page 74: Ptp Instructions
Easy to communicate between devices 6.2 PtP, USS, and Modbus communication protocols 6.2.1 PtP instructions The PORT_CFG, SEND_CFG, and RCV_CFG instructions allow you to change the configuration from your user program. • PORT_CFG changes the port parameters such as baud rate. •... -
Page 75: Library Of Uss Instructions
Easy to communicate between devices 6.2 PtP, USS, and Modbus communication protocols 6.2.2 Library of USS instructions The USS library supports the USS protocol and provides the functions that are specifically designed for communicating with drives over the RS485 port of a CM module. You can control the physical drive and the read/write drive parameters with the USS library. -
Page 76: Library Of Modbus Instructions
Easy to communicate between devices 6.2 PtP, USS, and Modbus communication protocols Calculating the time required for communicating with the drive Communications with the drive are asynchronous to the CPU scan. The CPU typically completes several scans before one drive communications transaction is completed. The USS_PORT interval is the time required for one drive transaction. - Page 77 Easy to communicate between devices 6.2 PtP, USS, and Modbus communication protocols The MB_SLAVE instruction allows your user program to communicate as a Modbus slave. A Modbus RTU master can issue a request and then your program responds via MB_SLAVE execution.
-
Page 79: Easy To Use The Built-In Pulse Generators
Easy to use the built-in pulse generators You can configure the outputs of the CPU or signal board (SB) to function as a pulse generator or pulse- train output (PTO). The pulse-width modulation (PWM) instruction and the basic motion instructions use these outputs. -
Page 80: High-Speed Counters
Easy to use the built-in pulse generators 7.1 High-speed counters High-speed counters A high-speed counter (HSC) can be used as an input for an incremental shaft encoder. The shaft encoder provides a specified number of counts per revolution and a reset pulse that occurs once per revolution. - Page 81 Easy to use the built-in pulse generators 7.1 High-speed counters Description Default Input Assignment Function HSC1 Built In I0.0 I0.1 I0.3 or Signal Board I4.0 I4.1 I4.3 or monitor PTO 0 PTO 0 Pulse PTO 0 Direction HSC2 Built In I0.2 I0.3 I0.1...
- Page 82 Easy to use the built-in pulse generators 7.1 High-speed counters Configuration of the HSC The CPU allows you to configure up to 6 high-speed counters. You edit the "Properties" of the CPU to configure the parameters of each individual HSC. Configure the parameters for the high-speed counters by editing the "Properties"...
- Page 83 Easy to use the built-in pulse generators 7.1 High-speed counters Parameter Data type Description NEW_PERIOD New period value in seconds: .01, .1, or 1 (only for frequency measurement mode) BUSY BOOL Function busy STATUS WORD Execution condition code While the counting rate of the CTU, CTD, and CTUD counter instructions is limited by the CPU scan rate, the HSC operates asynchronously to the CPU scan and allow counting events up to a 100 kHz count rate (for HSC 1, 2, or 3 and onboard CPU count input configuration).
-
Page 84: Pulse-Width Modulation (Pwm)
Easy to use the built-in pulse generators 7.2 Pulse-width modulation (PWM) Pulse-width modulation (PWM) Two pulse generators are available for controlling high-speed pulse output functions: Pulse Width Modulation (PWM) and Pulse train output (PTO). Since the PWM output can be varied from 0 to full scale, it provides a digital output that in many ways is the same as an analog output. - Page 85 Easy to use the built-in pulse generators 7.2 Pulse-width modulation (PWM) To prepare for PWM operation, first configure a pulse channel in the device configuration by selecting the CPU, then "Pulse Generator (PTO/PWM)", and choose either "PWM1" or "PWM2". Enable the pulse generator (check box). If a pulse generator is enabled, a unique default name is assigned to this particular pulse generator.
- Page 86 Easy to use the built-in pulse generators 7.2 Pulse-width modulation (PWM) Use the tag name for the PWM parameter to specify the enabled pulse generator. When the EN input is TRUE, the PWM_CTRL instruction starts or stops the identified PWM based on the value at the ENABLE input.
-
Page 87: Easy To Use The Online Tools
Easy to use the online tools Going online and connecting to a CPU The online connection provides you with additional capabilities: ● Using the CPU operator panel to change the operating mode of the CPU (Page 89) ● Uploading, comparing, and synchronizing the code blocks of the user program (Page 90) ●... - Page 88 Easy to use the online tools 8.2 Downloading an IP address to an online CPU If the CPU has not been previously configured, you can also use "Online access" (Page 87) to set the IP address. An IP address that has been downloaded as part of the device configuration will not be lost on a power cycle of the PLC.
-
Page 89: Interacting With The Online Cpu
Easy to use the online tools 8.3 Interacting with the online CPU Interacting with the online CPU The Online and Diagnostics portal provides an operator panel for changing the operating mode of the online CPU. The "Online tools" task card displays an operator panel that shows the operating mode of the online CPU. -
Page 90: Uploading From The Online Cpu
Easy to use the online tools 8.4 Uploading from the online CPU Uploading from the online CPU STEP 7 provides two methods for uploading the code blocks of the user program from an online CPU. Using the Project navigation, you can drag and drop the code blocks from the online CPU to a CPU in your off-line project. - Page 91 Easy to use the online tools 8.4 Uploading from the online CPU Using the "unspecified CPU" to upload the hardware configuration If you have a physical CPU that you can connect to the programming device, it is easy to upload the configuration of the hardware. You must first connect the CPU to your programming device, and you must create a new project.
-
Page 92: Comparing Offline And Online Cpus
Easy to use the online tools 8.5 Comparing offline and online CPUs Comparing offline and online CPUs You can compare the code blocks in an online CPU with the code blocks in your offline project: 1. Select the offline CPU. 2. -
Page 93: Using A Watch Table For Monitoring The Cpu
Easy to use the online tools 8.7 Using a watch table for monitoring the CPU Using a watch table for monitoring the CPU A watch table allows you to monitor or modify data points while the CPU executes your user program. -
Page 94: Forcing Variables In The Cpu
Easy to use the online tools 8.8 Forcing variables in the CPU Forcing variables in the CPU A watch table provides a "force" function that overwrites the value for an input or output point to a specified value for the peripheral input or peripheral output address. The CPU applies this forced value to the input process image prior to the execution of the user program and to the output process image before the outputs are written to the modules. -
Page 95: Technical Specifications
• Canadian Standards Association: CSA C22.2 Number 142 (Process Control Equipment) NOTICE The SIMATIC S7-1200 series meets the CSA standard. The cULus logo indicates that the S7-1200 has been examined and certified by Underwriters Laboratories (UL) to standards UL 508 and CSA 22.2 No. 142. - Page 96 2064 (Class A) Maritime approval: The S7-1200 products are periodically submitted for special agency approvals related to specific markets and applications. Consult your local Siemens representative if you need additional information related to the latest listing of exact approvals by part number.
- Page 97 Technical specifications A.1 General specifications Electromagnetic compatibility: Electromagnetic Compatibility (EMC) is the ability of an electrical device to operate as intended in an electromagnetic environment and to operate without emitting levels of electromagnetic interference (EMI) that may disturb other electrical devices in the vicinity.
- Page 98 Technical specifications A.1 General specifications Environmental Conditions - Operating Ambient temperature range 0° C to 55° C horizontal mounting (Inlet Air 25 mm below unit) 0° C to 45° C vertical mounting 95% non-condensing humidity Atmospheric pressure 1080 to 795 hPa (Corresponding to an altitude of -1000 to 2000m) Concentration of contaminants : <...
-
Page 99: Cpu Modules
Technical specifications A.2 CPU modules Relay electrical service life: The typical performance data supplied by relay vendors is shown below. Actual performance may vary depending upon your specific application. An external protection circuit that is adapted to the load will enhance the service life of the contacts. ①... - Page 100 Technical specifications A.2 CPU modules CPU features CPU 1211C CPU 1212C CPU 1214C User memory Work memory 25 Kbytes 25 Kbytes 50 Kbytes • • • • Load memory 1 Mbytes 1 Mbytes 2 Mbytes • • • • Retentive memory 2 Kbytes 2 Kbytes 2 Kbytes...
- Page 101 Technical specifications A.2 CPU modules Digital inputs Description Number of inputs Total Number that can be on simultaneously CPU 1211C • • • CPU 1212C • • • CPU 1214C • • • Type Sink/Source (IEC Type 1 sink) Rated voltage 24 VDC at 4 mA, nominal Continuous permissible voltage 30 VDC, max.
- Page 102 Technical specifications A.2 CPU modules Digital outputs Relay Coil to contact 1500 VAC for 1 Isolation (field side to logic) 500 VAC for 1 minute • minute Coil to logic: None • Isolation resistance 100 MΩ min. when new Isolation between open contacts 750 VAC for 1 minute Isolation groups AC/DC/Relay and DC/DC/Relay...
- Page 103 Technical specifications A.2 CPU modules Sample wiring diagrams for the S7-1200 CPU For complete information, see the S7-1200 system manual. CPU 1214C AC/DC/Relay ① 24 VDC Sensor Power Out CPU 1214C DC/DC/DC ① 24 VDC Sensor Power Out Easy Book Manual, 11/2009, A5E02486774-01...
-
Page 104: Signal Boards
Technical specifications A.3 Signal boards Signal boards General SB 1223 DI 2x24VDC, DQ 2x24VDC SB 1223 AQ 1x12bit Order number 6ES7 223-0BD30-0XB0 6ES7 232-4HA30-0XB0 Dimensions (W x H x D) 38 x 62 x 21 (mm) 38 x 62 x 21 (mm) Weight 40 grams 40 grams... - Page 105 Technical specifications A.3 Signal boards Digital Outputs SB 1223 DI 2x24VDC, DQ 2x24VDC Inductive clamp voltage L+ minus 48 V, 1 W dissipation Switching delay 2 μs max. off-to-on; 10 μs max. on-to-off Behavior on RUN to STOP Last value or substitute value (default value 0) Cable length (meters) 500 shielded, 150 unshielded Analog Outputs...
-
Page 106: Digital Signal Modules
Technical specifications A.4 Digital signal modules Digital signal modules The following specifications provide a sample of the digital SM modules available for S7- 1200. Refer to the S7-1200 system manual for more information. Sample SM 1221 digital input signal modules General SM 1221 DI 8x24VDC SM 1221 DI 16x24VDC... - Page 107 Technical specifications A.4 Digital signal modules Sample SM 1222 output-only signal modules General SM1222 DQ 16xRelay SM1222 DQ 16x24VDC Number and type of outputs 16 relay, dry contact 16 solid state - MOSFET Dimensions (W x H x D) 45 x 100 x 75 (mm) 45 x 100 x 75 (mm) Weight 260 grams...
- Page 108 Technical specifications A.4 Digital signal modules SM 1222 DQ 16 x Relay SM 1222 DQ 16 x 24 VDC Sample SM 1223 combination digital input/output signal modules General SM 1223 SM 1223 DI 16x24 VDC, DQ 16xRelay DI 16x24 VDC, DQ16x24 VDC Number and type of inputs 16 sink/source (IEC Type 1 sink) 16 sink/source (IEC Type 1 sink)
- Page 109 Technical specifications A.4 Digital signal modules Digital inputs Description Number and type of inputs 16 sink/source (IEC Type 1 sink) Rated voltage 24 VDC at 4 mA, nominal Continuous permissible voltage 30 VDC, max. Surge voltage 35 VDC for 0.5 sec. Logic 1 signal (min.) 15 VDC at 2.5 mA Logic 0 signal (max.)
-
Page 110: Analog Signal Modules
Technical specifications A.5 Analog signal modules SM1223 DI 16 x 24 VDC, DQ 16 x Relay SM 1223 DI 16 x 24 VDC, DQ 16 x 24 VDC Analog signal modules The following specifications provide a sample of the analog SM modules available for S7- 1200. - Page 111 Technical specifications A.5 Analog signal modules Analog inputs Description Type of inputs Voltage or Current (differential), selectable in groups of 2 Range ±10 V, ±5 V, ±2.5 V, or 0 to 20 mA Full scale range (data word) -27,648 to 27,648 Overshoot/undershoot range Voltage: 32,511 to 27,649 / -27,649 to -32,512 (data word)
-
Page 112: Communication Modules
Technical specifications A.6 Communication modules SM 1231 AI 4 x 13 Bit SM 1234 AI 4x13bit AQ 2x14bit SM 1232 AQ 2 x 14 bit Communication modules The following specifications provide a sample of the CM modules available for S7-1200. Refer to the S7-1200 system manual for pin-outs and other information. - Page 113 Technical specifications A.6 Communication modules Transmitter and Receiver Description Tranmitter Common mode voltage range -7 V to +12 V, 1 second, 3 VRMS continuous (RS485) Transmitter differential output voltage 2 V min. at R = 100 Ω 1.5 V min. at R = 54 Ω...
- Page 114 Technical specifications A.6 Communication modules Easy Book Manual, 11/2009, A5E02486774-01...
-
Page 115: Index
Index network, 67 Communication module Add modules, 42 Add new device, 41 Accessible devices, 83 Device configuration, 39 Accessing the online help, 14 Communication module (CM) Adding a device Comparison chart, 9 Unspecific CPU, 40, 86 Communications module (CM) Analog signal module specifications, 106 specifications, 108 ATEX approval, 91, 92 Communications module (CM), USS library, 71... - Page 116 Index configuring communication to HMI, 67 Add new device, 41 Configuring parameters, 44, 45 Configuring the CPU, 44, 45 Device configuration, 39 Configuring the modules, 44, 45 Diagnostics buffer, 88 Discover, 40, 86 Ethernet port, 46 Ethernet port, 46 force, 89 Network connection, 43 Getting started, 19 PROFINET, 46...
- Page 117 Index Getting started Getting started, 25, 27 addressing, 23 HMI connection, 26 Block, 52 network connection, 26 box instruction, 24 screen, 27 Cascading tool tips, 14 HMI connection, 26 contacts, 22 HMI devices Context-sensitive help, 14 Network connection, 43 CPU, 19 Overview, 10 Documentation, 14 HSC (high-speed counter), 76...
- Page 118 Index timer: TP (pulse timer), 58 Getting started, 19 TRCV_C, 69 HMI connection, 26 TSEND_C, 68 HMI screen, 27 uninterruptible move (UMOVE_BLK), 56 network connection, 26 Interrupts organization block (OB), 49 IP address, 46 IP router, 46 Off-delay (TOF) instruction, 58 On-delay delay (TON) instruction, 58 On-delay retentive (TONR) instruction, 58 Online...
- Page 119 Index PLC tags Project view, 13 Getting started, 20, 23 Add modules, 42 Point-to-point communication, 69 Add new device, 41 Portal view, 13 Configuring the CPU parameters, 44, 45 Add modules, 42 Configuring the Ethernet port, 46 Add new device, 41 Configuring the modules, 44, 45 Configuring the CPU, 44, 45 Device configuration, 39...
- Page 120 Index Ethernet port, 46 FM approval, 92 Expanding the capabilities, 9 general technical, 91 force, 89 maritime approval, 92 HMI devices, 10 protection, 94 IP address, 46 rated voltages, 94 Mounting dimensions, 11 relay electrical service life, 95 Network connection, 43 SB 1223, 100 online, 83 SM 1221 signal module, 102...
- Page 121 Index Technical specifications, 91 Undocking the online help, 14 Temp memory (L), 33 Uninterruptible move (UMOVE_BLK) instruction, 56 Testing the program, 64 Unspecific CPU, 40, 86 Thermal zone, 11 Upload TIA Portal code blocks, 85 Add modules, 42 Discover, 86 Add new device, 41 synchronize, 85 Configuring the CPU, 44, 45...
- Page 122 Index Easy Book Manual, 11/2009, A5E02486774-01...