Table of Contents
Advertisement
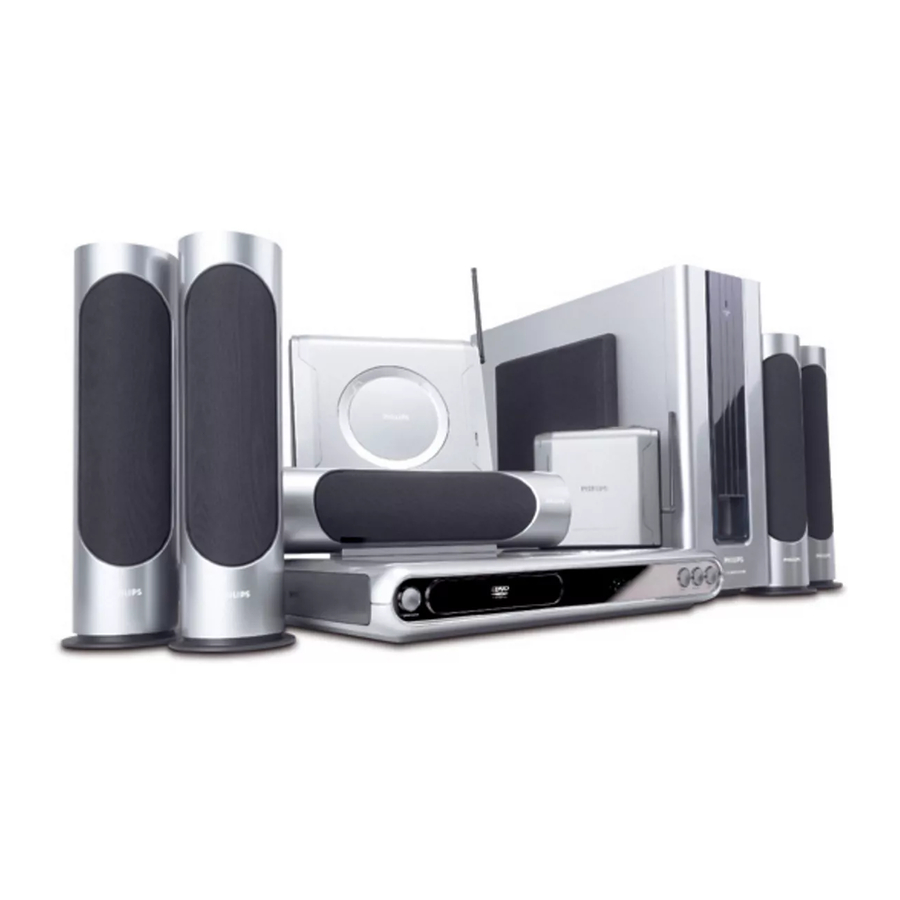
DVD VIDEO DIGITAL SURROUND SYSTEM
Need help? Call us!
Philips representatives are ready to help you with any
questions about your new product. We can guide you
through Connections, First-time Setup, or any of the Features.
We want you to start enjoying your new product right away!
CALL US BEFORE YOU CONSIDER
RETURNING THE PRODUCT!
Visit us on the web at www.philips.com
1-800-531-0039
or
3750
3750
LX
LX
Return
your Warranty
Registration Card
within 10 days
Advertisement
Table of Contents

Related Manuals for Philips LX3750


Summary of Contents for Philips LX3750
- Page 1 DVD VIDEO DIGITAL SURROUND SYSTEM Need help? Call us! Philips representatives are ready to help you with any questions about your new product. We can guide you through Connections, First-time Setup, or any of the Features. We want you to start enjoying your new product right away!
- Page 2 And most importantly you can count on our uncompromising commitment to your total satisfaction. All of this is our way of saying welcome – and thanks for investing in a Philips product. Sincerely, Lawrence J. Blanford President and Chief Executive Officer P.S.
- Page 3 Canada English: This digital apparatus does not exceed the Class B limits for radio noise emissions from digital apparatus as set out in the Radio Interference Regulations of the Canadian Department of Communications. Français: Cet appareil numérique n'emet pas de bruits radioélectriques dépassant les limites applicables aux appareils numériques de Class B prescrites dans le Règlement sur le Brouillage...
-
Page 4: Important Safety Instructions
IMPORTANT SAFETY INSTRUCTIONS Read these instructions. Keep these instructions. Heed all warnings. Follow all instructions. Do not use this apparatus near water. Clean only with dry cloth. Do not block any ventilation openings. Install in accordance with the manufacturer´s instructions. Do not install near any heat sources such as radiators, heat registers, stoves, or other apparatus (including amplifiers) that produce heat. -
Page 5: Table Of Contents
Instruction and General Information Features ... 6 Discs for playback ... 6 Region Codes Supplied accessories ... 6 Environmental information... 6 Care and safety information ... 7 Connections Placing the speakers and subwoofers ... 7 Connecting speakers and subwoofer ... 8 Connecting AD905W Wireless System ... -
Page 6: Instruction And General Information
– one 14V adapter – one table stand for wireless receiver If any item is damaged or missing, contact your retailer or Philips. Environmental information All unnecessary packaging has been omitted. We have tried to make the packaging easy to separate into three materials: cardboard (box), polystyrene foam (buffer) and polyethylene (bags, protective foam sheet). -
Page 7: Care And Safety Information
– Do not operate the DVD system in an enclosed cabinet, allow about 10 cm (4 inches) of free space all around the player for adequate ventilation. 10 cm (4 inches) PHILIPS 10 cm (4 inches) DVD Home Cinema System Care of disc –... -
Page 8: Connecting Speakers And Subwoofer
WOOFER LINE OUT Rear Speaker (Surround Left) 1 Connect the supplied Surround Speaker system using the supplied speaker cables to the speaker jacks on the AD905WA WIRELESS RECEIVER by matching the colours of the jacks and speaker plugs. Extend the RECEIVER antenna. -
Page 9: Connecting Tv
Step 4: Connecting TV Rear of TV (example only) AUDIO IN AUDIO OUT DIGITAL WOOFER COMPONENT LINE OUT VIDEO OUT Pr/Cr Pb/Cb TV/AV OPTICAL COAXIAL IMPORTANT! – If both S-Video and Component (Pr Pb Y) Video connections are used to connect to your TV, the video signal will automatically switch to Pr Pb Y when you power up the DVD system. - Page 10 75 ohm or RF In), you will need an RF modulator in order to view the DVD playback on the TV. See your electronics retailer or contact Philips for details on RF modulator availability and operations. Using an accessory RF modulator –...
-
Page 11: Connecting Fm/Am Antennas
Step 5: Connecting FM/AM antennas FM Antenna AM Antenna Fix the claw to the slot AUDIO IN AUDIO OUT ANTENNA WOOFER LINE OUT FM (75 ) TV/AV OPTICAL 1 Connect the supplied AM loop antenna to the AM jack. Place the AM loop antenna on a shelf or attach it to a stand or wall. -
Page 12: Connecting A Vcr Or Cable Satellite Box
Connections Step 7: Connecting a VCR or Cable /Satellite Box Rear of TV (example only) VCR or ANT IN Cable/Satellite TO TV AUDIO IN AUDIO OUT DIGITAL WOOFER LINE OUT SPEAKERS SPEAKERS (8 ) TV/AV OPTICAL COAXIAL Viewing and listening to the playback 1 Connect the VCR or Cable/Satellite Box to the TV as shown. -
Page 13: Ad905W Wireless System
– 1 x AD905WA WIRELESS RECEIVER – 1 x 14V adapter – 1 x table stand Remove the PHILIPS cover from the AD905WA as shown in Fig. 1, to access the connection RECEIVER terminal. Connect your rear speaker terminals with the... -
Page 14: Functional Overview
Functional Overview Front panels Front view Top view Side view OPEN / CLOSE – to open or close the disc tray. Disc Tray SOURCE – to select the relevant active mode: TV/AV, DISC, TUNER or AUX/DI. SURROUND – to select multichannel surround (Dolby Digital, DTS, VSS Dolby ProLogic or Dolby ProLogic II) or stereo sound effect. -
Page 15: Rear Panel
Rear panel AUDIO IN AUDIO OUT ANTENNA WOOFER LINE OUT FM (75 ) TV/AV 2 3 4 5 6 7 AM / FM ANTENNA – connect to the AM loop antenna or FM antenna. AUDIO IN -AUX – connect to the analog audio outputs of a TV or VCR. AUDIO OUT –... -
Page 16: Remote Control
(auto-off) timer function. SUBW +/- ¡ – to adjust the subwoofer’s level. REAR +/- – to adjust the rear speakers’ level. CENTER +/- – to adjust the center speaker’s level. TV +/- – to adjust Philips’s television volume level. -
Page 17: Preparations
(or press DISC on the remote). Turn on the TV and set to the correct video-in channel. You should see the blue Philips DVD background screen on the Usually this channel is between the lowest and highest channels and may be called FRONT, A/V IN, or VIDEO. See your TV manual for more details. -
Page 18: System Setup (Dvd)
Preparations System Setup (DVD) The system setup is carried out via the TV, it enables you to customize the DVD system to suit your particular requirement. If the preferred options selected are not available on a disc, then the disc’s own preference will be used. -
Page 19: Setting The Sound
16:9 (Wide screen) 4:3 LB (Letter Box) 4:3 PS (Pan Scan) – TV System Allows you to select the color system matching the connected TV set. A UT O – If the connected TV is multi system, select this mode.The output format will be in accordance with the video signal of the disc. -
Page 20: Setting The Language
Preparations Setting the language – Audio – Subtitle – Disc Menu This is to select the audio language, subtitle language and the language used on TV screen menus or DVD menus which will always be used for every disc to be played back. The default setting is English. -
Page 21: Setting The Progressive Scan Mode
Setting the Progressive Scan Mode The progressive- scan display present 60 complete frames per second, rather than the 30 frames per second of interlaced scanning (ordinary normal TV system). With nearly double the numbers of line, progressive scan offers higher picture resolution and eliminates bothersome motion artifacts those jagged edges on moving objects. -
Page 22: Operations
Operations Discs information DVD-VIDEO DISC TITLE 1 CHAPTER 1 CHAPTER 2 DVD video discs may have one or more Titles, and each Title may have one or more Chapters. Playback stops at the end of each Title. Video CDs may have one or more Tracks, and each Track may have one or more Indexes. -
Page 23: Repeat Play
Repeat play You can only select the repeat play mode during playback. For DVD - Repeat chapter / title Press REPEAT repeatedly to select the following: REPEAT CHAPTER REPEAT TITLE For CVD/SVCD/VCD/CD - Repeat track / disc Press REPEAT repeatedly to select the following: REPEAT TRACK REPEAT DISC If VCD or CD has been programed press this key... -
Page 24: Changing Sound Track Language
Operations Changing sound track language This operation works only on DVDs with multiple soundtrack language. from the menu bar and use 4 key to select Select the desired language. For VCD ,CVD,SVCD: Press 4 to select the desired audio channels for sound, it is only available for disc with different channels recorded : LEFT VOCAL ™... -
Page 25: Zooming In
Zooming in This function allows you to enlarge the picture on the TV screen and to pan through the enlarged image. from the menu bar and press 4 key Select repeatedly to select the zoom factor : ZOOM x 1.5 ™ ZOOM x2 ™ ZOOM x4™ ZOOM OFF To pan through the enlarged image, press SYSTEM MENU to exit and use 1 / 2 / 3 / 4 keys to move the zoomed picture left, right, up and down. -
Page 26: Mp3/Picture Disc Operations
MP3 / Picture Disc Operations Playing MP3 / Picture disc (Kodak, JPEG) IMPORTANT! You have to turn on your TV and set to the correct Video In channel. See page 17, Switching on the system. 1 Load a MP3/Picture (Kodak, JPEG) disc. The disc reading time may exceed 30 seconds due to complexity of the directory/file configuration. -
Page 27: Other Functions
Tuning to radio stations Press STANDBY ON to switch on the last selected source. Press SOURCE (or press TUNER) to select TUNER mode. Press TUNER again to select the desired band : FM or Press and hold S or T until the frequency indication starts to change, then release. -
Page 28: Sound And Volume Controls
Sound and Volume Controls Selecting the surround sound mode IMPORTANT! – For proper surround sound, make sure you have followed the “Connections” and “Preparations” procedures fully. – The center and surround speakers only operate when the system is set to surround sound mode and the source material being played is recorded or broadcast in Dolby Digital Surround, DTS, Dolby Pro Logic or ProLogic II surround sound. -
Page 29: Volume Control
Press CENTER +/- to adjust the level of the center speakers volume. “CNT XXDB” is displayed. The range is from -15dB to 10dB. For PHILIPS TVs only: Press TV VOL +/- on the remote control to adjust the TV’s volume level. Notes –... -
Page 30: Specifications
AD905WA ... 207 mm x 55 mm x 186 mm Weight ... 1.7 kg Specifications subject to change without prior notice Philips Industrial Activities nv declares that the LX3750W DVD HOME CINEMA SYSTEMs are in conformity with the essential requirements and other relevant standards of the directive... -
Page 31: Troubleshooting
WARNING! Under no circumstances should you try to repair the system yourself, as this will invalidate the warranty. Do not open the system as there is a risk of electric shock. If a fault occurs, first check the points listed below before taking the system for repair. If you are unable to solve a problem by following these hints, consult your dealer or service center. -
Page 32: Limited Warranty
TO GET WARRANTY SERVICE IN U.S.A., PUERTO RICO, OR U.S. VIRGIN ISLANDS... Take the product to a Philips factory service center (see enclosed list) or authorized service center for repair.When the product has been repaired, you must pick up the unit at the center. Centers may keep defective parts. - Page 33 Meet Philips at the Internet http://www.philips.com PHILIPS CONSUMER ELECTRONICS NORTH AMERICA Knoxville, Tennessee 37914-1810, USA LX3750W CLASS 1 LASER PRODUCT SC/JW 418.10...