Table of Contents
Advertisement
Advertisement
Table of Contents

Related Manuals for LG LH-C6230


Summary of Contents for LG LH-C6230
- Page 1 LH-C6230Y NA8PLL-ENG DVD/CD/VCR RECEIVER Home Cinema System OWNER’S MANUAL MODEL: LH-C6230 (Main Unit: LH-C6230Y Speakers: LHS-C6230T, LHS-C6230W) CD-R/RW Before connecting up, operating or repairing this product, please read this instruction booklet carefully and completely. P/N: 3828R-D032X...
-
Page 2: Safety Precautions
Safety Precautions CAUTION RISK OF ELECTRIC SHOCK DO NOT OPEN CAUTION: TO REDUCE THE RISK OF ELECTRIC SHOCK DO NOT REMOVE COVER (OR BACK) NO USER-SERVICEABLE PARTS INSIDE REFER SERVICING TO QUALIFIED SERVICE PERSONNEL. This lightning flash with arrowhead symbol within an equilateral triangle is intended to alert the user to the presence of uninsulated dangerous voltage within the product’s enclosure that may be of... -
Page 3: Table Of Contents
Table of Contents Introduction Special DVD Features ..... . . 30 Title Menu ......30 Safety Precautions . -
Page 4: Before Use
Before Use Playable Discs Disc-related terms Title (DVD only) The main film content or accompanying feature content or additional feature content, or music album. (8 cm / 12 cm disc) Each title is assigned a title reference number enabling Video CD (VCD) you to locate it easily. -
Page 5: Precautions
Before Use (Continued) Precautions Cleaning discs Fingerprints and dust on the disc can distort the picture Handling the unit or reduce sound quality. Before playing, clean the disc with a clean cloth. Wipe the disc from the centre out- When shipping the unit wards. -
Page 6: Front Panel Controls
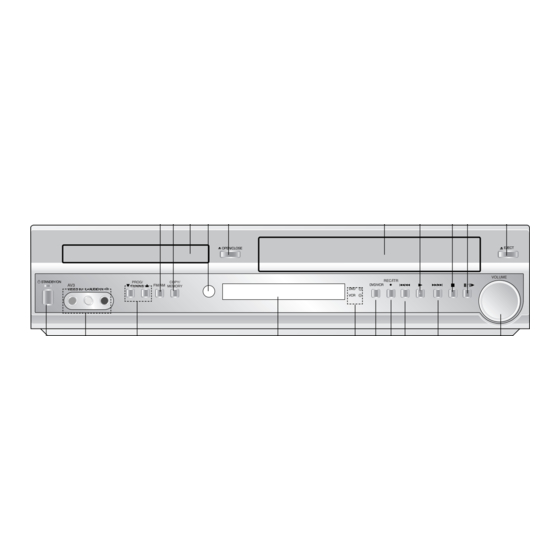
Front Panel Controls OPEN/CLOSE (Z Z ) EJECT(Z Z ) Opens or closes the disc tray. Ejects the tape in the VCR deck. Remote Sensor PAUSE/STEP(X X /C Point the DVD/CD/VCR receiver Pause playback of a tape or a disc in the DVD or remote control here. -
Page 7: Display Window Indicators
Display Window Indicators Indicates current A disc is loaded in the DVD deck. (Lights when a disc is audio stream. loaded in the DVD deck.) WMA disc inserted DVD/CD/VCR receiver is in VCR timer recording mode or a VCR timer recording is programmed. Indicates the unit is radio mode. -
Page 8: Remote Control Buttons
Remote Control Buttons FM/AM Tuner select button POWER Switches DVD/CD/VCR receiver ON and Select the DVD/CD/VCR receiver’s tuner as the OFF . listening choice. (FM and AM bands) OPEN/CLOSE, EJECT (Z Z ) AV SELECT - Opens and closes the disc tray. Select input source. -
Page 9: Rear Panel Connections
Rear Panel Connections EURO AV2 AUDIO/VIDEO (VCR IN+OUT/DVD OUT) S-VIDEO OUT (DVD OUT) Connect to Set Top Box or another video recorder. Connect to a S-Video Input on TV. FOR DVD VIEWING ONLY. SPEAKER CONNECTORS AC Power Cord Connect the six supplied speakers to Plug into the power source. -
Page 10: Connections
Connections TV & Set Top Box (or another VCR Connections) Set Top Box(or another VCR) REAR FRONT FRONT REAR CENTER WOOFER VHS IN+OUT/DVD OUT (R 4 ) ( 4 ) (L 4 (R 4 ) (L 4 ) ( 8 ) EURO AV2 S-VIDEO OUT AUDIO/VIDEO... -
Page 11: Dvd/Cd/Vcr Receiver
Connections (Continued) Accessory Audio/Video (A/V) Connections to DVD/CD/VCR receiver Connect the AV3 jacks on the DVD/CD/VCR receiver to the audio/video out jacks on your accessory component, using the optional audio/video cables. Radio Aerial Connections Connect the supplied FM/AM aerial for listening to the radio. Connect the AM loop aerial to the AM aerial connector. -
Page 12: Speaker System Connection
Connections (Continued) Speaker System Connection Connect the speakers using the supplied speaker cords. To obtain the best possible surround sound, adjust the speaker parameters; distance, level, etc.. Centre Speaker Front Speaker Front Speaker (Right) (Left) FRONT REAR CENTER REAR FRONT WOOFER VCR IN+OUT/DVD OUT (R 4 ) -
Page 13: Speaker Positioning
Connections (Continued) Speaker Positioning In the case of normal position use the 6 speakers (2 front speakers, centre speaker, 2 rear speakers and subwoofer). If you want to play the excellent bass sound, DTS digital surround or Dolby Digital surround, you should connect a subwoofer. -
Page 14: Mini Glossary
Mini Glossary Mini Glossary for Audio Stream & BYPASS Software with multichannel surround audio signals is played Surround mode according to the way it was recorded. Sound Mode Allows you to enjoy 5.1(or 6) discrete channels of high quality You can enjoy surround sound simply by selecting one digital audio from DTS program sources such as discs, DVD and compact discs, etc.bearing the trademark. -
Page 15: Before Operation - Vcr Part
Before Operation - VCR part Video channel Set Using your Receiver for the very first time Video channel (RF output channel) is the channel on For the following steps we assume that you have just which your TV receives picture and sound signals from connected your Receiver for the very first time. -
Page 16: How To Use The Main Menu
Before Operation - VCR part How to use the main menu Tuning in TV Stations Automatically This DVD/CD/VCR receiver can easily be programmed Should you wish to perform the Automatic Channel by using the menus displayed on screen. Memory System (ACMS) again please follow the guid- The menus are controlled from the Remote Control ance given on this page. -
Page 17: Tuning In Tv Stations Manually
Before Operation - VCR part Tuning in TV Stations Manually Searching will stop when it locates a station. Control the fine tuning of the station by pressing In certain areas of the country broadcast signals may be too weak for your DVD/CD/VCR receiver’s automatic tuning process to find or assign TV stations correctly. -
Page 18: Changing The Order Of Tv Stations
Before Operation - VCR part Changing the order of TV Stations 1 - 4. Deleting TV Stations After tuning TV stations into your DVD/CD/VCR receiver you may wish to change the order in which they are After tuning TV stations into your DVD/CD/VCR receiver stored without having to retune them. -
Page 19: Setting The Clock Manually
Before Operation - VCR part Setting the Clock Manually To set the colour system Press i. Your DVD/CD/VCR receiver is equipped with dual colour Press to select TIME DATE and press standard, you can play back a tape in PAL and MESE- CAM. -
Page 20: Before Operation - Dvd Part
Before Operation - DVD part General Explanation Press 1 1 /2 2 to change the setting of an item. The number buttons can be also be used for setting This manual gives basic instructions for operating the numbers (e.g., title number). For some functions, DVD/CD/VCR receiver. -
Page 21: Initial Settings
Before Operation - DVD part (Continued) Initial Settings Language Disc Language You can set your own Personal Preferences on the DVD/CD/VCR receiver. Select a language for the disc’s Menu, Audio, and Subtitle. General Operation Original : The original language set for the disc is selected. Other : To select another language, press number buttons to Press SETUP. -
Page 22: Speaker Setup
Before Operation - DVD part (Continued) Speaker setup Auto Play You can set up the DVD/CD/VCR receiver so a DVD 5.1 Speaker settings disc automatically starts playing whenever the DVD is Select speaker settings, including volume balance and inserted. delay time, or test the speaker settings. If Auto Play mode is set to On, this DVD/CD/VCR Speaker settings are only active on the Analog Multi- receiver will search a title that playback time is longest... -
Page 23: Parental Control
Before Operation - DVD part (Continued) Parental Control Country Code Enter the code of a country/area whose standards were Rating used to rate the DVD video disc, referring to the list Movies on DVDs may contain scenes not suitable for (See “Country Code List”, page 42). -
Page 24: Operation With Tape
Operation with tape Playing a tape During playback or still picture press You can reach the following playback speeds. You will only be able to load and eject video cassettes (-7xplay, -3xplay, -play, still, 1/19 slow, play, 2xplay, when your DVD/CD/VCR receiver is plugged into the 7xplay) mains. -
Page 25: Instant Timer Recording (Itr)
Operation with tape The DVD/CD/VCR receiver allows you to make record- Press REC/ITR (z z ) to start recording. ings using a variety of simple methods: RECORD will appear on the TV screen. Instant Timer Recording (ITR): Starts recording imme- Press REC/ITR several times. -
Page 26: Timer Recording Using On Screen Display
Operation with tape Timer recording using On Screen select one of the following automated recording features. Press to select, then press OK to confirm. Display DLY To record every day (except Saturday and You may set up to seven timer record events within one Sunday) at the same time. - Page 27 Operation with tape If Timer record events Overlap... Change (Deleting) the Timer Programme Do not overlap programmes, since overlapping portions If at a later date you wish to delete or change any of of the conflicting programmes will not be recorded. the settings in timer event memory you may do so with- Earlier recording times have priority over later recording out having to enter all the timer event information again.
-
Page 28: Operation With Dvd And Video Cd
Operation with DVD and Video CD Playing a DVD and Video CD General Features Playback Setup VCD2.0 VCD1.1 Unless stated otherwise, all operations described use Turn on the TV and select the video input source con- the remote control. Some features may also be nected to the DVD/CD/VCR receiver. -
Page 29: Still Picture And Frame-By-Frame Playback
Operation with DVD and Video CD General Features (continued) Repeat A-B VCD2.0 VCD1.1 Still Picture and Frame-by-Frame Playback VCD2.0 VCD1.1 To repeat a sequence in a title: 1 Press PAUSE/STEP during playback. 1 Press REPEAT A-B at your chosen starting point. “... -
Page 30: Zoom
Operation with DVD and Video CD General Features (continued) Special DVD Features Zoom VCD2.0 VCD1.1 Checking the contents of DVD Video The Zoom function allows you to enlarge the video discs: Menus image and to move through the enlarged image. 1 Press ZOOM during playback or still playback to DVDs may offer menus that allow you to access special activate the Zoom function. -
Page 31: Operation With Audio Cd And Mp3/Wma Discs
Operation with Audio CD and MP3/WMA Disc Playing an Audio CD and MP3/WMA Discs Notes on MP3/WMA Recordings About MP3 An MP3 file is audio data compressed by using the The DVD/CD/VCR receiver can play MP3/WMA format- MPEG1 audio layer-3 file-coding scheme. We call ted recordings on CD-ROM, CD-R or CD-RW discs. -
Page 32: Pause
Operation with Audio and MP3/WMA Disc (Continued) Pause 3D Surround 1 Press PAUSE/STEP during playback. This unit can produce a 3D Surround effect, which 2 To return to playback, press PLAY, PAUSE/STEP or simulates multi-channel audio playback from two ENTER again. conventional stereo speakers, instead of the five or more speakers normally required to listen to multi- channel audio from a home theater system. -
Page 33: Operation With Jpeg Disc
Operation with JPEG Disc Moving to another File Viewing a JPEG disc JPEG Press . or > once while viewing a picture to This DVD/CD/VCR receiver can play discs with JPEG advance to the next file or to the previous file. files and Kodak picture CD. -
Page 34: Programmed Playback
Programmed Playback VCD2.0 VCD1.1 Programmed Playback with Audio CD Programmed Playback with Video CD and MP3/WMA Discs The Program function enables you to store your On a Video CD with PBC, you must set PBC to Off on the favourite tracks from any disc in the player memory. setup menu to use the Program function. -
Page 35: Speaker Setup
Speaker Setup Additional Information Adjust the following settings for the built-in 5.1 channel Last Condition Memory surround decoder. VCD1.1 Disc Audio This DVD/CD/VCR receiver memorizes the user settings Disc Subtitle for the last disc that you have viewed. Settings remain in Disc Menu memory even if you remove the disc from the player or Rating... -
Page 36: Additional Operation - Vcr Part
Additional Operation - VCR part On Screen Display Friendly User Guide (Video Doctor) You may easily display the clock or tape counter and This feature informs you that there is a problem with tape remaining, day, month, year, day of week, your DVD/CD/VCR receiver. -
Page 37: Hi-Fi Stereo Sound System
Additional Operation - VCR part Hi-Fi Stereo Sound System Widescreen Compatibility 16:9 Your DVD/CD/VCR receiver will record and play back Your Receiver can record and play back widescreen Hi-Fi stereo sound. In addition it has a NICAM digital aspect ratio programmes (16:9). To record a wide stereo sound decoder. -
Page 38: Special Recording
Special Recording Copying from DVD To VCR Recording from another video This unit allows you to copy the contents of a DVD to a recorder VHS tape. With the DVD/CD/VCR receiver you can make record- ings from an external source, such as copying from another VCR or a camcorder. -
Page 39: Radio Operation
Radio Operation Presetting the Radio Stations Listening to the Radio You can preset 30 stations for FM and AM. Before tun- Preset radio stations in the DVD/CD/VCR receiver ing, make sure that you have turned down the volume. memory first (see “Presetting radio stations” on the left). Press FM/AM on the remote control or on the Press FM/AM on the remote control or on the front panel until the frequency band appears on... -
Page 40: Tuning Into A Station Manually
Operation with Radio (Continued) Tuning into a Station Manually RDS Operation This unit is equipped with RDS (Radio Data System), Press FM/AM on the remote control or on the which brings a wide range of information to FM radio. front panel until the frequency band appears on Now in use in many countries, RDS is a system for the display and TV screen. -
Page 41: Language Code List
Language Code List Enter the appropriate code number for the initial settings “Disc Audio”, “Disc Subtitle” and/or “Disc Menu” (See page 21). Code Language Code Language Code Language Code Language 6566 Abkhazian 7074 Fiji 7678 Lingala 8373 Singhalese 6565 Afar 7073 Finnish 7684... -
Page 42: Country Code List
Country Code List Enter the appropriate code number for the initial setting “Country Code” (See page 23). Code Country Code Country Code Country Code Country Andorra Eritrea Saint Lucia Seychelles United Arab Emirates Spain Liechtenstein Sudan Afghanistan Ethiopia Sri Lanka Sweden Antigua and Barbuda Finland... -
Page 43: Troubleshooting
Troubleshooting Check the following guide for the possible cause of a problem before contacting service. Cause Correction Symptom No power. The power cord is disconnected. Plug the power cord into the wall outlet securely. No disc is inserted. Insert a disc or tape. (Check that the The power is on, but the No tape is inserted. - Page 44 Troubleshooting (Continued) Cause Correction Symptom The tape does not run The DVD/CD/VCR receiver is in the Press PAUSE/STEP (X X ) to resume RECORD PAUSE MODE. recording. during recording. The tape is already fully rewound or Check the tape. The tape will not rewind or fast-forward.
-
Page 45: Specifications
Specifications General Power requirements AC230V ~ , 50 Hz Power consumption 130 W Dimensions (approx.) 430 X 90 X 350 mm (w x h x d) Mass (approx.) 8 kg (17.6 lbs) Operating temperature 5˚C to 40˚C (41˚F to 104˚F) Timer 24-hour display type Operating humidity... - Page 46 Specifications (Continued) Speaker Section Satellite (LHS-C6230T) Type 1 Way 1 Speaker 4 Ω Impedance Frequency Response 130 - 20,000 Hz Sound Pressure Level 83 dB/W (1m) Rated Input Power Max Input Power Net Dimensions (W x H x D) 88 x 100 x 95 mm Net Weight 0.54 kg Passive Subwoofer (LHS-C6230W)